
Manage Employee Work Schedules Efficiently #
The Work Shifts module in Office-X helps organizations manage employee work schedules in both Weekly and Monthly views (plus a custom date range). It keeps working hours, break times, and shift assignments organized in one place.
This module is specifically designed for shift worker scheduling. An employee only shows up anywhere in Work Shifts — the schedule grid, the summary cards, or the employee selector — if they’re both marked as a shift worker and currently have an active license. Employees missing either of those are left out entirely.
Who Can Use This Feature #
Subscriber Admin can view and manage all work shifts, including adding, editing, deleting, bulk assigning, exporting, and printing schedules — for every shift-worker employee in the company.
Employees can use Work Shifts based on permission. They may view subordinate schedules, add/edit/delete shifts for subordinates, export/print schedules, or view (and manage) all shifts company-wide if they have the required permissions.
Permission Behavior
Each Work Shift permission works with only one relevant CRUD action.
- Create Bulk Work Shift (For Subordinate)
Required action: Create
Shows the Add Bulk Shift button and allows access to the bulk shift creation page. - Create Work Shift (For Subordinate)
Required action: Create
Shows “+ Add shift” in empty schedule cells. - Edit Work Shift (For Subordinate)
Required action: Update
Shows Save Changes in the Edit Shift dialog. - Delete Work Shift (For Subordinate)
Required action: Delete
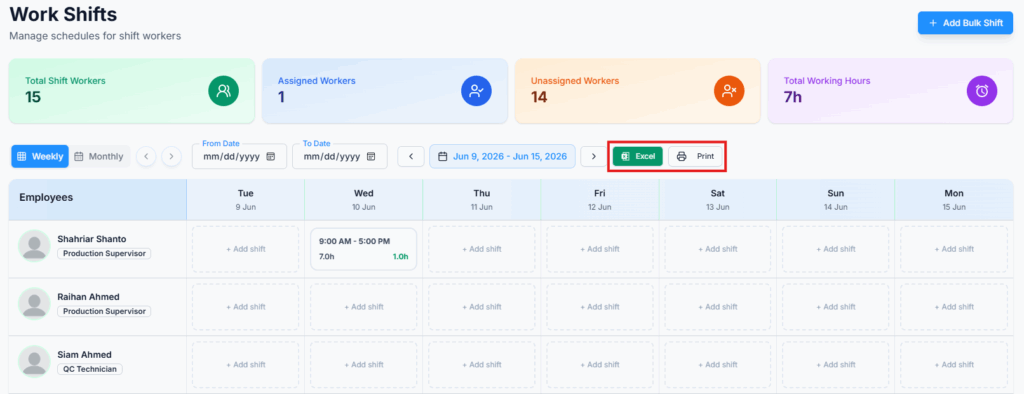
Shows Delete Shift in the Edit Shift dialog. - Export Work Shift (Excel & PDF)
Required action: View
Shows the Excel and Print buttons. - View All Work Shift
Required action: View
Allows access to all employees’ shift data. Without this permission, employees can only access subordinate shift data.
Good to know: View All Work Shift does more than widen what you can see. If you also hold Create, Edit, and/or Delete Work Shift, having View All Work Shift removes the subordinate-only restriction from those actions too — so you can create, edit, or delete shifts for any shift-worker employee in the company, not just people who report to you. Without View All Work Shift, those same Create/Edit/Delete permissions only ever reach your own subordinates.
Good to know: If you’re a shift worker yourself and hold any of the “For Subordinate” permissions above, your own shift now shows up alongside your team’s — in the schedule grid, the employee picker, and the summary counts — not just your subordinates’. You don’t need a separate permission for this; it’s included automatically.
These six permissions can be assigned directly to an employee, or to an entire team at once (so everyone on that team inherits them). See the Permissions Management guide for how to assign permissions.
How Subordinate Access Works in Work Shifts #
In the Work Shifts feature only, subordinate access works like a reporting tree. The system checks the logged-in Employee’s Reporting Manager hierarchy and allows access only to employees under that reporting line.
Example:
Michael Johnson
└── David Smith
    ├── Emily Brown
    └── James Wilson
If David Smith logs in:
- He can access Emily Brown and James Wilson because they are his subordinates.
- He cannot access Michael Johnson because Michael is his manager.
- He cannot access employees from another manager’s team.
If Michael Johnson logs in, he can access David Smith and may also access Emily Brown and James Wilson because they are under his reporting tree.
This reporting tree walk always includes every level below you, not just people who report to you directly — so a subordinate’s own subordinates are covered too.
One exception: if Michael Johnson is himself a shift worker, his own shift also appears on his screen alongside David’s, Emily’s, and James’s — a manager’s reporting tree always includes their own shift, not only the people below them.
Dashboard Overview #
The Work Shifts dashboard shows summary cards at the top.
- Total Shift Workers: Total employees configured as shift workers (with an active license) within your accessible scope. This number stays the same no matter which week, month, or date range you’re viewing.
- Assigned Workers: Shift workers who have at least one saved shift in the selected period.
- Unassigned Workers: Shift workers without saved shifts in the selected period.
- Total Working Hours: Combined working hours calculated from saved shifts in the selected period.
Unlike Total Shift Workers, the other three cards recalculate every time you change the view — switching between Weekly, Monthly, or a custom range updates Assigned Workers, Unassigned Workers, and Total Working Hours to match whatever period is currently on screen.

Weekly, Monthly, and Custom Range Schedule View #
The Work Shifts page supports three ways of choosing what date range you’re looking at:
- Weekly View – 7 days at a time, with ‹ and › buttons to move to the previous or next week.
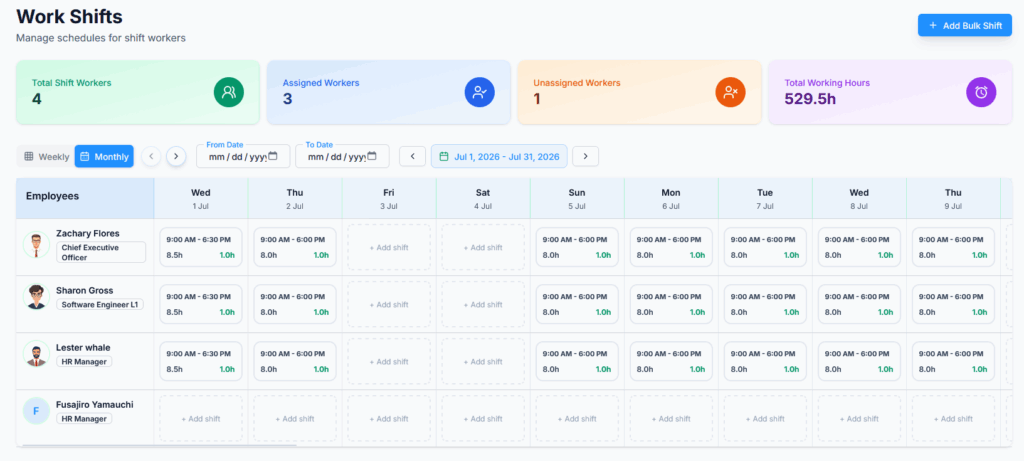
- Monthly View – the full current calendar month, with ‹ and › buttons to move a month at a time.
- Custom Range – set a From Date and To Date directly (up to 365 days) to look at any specific stretch of time. While a custom range is set, the Weekly/Monthly ‹ › navigation buttons are disabled; click Clear next to the date fields to drop the custom range and go back to Weekly/Monthly navigation.
[SS Placeholder: Weekly schedule grid with the Weekly/Monthly tabs and custom date range fields visible]
In the schedule grid, employees are listed on the left and dates are shown across the top. Each employee row displays assigned shift information. If a range is wider than what fits on screen (Monthly view, or a long custom range), the grid scrolls horizontally — use the scroll arrows above the grid or scroll directly.
Example shift display:
9:00 AM – 6:00 PM
8h work, 1h break
6:00 PM – 3:00 AM
8h work, 1h break
Good to know: an end time earlier than the start time (like the 6:00 PM – 3:00 AM example above) is automatically treated as an overnight shift ending the next day — you don’t need to do anything special to schedule one. Also, break time is always entered in minutes when adding or editing a shift, but the schedule grid displays it back to you in hours (e.g. entering 60 shows as “1h break”).
Add Individual Work Shift #
Subscriber Admins and Employees with permission can add individual shifts.
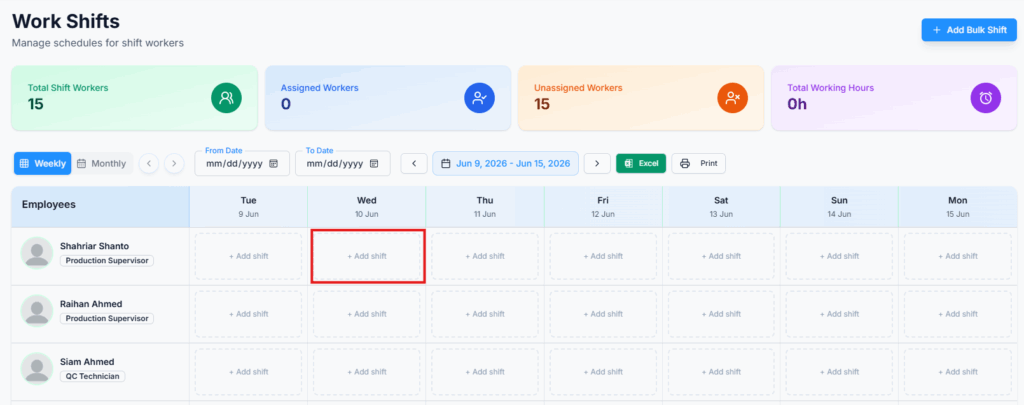
Steps:
- Open Work Shifts.
- Find an employee row and an empty date cell — a cell that already has a shift won’t show this option; you’d edit that shift instead (see below).
- Click “+ Add shift”.
- Enter Start Time, End Time, and Break Time (in minutes). These default to 9:00 AM, 5:00 PM, and 60 minutes, so adjust as needed.
- Click Create Shift.
Edit or Delete an Individual Work Shift #
Editing and deleting both happen from the same place — clicking any existing shift block opens one Edit Shift dialog with both actions available side by side. Which buttons you actually see depends on your permissions: you might be able to view a shift’s details but see no action buttons at all if you hold neither Edit nor Delete for it.
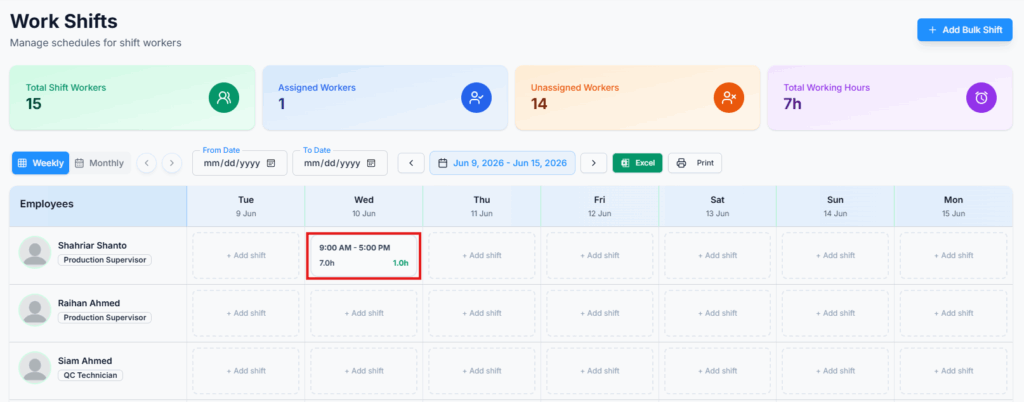
To edit:
- Click an existing shift block.
- Update Start Time, End Time, or Break Time.
- Click Save Changes.
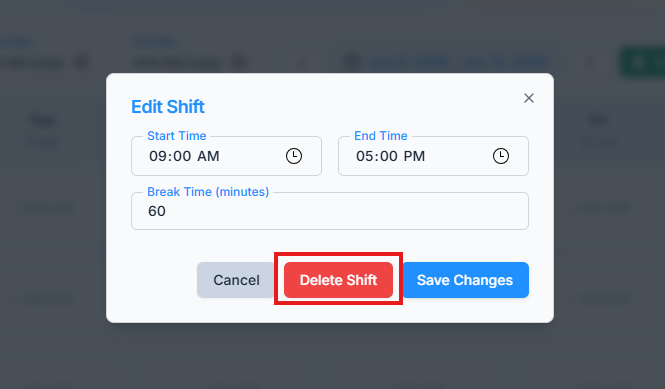
To delete:
- Click an existing shift block.
- Click Delete Shift.
Careful: unlike some other delete actions in Office-X, there’s no separate “are you sure?” confirmation step here — clicking Delete Shift removes it immediately.
After deletion, the shift is removed from the calendar grid and summary cards are updated.
Add Bulk Shift #
Bulk Shift allows creating shifts for multiple employees across a selected date range in one go.
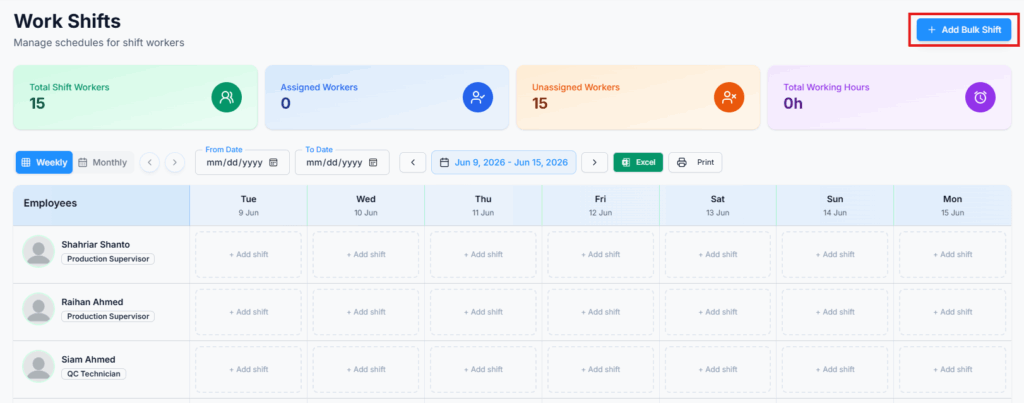
Steps:
- Open Work Shifts and click Add Bulk Shift.
- Under Shift Period, select a Start Date and End Date for the range this bulk assignment covers. This range can’t be longer than 6 months — for anything longer, create the assignment in separate batches.
- Under Shift Time, enter a Start Time and End Time — this single time range applies to every day you select below.
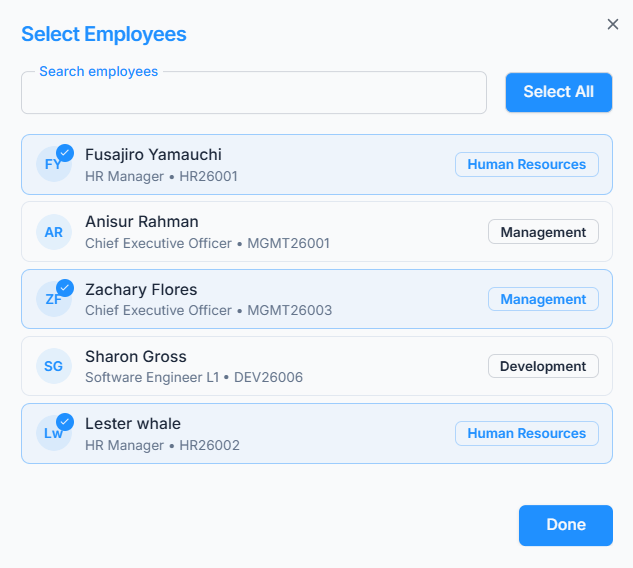
- Under Select Employees, click Add / Select Employees to open the employee picker. Search by name, designation, or employee ID. Matching employees load a page at a time — click Load More to bring in additional results if the person you want isn’t showing yet. Once you’ve found everyone you need, click Done. Selected employees appear as removable cards on the page.
- Under Weekly Schedule & Break Times, tick each day of the week this shift should repeat on within your date range (e.g. only Monday–Friday). Each day you tick gets its own Break (min) field — so different days can have different break lengths. A day’s break field stays disabled until you tick that day.
- Click Create Work Shift. This button stays disabled until at least one employee and at least one day are selected.
For Employees, the employee picker shows only eligible subordinate employees unless View All Work Shift is granted.
Eligible employees must be shift workers, have active licenses, and be within your permitted access scope.
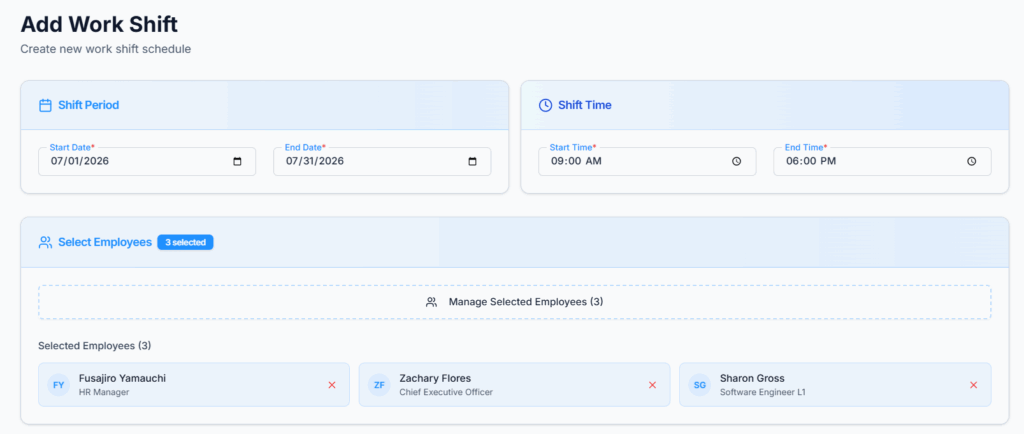
Important: the picker also has a Select All option, but it only selects the employees currently loaded on screen — it never reaches ahead and grabs people you haven’t scrolled to or loaded yet. If you have more eligible employees than fit on the first page, click Load More until everyone you want to include has appeared, and only then use Select All (or select people individually). Using Select All too early is an easy way to accidentally leave part of your team out of a bulk assignment.
If some shifts already exist: since each employee can only have one shift per day, any (employee, date) pair that already has a shift scheduled is automatically skipped rather than overwritten. If nothing was skipped, you’re taken straight back to the Work Shifts page. If anything was skipped, you stay on this page and see a list of exactly which employee and which date was skipped, so you can review and adjust before moving on.
Export Work Shifts (Excel) #
Steps:
- Open Work Shifts.
- Select Weekly, Monthly, or a custom date range.
- Click Excel.
The downloaded spreadsheet reflects exactly what’s on screen: your company’s name and contact details, the report period and generation time, the same four summary numbers as the dashboard cards, and then a full grid — one row per employee (with designation), one column per date showing that day’s time range plus hours worked and break, and a Total Hours column at the end of each row.
Print Work Shifts #
Steps:
- Open Work Shifts.
- Select Weekly, Monthly, or a custom date range.
- Click Print.
Good to know: despite the name, Print doesn’t open your browser’s print dialog — it downloads a ready-to-print PDF (landscape) with the same header and summary information as the Excel export. If your selected range covers more than 7 dates (Monthly view, or a longer custom range), the schedule automatically splits across multiple PDF pages, 7 dates per page, with the header repeated on every page, so nothing gets cut off.
Viewing a Shift Schedule from an Employee’s Profile #
Besides the main Work Shifts calendar, an individual’s shift schedule is also visible from their employee profile, under a Work Schedule tab. This tab only appears for employees marked as shift workers, and shows:
- A Work Summary card — whether they’re a shift worker, days per week, hours per week, and which days are their weekend.
- A Weekly Schedule table showing their recurring weekly pattern.
- A Shift Work Schedule card, where you can pick a month and year and click Find to list their actual scheduled shifts for that month — with start time, end time, break, and hours worked for each date.
Access here follows the same rules as the main Work Shifts page: you can always see your own profile’s schedule, and beyond that, Subscriber Admins, anyone holding View All Work Shift, and reporting managers (for their own subordinates) can see it too.
Summary #
The Work Shifts module provides a centralized way to manage schedules for shift-worker employees. Subscriber Admins and authorized Employees can view schedules across Weekly, Monthly, or custom ranges, create individual or bulk shifts, edit or delete existing ones, and export or print shift records — all shaped by the same permission rules and reporting-tree scoping throughout, with an individual’s schedule also reachable from their employee profile.