
Payroll Management is designed to automate salary calculation, overtime and premium pay, tax deductions (Bangladesh-compliant), bonuses, and paystub generation for employees.
This module currently supports Bangladesh, including Bangladesh-specific tax rules, salary structures, and minimum tax calculations. (Payroll is available to organisations on the Advanced plan with Bangladesh as the country.)
Overview #
As an Admin, you can manage the entire payroll for your company — view employee pay history, run payroll for selected months, review pay breakdowns, and generate detailed paystubs.
Employees can be granted different levels of payroll access:
- No Payroll Permission: Can only see their own paycheck history and paystubs.
- View Payroll Permission: Can see all employees’ payroll data but cannot run or submit payroll.
- Run Payroll Permission: Has the same full payroll access as an Admin, including running, reviewing, and submitting payroll.
Permission changes take effect on the user’s next page load or navigation.
Before You Run Payroll — Required Setup #
Before running payroll for the first time, make sure the following are configured. Missing any of these will block payroll processing.
1. Business Payroll Configuration
Go to Business → Payroll Config. This page is split into two sections:
Common Payroll Configuration (applies to all organisations):
- Overtime Calculation Setting — enable the overtime and premium rules your organisation uses (Daily / Weekly / Daily Second-Time / Monthly Excess overtime, plus Rest Day, Holiday and Night premiums), set the late-night window, the salary-to-hourly divisor, and the default compensation method for rest-day/holiday work. See the Payroll Configuration guide for full details and examples.
- Hourly Rate Calculation Basis — choose how the per-hour salary rate is calculated:
→ Monthly Basis (recommended for Bangladesh): Hourly Rate = Monthly Salary ÷ Expected Working Hours This Month - Bonus Types — define the bonus categories used across the organisation (e.g., Eid Bonus, Performance Bonus). These will appear as options when configuring individual employee bonuses.
Payroll Configuration for Bangladesh (visible only for Bangladesh organisations):
- Deduction Calculation Basis — choose whether hour-based deductions (such as absent deductions and leave deductions) are calculated using the employee’s Basic salary only, or their Gross salary (Basic plus benefits).
2. Employee Payroll Configuration
Go to Employees → Action → Payroll Config for each employee. This page is also split into sections.
Common Payroll Configuration (all organisations):
- Overtime & Premium — for overtime-eligible employees, fine-tune each multiplier (OT rate, rest-day/holiday/night premiums, second-time and monthly-excess settings). Only the rules enabled in Business Payroll Config appear here, pre-filled with your organisation defaults. The base overtime hourly rate is calculated as Salary ÷ Divisor.
- Bonuses — assign bonus types and amounts for the employee. These will appear as selectable bonuses during payroll review. Multiple bonus types can be added, one per type.
Bangladesh Payroll Configuration (Bangladesh organisations only):
- Tax Information — set the employee’s personal tax status. These flags determine which tax exemption limit applies.
- Work Location Settings — specify whether the employee’s work location is within a city corporation area, and if so, which city corporation.
⚠️ This is required for all salary-based employees in Bangladesh. If work location is not saved, the payroll run for that employee will be blocked with the message: “Work location not set for {Name}. Please add work location from Employee Payroll Config.”
Work location is not required for hourly employees.
3. Employee Work Schedule
Each salary-based employee must have a work schedule assigned under Employees → Actions → Work Hours. The work schedule defines daily working hours and working days per week, which the system uses to calculate expected monthly hours and deductions.
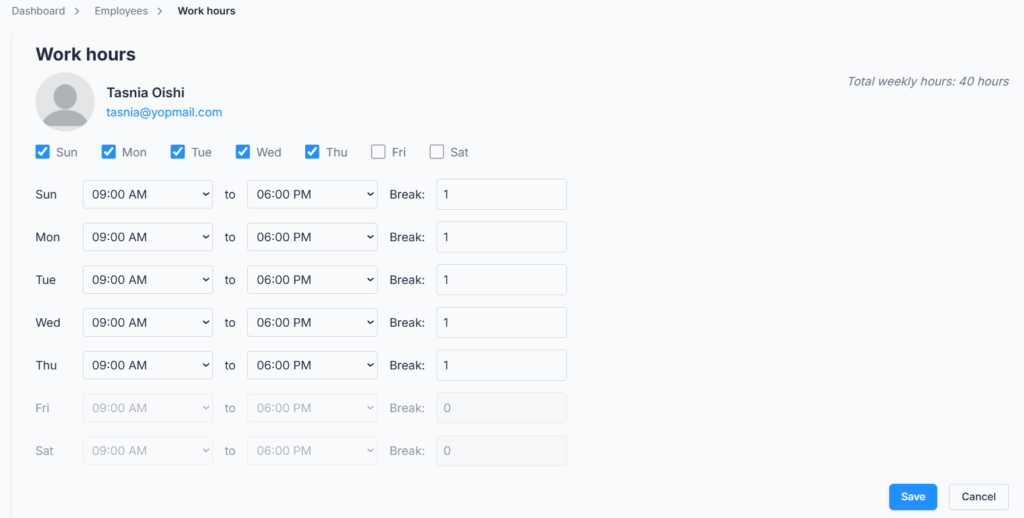
If no work schedule is found, payroll will be blocked with the message: “No work schedule found for {Name}.”
Employee Payroll List #
When you go to Payroll → BD, you will see a list of all payroll-eligible employees.
Eligible employees are those with an employment status of Active or on an approved leave (Maternity, Paternity, Sick, or Vacation Leave).
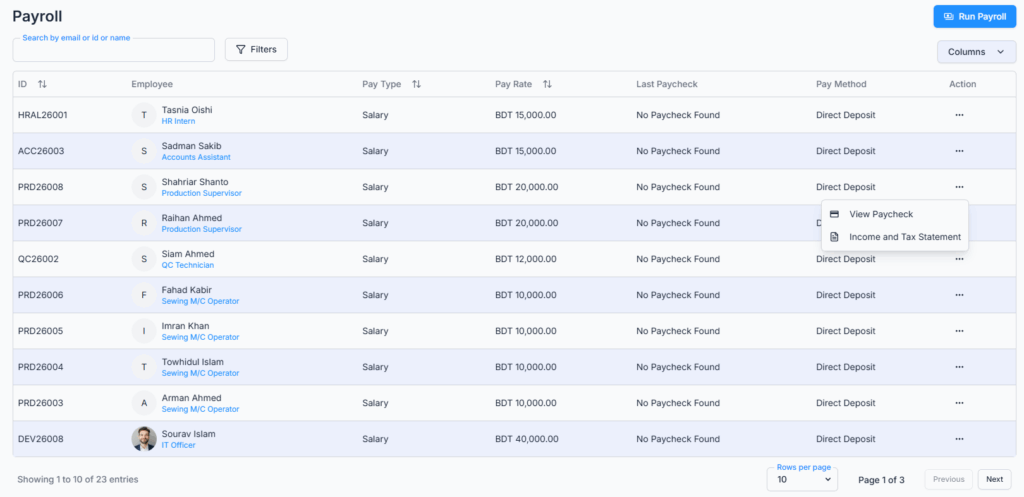
| Employee ID | Employee | Pay Type | Pay Rate | Last Paycheck | Pay Method | Action |
|---|---|---|---|---|---|---|
| DEV25004 | Md. Anisur Rahman | Hourly | ৳180.00/hr | No Paycheck Found | No Bank Details | View Paycheck · Income and Tax Statement |
| DEV25005 | Minhaz Mazumder | Salary | ৳60,000/month | 1 Sept 2025 – 30 Sept 2025 | Direct Deposit | View Paycheck · Income and Tax Statement |
- Admin / Run Payroll permission: Can see all employees, search, filter, and run payroll.
- View Payroll permission: Can see all employees and their paycheck history but cannot run payroll.
- No payroll permission: Can see only their own row.
From each row you can click View Paycheck to see that employee’s full paycheck history, or Income and Tax Statement to generate a yearly income and tax report. The list supports search (by name, email, or employee ID), Pay Type / Pay Method filters, column show/hide, and pagination (default 10 rows; 10/20/30 options).
Paycheck History #
Clicking View Paycheck takes you to the employee’s Paycheck History page, showing all submitted payroll records, most recent first.
| Pay Date | Pay Cycle | Pay Method | Basic salary | Additions | Gross Pay | Deductions | Net Pay | Action |
|---|---|---|---|---|---|---|---|---|
| 10/21/2025 | 1 Sept 2025 – 30 Sept 2025 | Direct Deposit | ৳60,000.00 | ৳3,000.00 | ৳63,000.00 | ৳2,500.00 | ৳60,500.00 | View Paystub |
You can filter records by a date range using the From Date and To Date pickers and clicking Date Filter. Click Show All to clear the filter. If both dates are not selected, you will see: “Please select a date range to filter.” If the employee has no records yet, the page shows: “No paycheck data available. Paycheck details will appear here once processed.”
Click View Paystub on any row to open the detailed salary breakdown for that pay period.
Running Payroll #
Admins and employees with Run Payroll permission can generate payroll. Click the Run Payroll button from the Payroll List page.
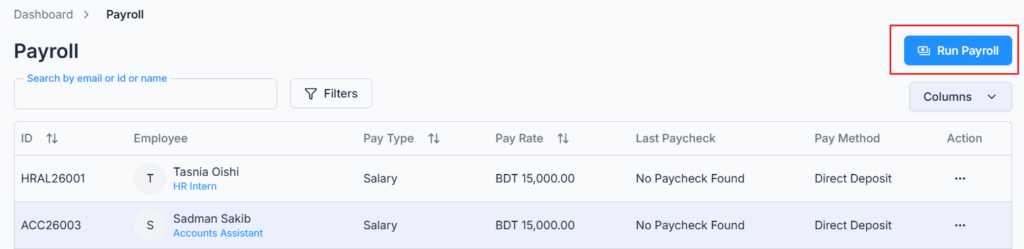
Step 1 — Set the Pay Period

| Field | Description |
|---|---|
| Pay Month | The month for which payroll is being processed (e.g., October). |
| Pay Year | The year of payment (e.g., 2025). |
| Pay Date | The actual disbursement date (e.g., 23/10/2025). |
Step 2 — Select Employees
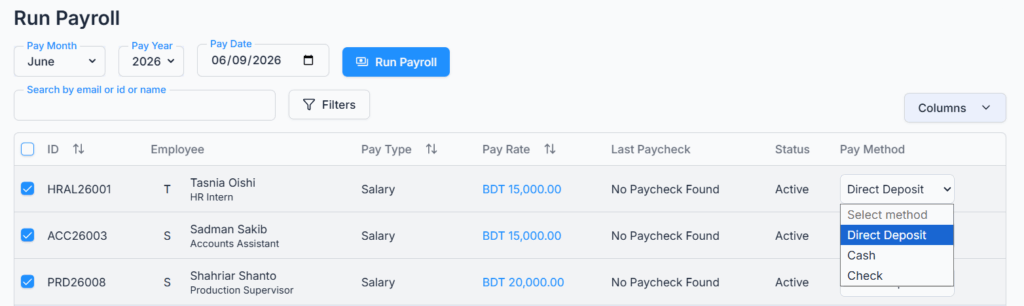
The table shows Active employees (and those on approved leave) who hold a valid licence. Select employees individually or use the header checkbox to select all. Your selections, chosen pay methods, and edited hours are kept even as you move between pages.
| Employee ID | Employee | Pay Type | Pay Rate | Last Paycheck | Status | Pay Method |
|---|---|---|---|---|---|---|
| DEV25005 | Minhaz Mazumder | Salary | ৳60,000/month | No Paycheck Found | Active | Select Method |
| DEV25004 | Md. Anisur Rahman | Hourly | ৳180.00 × 160 hr | No Paycheck Found | Active | Select Method |
Step 3 — Set Pay Method per Employee
Each selected employee must have a Pay Method chosen before payroll can proceed.
| Method | Description |
|---|---|
| Direct Deposit | Salary transferred directly to the employee’s bank account. Requires valid bank details on the employee record. |
| Cash | Paid in cash. |
| Check | Paid via company cheque. |
⚠️ If a pay method is missing for any selected employee: “Please select a pay method for {Name}.” If bank details are missing and Direct Deposit is chosen: “Bank details not found for {Name} for direct deposit!”
Step 4 — Set Hours for Hourly Employees

For hourly employees, the system automatically pulls total worked hours from the Attendance module for the selected Pay Month. You can edit the hours manually before running payroll if needed.
Example: ৳180/hour × 160 hours = ৳28,800 Basic Salary
⚠️ If an hourly employee has zero hours and no manual entry, payroll will be blocked with: “Please set hours for hourly employee: {Name}.”
Step 5 — Click Run Payroll
Once all inputs are set, click Run Payroll. The system validates each selected employee in a five-step process:
- Validating employee data
- Calculating attendance hours
- Processing leave balances
- Computing tax deductions
- Finalising salary calculations
If any validation fails — for example a missing work schedule, missing work location, missing pay method, or a duplicate payroll already processed for that month (“Payroll already processed for {Name} for {Month} {Year}!”) — the entire payroll run is stopped and a message tells you exactly what needs to be fixed.
How Salary is Calculated #
Salary Employees
The system calculates a per-hour rate based on the Hourly Rate Basis you configured in Business Payroll Config.
Monthly Basis example:
Monthly Salary: ৳60,000
Working Days in October: 22 days
Daily Work Hours: 8 hours
Expected Hours: 22 × 8 = 176 hours
Per Hour Rate: ৳60,000 ÷ 176 = ৳340.91/hour
The Basic Salary always shows the employee’s full monthly salary on the paystub. If the employee was absent, an Absent deduction line is added separately — the Basic Salary amount itself does not change.
Absent Hours example:
Expected Hours: 176
Worked Hours (attendance + leave + holidays + lieu): 168
Absent Hours: 176 − 168 = 8 hours
Absent Deduction: 8 × ৳340.91 = ৳2,727.27
When Deduction Calculation Basis is set to Gross in Business Payroll Config, the per-hour rate for deductions uses Monthly Salary plus all monthly benefits instead of Basic Salary alone.
Overtime & Premium Pay
If an employee is overtime-eligible, the system automatically calculates overtime and premium pay from their approved attendance. Worked hours are split into the relevant categories — for example Daily Overtime, Night Premium, Rest Day Premium, Holiday Premium, and their overtime variants — and each category is paid at its own multiplier on top of the base hourly rate. Each category appears as its own line on the payroll review and on the paystub. See the Payroll Configuration guide for the full list of categories and worked examples.
Employees who are eligible for both overtime and lieu (compensatory) off follow the Default Compensation setting for rest-day and holiday work: OT Pay Only, Lieu Off Only, or OT Pay + Lieu Off.
Hourly Employees
For hourly employees, the calculation is straightforward:
Basic Salary = Hourly Rate × Total Worked Hours
Example: ৳180/hour × 160 hours = ৳28,800
Hourly employees can still earn overtime and premium pay, but they have no income tax calculated and do not require a work location to be configured.
Payroll Records — Review Before Submitting #
After running payroll, you are taken to the Payroll Records page. Here you can review and adjust values for each employee before final submission.
The three KPI cards at the top of the page show the running Total Payroll Cost, Total Additions, and Total Deductions across all employees.
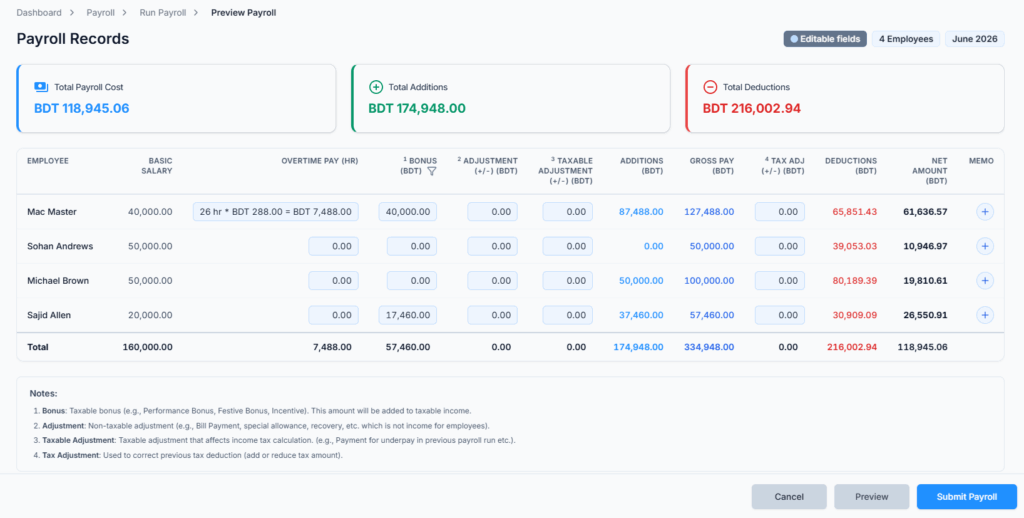
The review table is split across Earnings and Deductions. The overtime area is dynamic: the system shows one column per overtime or premium category in which the employee actually earned hours (for example Daily OT, Night Premium, Holiday Premium, Rest Day OT). The example below is simplified for readability.
Earnings Side
| Employee | Basic Salary | Daily OT (hr) | ¹ Bonus | ² Adjustment (+/−) | ³ Taxable Adjustment (+/−) | Additions | Gross Pay |
|---|---|---|---|---|---|---|---|
| Minhaz Mazumder | ৳60,000.00 | 5.00 | — | ৳0.00 | ৳0.00 | ৳5,500.00 | ৳65,500.00 |
| Md. Anisur Rahman | ৳28,800.00 | 0.00 | — | ৳0.00 | ৳0.00 | ৳1,000.00 | ৳29,800.00 |
Deductions Side
| Employee | ⁴ Tax Adjustment (+/−) | Deductions | Net Amount | Memo |
|---|---|---|---|---|
| Minhaz Mazumder | ৳0.00 | ৳3,530.31 | ৳61,969.69 | — |
| Md. Anisur Rahman | ৳0.00 | ৳0.00 | ৳29,800.00 | — |
What Each Column Does
| Column | Explanation |
|---|---|
| Basic Salary | Full monthly salary for salary employees, or hourly rate × hours worked for hourly employees. |
| Overtime & Premium columns | One column appears per category the employee earned (Daily OT, Night Premium, Holiday Premium, Rest Day OT, etc.). You can reduce the hours in any column, but not increase them beyond what attendance recorded. Editing overtime triggers income-tax recalculation for salary employees. If you try to exceed the recorded hours you will see: “{Category}: you can request up to {X}h based on your attendance. Entered hours cannot exceed this limit.” |
| ¹ Bonus | Select from the employee’s configured Bonus Types. This is taxable and is added to annual taxable income. Use the header option to apply one bonus type to all eligible employees at once. Select None to remove. |
| ² Adjustment (+/−) | A non-taxable adjustment — for example, a bill reimbursement or a salary recovery. Positive adds to Additions; negative adds to Deductions. Does not affect income tax. |
| ³ Taxable Adjustment (+/−) | A taxable adjustment that changes the employee’s taxable income. Triggers income tax recalculation. |
| Additions | Auto-added benefits (health insurance, transport allowance, etc.), overtime/premium pay, and any positive adjustments. |
| Gross Pay | Total of Basic Salary plus all addition lines before deductions. |
| ⁴ Tax Adjustment (+/−) | Directly corrects the income tax amount — useful when a previous month’s tax needs adjustment. Updates the Income Tax deduction line and Net Amount. |
| Deductions | Includes absent deduction, excess leave deduction, income tax (salary employees only), and any negative adjustments. |
| Net Amount | Final payable amount after all deductions. |
| Memo | Add an optional note for this payroll record. The memo appears on the saved paystub. |
Bangladesh Income Tax Calculation #
For salary employees in Bangladesh, the system automatically calculates income tax using the following steps. Hourly employees are not subject to income tax.
Step 1 — Annualise Monthly Income
Monthly Income for Tax = Full Monthly Salary + taxable additions (benefits, taxable adjustments, etc.)
Annual Income = Monthly Income × 12, then add annual Bonus and the current month’s Overtime Pay.
Step 2 — Apply One-Third Non-Taxable Rebate
Taxable Income = Annual Income − (Annual Income ÷ 3)
Step 3 — Apply Progressive Tax Slabs
The applicable exemption limit is automatically selected based on the employee’s tax status (disabled, freedom fighter, guardian of disabled children, etc.) configured in their Employee Payroll Config.
| Income Range (Annual) | Tax Rate |
|---|---|
| First ৳350,000 | 0% (tax-free) |
| Next ৳100,000 | 5% |
| Next ৳400,000 | 10% |
| Next ৳500,000 | 15% |
| Next ৳500,000 | 20% |
| Next ৳2,000,000 | 25% |
| Remaining income | 30% |
Step 4 — Apply Minimum Tax
The system checks the employee’s work location (configured in Employee Payroll Config) and compares the calculated annual tax against the applicable minimum tax:
| Work Location | Annual Minimum Tax |
|---|---|
| Specific City Corporations (e.g., DNCC, DSCC, CCC) | ৳5,000 |
| Other City Corporations | ৳4,000 |
| Non-City Areas | ৳3,000 |
If the calculated tax is less than the minimum tax, the minimum tax is used. The paystub will show an Area Minimum Tax Applied row in the Tax Breakdown section when this applies.
Step 5 — Convert to Monthly Tax
Monthly Tax = Annual Tax ÷ 12. This monthly tax amount appears as the Income Tax deduction line on the paystub.
Example for a salary of ৳60,000/month:
Annual Income = ৳60,000 × 12 = ৳720,000
One-third rebate: ৳720,000 ÷ 3 = ৳240,000
Taxable Income = ৳720,000 − ৳240,000 = ৳480,000
Tax on first ৳350,000 at 0% = ৳0
Tax on next ৳100,000 at 5% = ৳5,000
Tax on remaining ৳30,000 at 10% = ৳3,000
Total Annual Tax = ৳8,000
Monthly Tax = ৳8,000 ÷ 12 = ৳666.67
Preview Payroll #
Before submitting, click Preview to review the full per-employee breakdown. The preview shows everything that will appear on the final paystub, including earnings, deductions, tax breakdown, work summary, leave details, and year-to-date totals.
No payroll records are saved at the preview stage. Clicking Back returns you to the Payroll Records page to make further adjustments. Clicking Cancel exits the payroll flow entirely without saving anything.
When you are satisfied, click Submit Payroll to finalise.
Submitting Payroll #
Clicking Submit Payroll on the Preview page finalises payroll. Each employee’s record is saved independently. If one employee’s submission fails, the others are not affected — you will see a per-employee success or error notification.
Once submitted:
- Payroll records are locked and cannot be re-submitted for the same period.
- Records immediately appear in each employee’s Paycheck History.
- Each overtime / premium category’s quota is decremented by the hours paid.
- Leave balances are updated for any excess or unpaid leave deducted, and backdated leave hours are reset.
- An Activity Log entry is created recording the payroll run details.
Each saved record also freezes a snapshot of the deduction basis, payroll configuration, employee details, hours-per-day, year-to-date totals, and tax details — so later changes to settings or profiles never alter an already-issued paystub.
Paystub #
Clicking View Paystub from Paycheck History opens the saved paystub for that pay period. The paystub is read-only and reflects data as it was at the time of submission.
Example Paystub — Minhaz Mazumder
VimZ Corporation
Nasirabad, Khulshi, Chattogram
PAYSTUB
Pay Period: 1 Oct 2025 – 31 Oct 2025
Pay Date: 23 Oct 2025
Pay Method: Direct Deposit
Employee Information
| Field | Details |
|---|---|
| Name | Minhaz Mazumder |
| Employee ID | DEV25005 |
| Department | Design |
| Designation | UI/UX Designer |
| Pay Type | Salary |
| Gender | Male |
| TIN | 123456789 |
| Disabled Person | No |
| Freedom Fighter | No |
Pay Information
| Field | Details |
|---|---|
| Pay Date | 23 Oct 2025 |
| Pay Method | Direct Deposit |
| Pay Period | 1 Oct 2025 – 31 Oct 2025 |
| Regular Hourly Rate | ৳357.95 (based on Gross) |
| Overtime Hourly Rate | ৳500.00 |
Earnings and Deductions
| Description | Hours | Per Hr. Rate | Amount |
|---|---|---|---|
| Basic salary | — | — | ৳60,000.00 |
| Health Insurance | — | — | ৳2,000.00 |
| Transport Allowance | — | — | ৳1,000.00 |
| Daily Overtime Pay | 5.00 | ৳500.00 | ৳2,500.00 |
| Gross Pay | ৳65,500.00 | ||
| Absent | 8.00 | ৳357.95 | −৳2,863.64 |
| Income Tax | — | — | −৳666.67 |
| Total Deductions | −৳3,530.31 | ||
| Net Pay | ৳61,969.69 |
Note: Overtime and premium pay appears as separate lines per category (for example, Daily Overtime Pay, Night Premium Pay, Holiday Premium Pay). Deduction line hours are shown to two decimal places. The Basic salary row always shows the full monthly salary — absent hours do not reduce it directly; they appear as a separate deduction line instead.
Net Pay and Year-to-Date Summary
| Field | Amount |
|---|---|
| Net Pay (Current) | ৳61,969.69 |
| Gross Pay YTD | ৳65,500.00 |
| Deductions YTD | ৳2,863.64 |
| Tax YTD | ৳666.67 |
| Net Pay YTD | ৳61,969.69 |
YTD (Year-to-Date) totals accumulate from 1 July of the current fiscal year up to the current payroll month. They do not reset on 1 January. Deductions YTD and Tax YTD are shown separately to avoid double counting.
Work Summary
| Metric | Value |
|---|---|
| Total Worked | 20 days | 160 hr |
| Total Absent | 1 day | 8 hr |
| Total Holidays (Month) | 2 days |
Tax Breakdown (Salary Employees Only)
| Tax Slab | Taxable Amount | Rate | Yearly Tax Amount |
|---|---|---|---|
| First ৳350,000 | ৳350,000 | 0% | ৳0.00 |
| Next ৳100,000 | ৳100,000 | 5% | ৳5,000.00 |
| Next ৳30,000 | ৳30,000 | 10% | ৳3,000.00 |
| Total Monthly Tax | ৳666.67 |
When area minimum tax applies, an Area Minimum Tax Applied row appears and the slab values are visually distinguished.
The paystub footer reads: “This is a computer-generated paystub. For questions regarding your pay, please contact HR.” You can download the paystub as a PDF at any time — downloading never changes any payroll data.
Leave Summary (Preview Only)
The Leave Details section appears on the Payroll Preview page only, not on the saved paystub.
| Leave Type | Entitled | Used (Paid / Unpaid) | Earned | Remaining |
|---|---|---|---|---|
| Casual Leave | 11.00 days | 1.00 (Paid: 1.00 / Unpaid: 0.00) | 3.50 days | 2.50 days |
| Sick Leave | 3.00 days | 0.00 (Paid: 0.00 / Unpaid: 0.00) | 1.00 day | 1.00 day |
Income and Tax Statement #
From the Payroll List, click Income and Tax Statement on any employee row to generate a yearly income and tax report.
- Select the fiscal year from the dropdown. Only past completed fiscal years are available (constrained by the employee’s joining date). The current running fiscal year cannot be selected. If none are available, you will see “No fiscal years available.”
- Click Generate Statement.
The statement shows yearly income totals, deductions, and tax details aggregated across all payroll records within the July-to-June fiscal year window. If some months have no payroll data, a banner lists the available months and the statement is still generated using the available records. If there are no records at all for the selected year, you will see: “No payroll records found for the selected fiscal year. Run at least one payroll to generate this statement.”
You can download the statement as a PDF.