The Bookings module lets clients book appointments with your employees through a public booking page. Clients can choose an available time slot based on the employee’s actual availability, without needing to contact anyone back and forth.
Good to know: Bookings is part of the CRM feature set, which is available as a paid add-on. If your company’s plan doesn’t include CRM, you can purchase the CRM add-on from Business → Billing & Payment. Once added, Bookings and the other CRM features become available.
Two Ways Your Clients Can Book #
Everything in this guide — the availability you set, the notice periods, the daily limits, the questions you ask — is set up once. Your clients can then reach it in two different ways:
- Online, through your booking link. You share the public link (or embed it on your website) and the client picks a slot themselves. This works as soon as you’ve created a Booking Service — nothing else to set up.
- By phone, through an AI voice agent. If you connect ElevenLabs under Admin → Integrations and tick AI Calling on a service, clients can simply call your number and talk to a voice agent instead. The agent tells them what you offer, reads out real open slots, and books the appointment during the call.
The important part: both routes use the same engine. A phone booking obeys exactly the same availability, buffers, notice periods, and daily limits as a web booking, lands in the same Client Responses list, creates or reuses a Client the same way, and can be rescheduled or cancelled by you in exactly the same place. The only difference is how it arrived — which Office-X labels for you, so you can always tell a phone booking from a web one.
Good to know: The AI Calling feature is optional. If you don’t connect ElevenLabs, the normal online booking system works as usual — you simply won’t have the phone-booking option. If you do connect it, you can choose which services the AI agent is allowed to book using the AI Calling checkbox.
Phone calls also get one thing web bookings don’t: an AI Call History, which keeps a record of every call — including the ones that never turned into a booking. There’s a full section on it further down.
And there’s a third route where the client doesn’t book at all — you do it for them. If someone phones you or walks in, the Book for a Client button on the service’s own page lets you pick a slot and enter their details yourself. Same rules, same list, and they still get their confirmation email. See “Booking for a Client Yourself” below.
Before You Start #
Two things to get right first — both save a lot of confusion later:
- Check your company timezone. Every time in Bookings — the hours you set, the slots your clients see, the times on their confirmation email — is your company’s own timezone, taken from Admin → Company. Set that correctly before you set anyone’s availability. (More on this in “A Word About Timezones” below.)
- The employee you assign has to be currently working. Anyone whose employment status is inactive, resigned, terminated, suspended, retired, or on maternity, paternity, sick or vacation leave won’t appear in the Assigned Employee list. If someone’s missing, that’s why — check their status under Employees first.
Two Sides to Every Booking #
Every Booking Service has two very different people involved:
- You (the Subscriber Admin, or an employee with the right Bookings permissions) — set an employee’s real availability, define the appointment type (duration, location, what to ask), and share the public link.
- The Client — the person booking an appointment. They never log into Office-X at all. They open your public link, pick a genuinely open slot, and confirm.
Worked example, start to finish: Dr. Emily Chen offers 30-minute consultations, and Michael Torres wants to book one. Here’s exactly what happens on each side:
| Step | You (Admin) | Client |
|---|---|---|
| 1 | Set Dr. Chen’s availability (Monday–Friday, 9 AM–4 PM) and create a “30-Minute Consultation” Booking Service assigned to her. Share the public link. | — |
| 2 | — | Michael opens the link and sees a calendar of genuinely open slots — Office-X has already worked out which times are actually free. |
| 3 | — | Michael picks a slot, fills in his contact info, and confirms. |
| 4 | Office-X automatically creates a Client record for Michael and blocks that slot from anyone else — you don’t do anything for this step. | — |
| 5 | — | Michael sees a confirmation screen and receives a calendar invite by email, along with a link to view or cancel his own booking. |
| 6 | If Michael later needs a different time, you reschedule it for him from the dashboard — he can’t self-reschedule, only self-cancel. | Or Michael cancels his own booking via his confirmation link and books a new slot himself. |
Keep this example in mind as you read the rest of this guide — most of what follows is really just a closer look at one row of that table.
Who Can Use This Feature #
Subscriber Admin can always create, edit, delete, and manage every Booking Service and every Booking, without needing any specific permission.
Employees need permissions from Admin → Permission → CRM – Bookings. Each of the three main actions comes in an (For Own) and a (For All) version:
- Create Booking Service (For Own / For All)
“For Own” lets you create a service assigned to yourself; “For All” lets you create one assigned to anyone. - Edit / Activate-Deactivate Booking Service (For Own / For All)
“For Own” only covers services assigned to you. - Delete Booking Service (For Own / For All)
- View Bookings (For Own / Assigned) and View All Bookings
“For Own / Assigned” shows only bookings where you’re the assigned employee. - Manage Booking Response (For Own / For All)
Covers rescheduling, cancelling, marking No-show, and booking on a client’s behalf. “For Own” only covers bookings assigned to you.
These permissions can be assigned directly to an employee, or to an entire team at once. See the Permissions Management guide for how to assign permissions.
The Booking Services List #
Route: Dashboard → CRM → Bookings — this is what you land on first when you open the module. It lists every appointment type your company offers, not individual client bookings; you’ll drill into a specific service to see who’s actually booked it (see “Viewing a Booking Service” below).
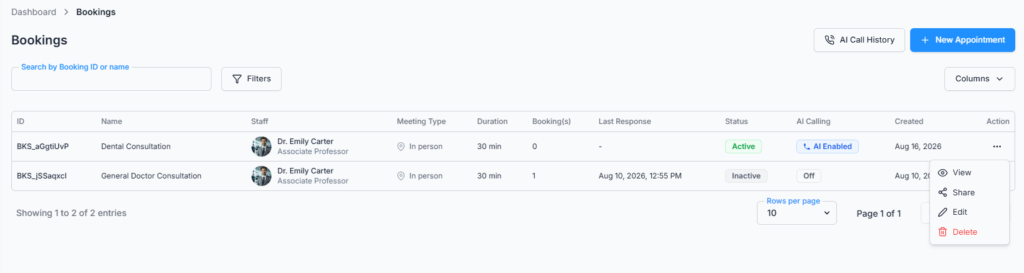
The table shows: ID, Name, assigned Staff, Meeting Type, Duration, total Bookings, most recent response date, Status, and Created date.
- Search — by ID or name.
- Filters — Status (Active / Inactive) and AI Calling (Enabled / Off), so you can see at a glance which services are phone-bookable.
Results are paginated (10, 20, or 30 per page), and the Columns option hides any column you don’t need. The Action column is where View, Edit, Share, Activate/Inactivate, and Delete live — the next two sections walk through creating a service and then what you’ll find when you open one.
Step 1: Create a Booking Service #
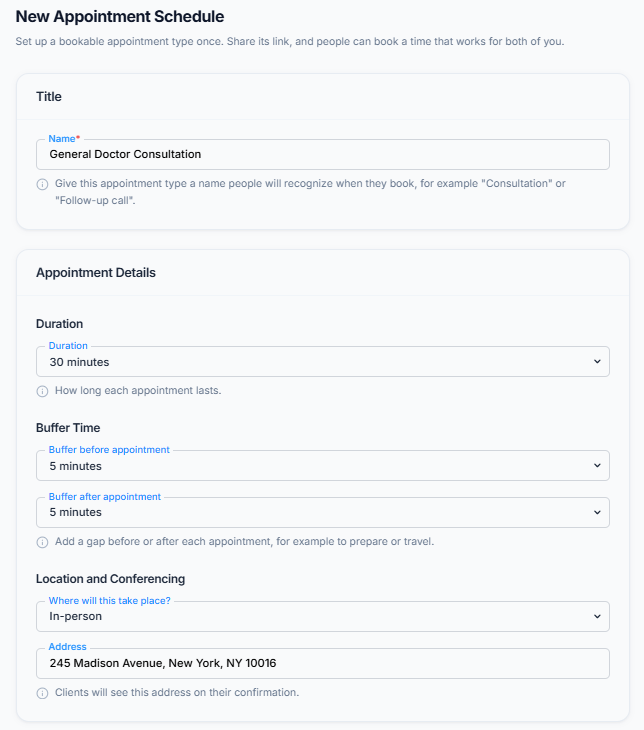
A Booking Service is the specific appointment type clients can book — “30-Minute Consultation,” “Home Cleaning Visit,” and so on.
Basics #
- Name (up to 200 characters) and Description — the description supports long-form text if you need it, up to 2,000 characters.
- Duration — how long each appointment runs, anywhere from 5 minutes to 8 hours.
- Buffer Before / Buffer After — padding automatically kept clear before and after every booking, so back-to-back appointments always leave a gap. Up to 2 hours each, and both start at 0.
- Assigned Employee — exactly one. Picking a different employee replaces whoever was assigned before; a service can’t be shared across a pool of employees.
Employee’s Availability #
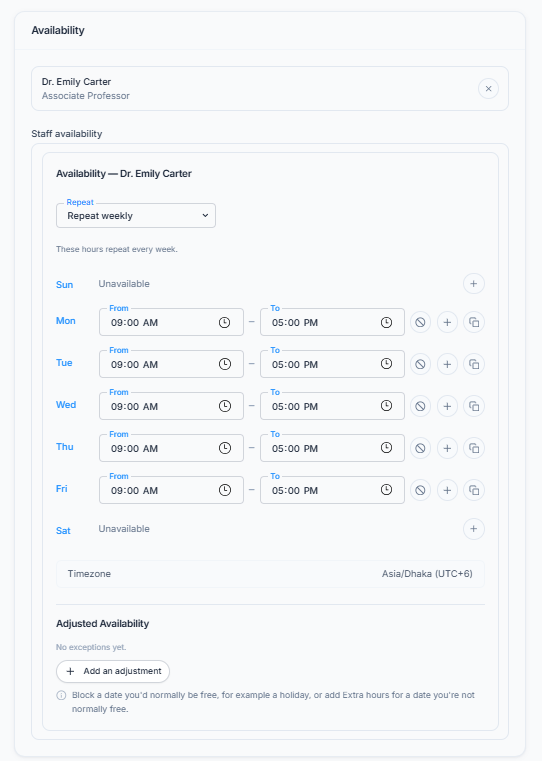
Availability belongs to the employee, not to any one service — set it once, and every Booking Service assigned to that employee shares it. You’ll find this inside the Staff section of a Booking Service’s create/edit form.
- Weekly Hours — a start/end time for each day of the week they’re available.
- Does Not Repeat — instead of a weekly pattern, pick specific individual dates and set unique hours for each one.
- Adjusted Availability — one-off overrides layered on top of whichever mode above is active: Block time off (removes availability for a date range — a vacation, for example) or Extra hours (adds availability that wouldn’t otherwise exist, even entirely outside the normal weekly pattern).
Worked example: Dr. Emily Chen is available Monday–Friday, 9:00 AM–4:00 PM, with a specific-date override on August 1st and 2nd narrowing her hours to 10:00 AM–3:00 PM those two days only.
Good to know: switching between “Weekly Hours” and “Does Not Repeat” doesn’t erase whichever one you’re not currently using — your weekly pattern and your specific dates are both saved independently, so you can switch back later without having to redo anything.
Booking Limits #
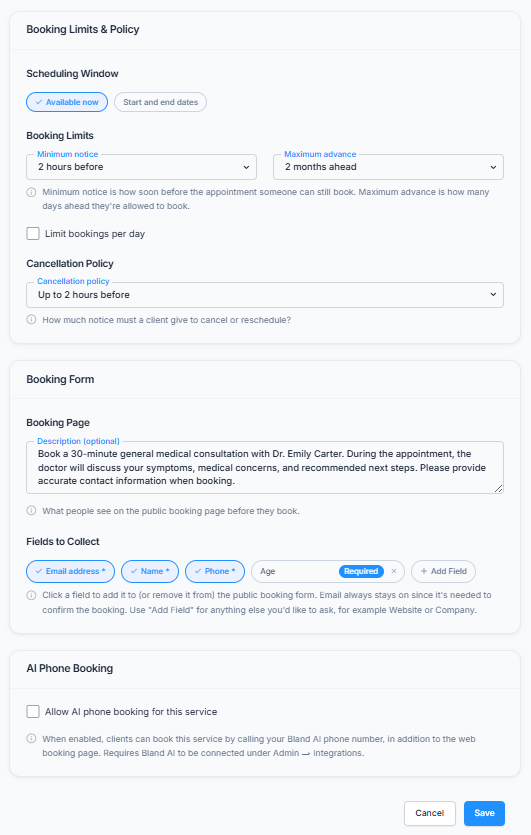
- Minimum Notice — how many hours in advance a booking must be made (e.g. 2 hours means nobody can book a slot starting less than 2 hours from now). Starts at 2 hours.
- Maximum Advance — how many days into the future clients are allowed to book. Starts at 60 days.
- Cancellation Notice — how many hours before the appointment a client is still allowed to cancel it themselves. Starts at 1 hour.
- Max Bookings Per Day — optional. Caps how many appointments for this specific service the assigned employee can take in one day. If they also handle a second service, that service’s own limit is tracked separately — this doesn’t cap their combined total across every service they offer.
- Active From / Active Until — optional, a date window outside which this service simply isn’t bookable at all, regardless of anything else.
Location #
Choose In Person, Video Call, or Phone Call, plus free-text Location Details. For Video Call, you paste in your own meeting link (Zoom, Google Meet, or anything else) — Office-X doesn’t generate one for you.
What to Collect From the Client #
You can turn Name and Phone Number on or off. When enabled, the field is shown and required; when disabled, it is removed from the booking form. Email is always required.
You can also add up to 20 Custom Fields with your own questions and choose whether each one is required or optional.
Public Link #
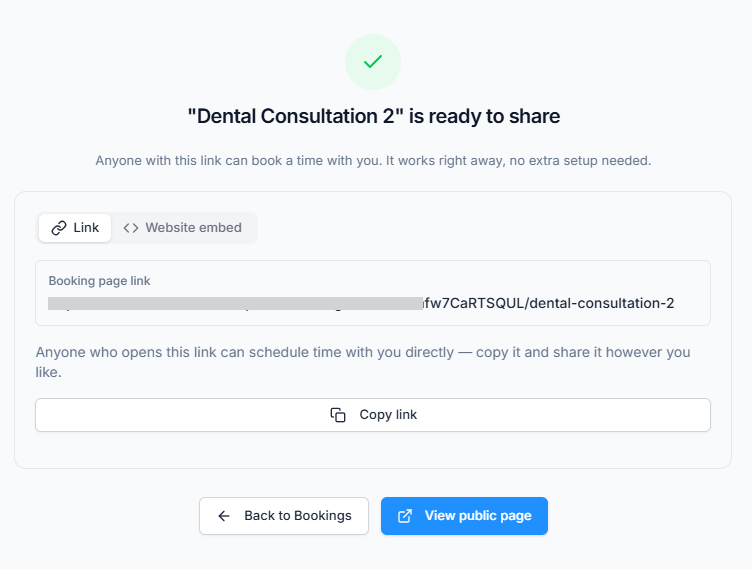
Each service has a unique Page Slug that creates its public booking URL. From the Share option in the Action menu, you can copy the direct booking link or get a ready-made “Book now” button or embedded calendar to add to your website.
Good to know: You also have a single booking page for your whole company. It shows all your Active services, so visitors can choose the appointment type they need. This is useful for places like your email signature or Contact page when you offer multiple services.
AI Calling #
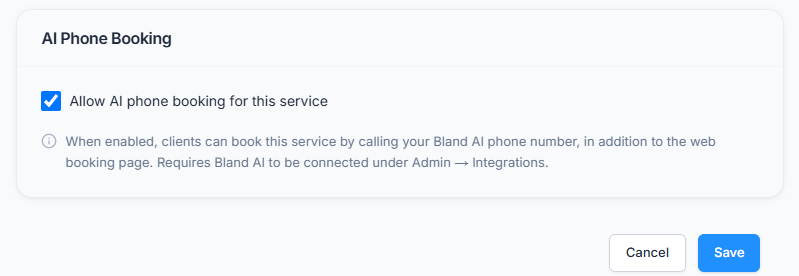
Enable AI Calling to let clients book this service by phone through your AI voice agent. Leave it off if you want the service to be available online only.
For phone booking to work, all three must be true:
- ElevenLabs is connected under Admin → Integrations.
- AI Calling is enabled for this service.
- The service is Active.
Once enabled, callers can ask about services, check available times, book appointments, or cancel an existing booking. The agent checks your live availability, so it only offers available slots.
Good to know: The AI agent cannot reschedule a booking. Clients can cancel and book again, or you can reschedule it from the dashboard. Phone bookings appear in Client Responses with an AI Calling label and a link to the call transcript. Turning off AI Calling only stops new phone bookings; existing bookings remain unchanged.
Viewing a Booking Service #
Clicking View from the list’s Action menu (or the row itself) opens a full picture of that one service — its setup, how it’s performing, and every client who’s booked it. Top to bottom:
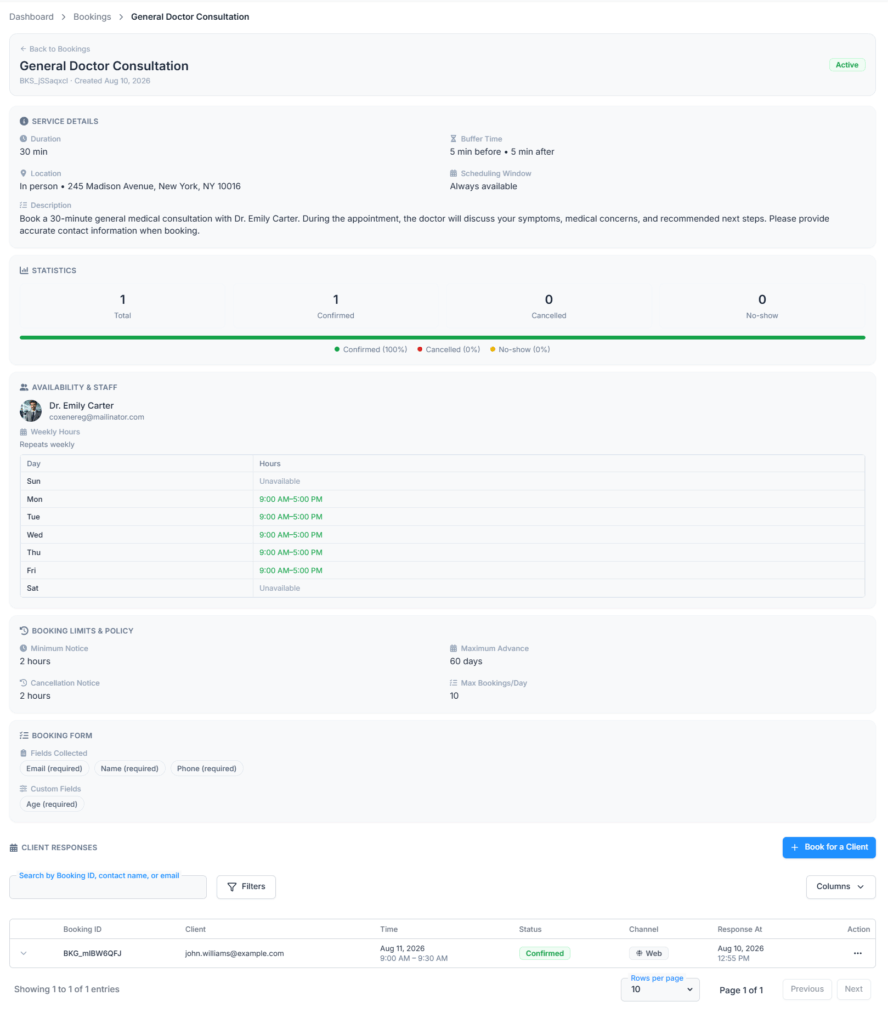
- Service Details — Duration, Buffer Time, Location (and Meeting Link, for Video Call), Scheduling Window, and Description.
- Statistics — total bookings ever made against this service, broken down by Confirmed / Cancelled / No-show, both as counts and as a proportional bar.
- Availability & Staff — the assigned employee, and (if you hold edit rights on this service) a read-only look at their current Weekly Hours or specific dates, plus any Adjusted Availability overrides — the exact same schedule covered in Step 1, shown here for reference rather than editing.
- Booking Limits & Policy — Minimum Notice, Maximum Advance, Cancellation Notice, and Max Bookings/Day, all as a quick read-only summary.
- Booking Form — exactly which fields this service collects (Email always, Name/Phone if turned on) and any Custom Fields, each labeled required or optional.
- Client Responses — every booking ever made against this specific service (see below).
Good to know: this is also where you’ll find the Book for a Client button — for when a client phones you or walks in and you book it for them. It gets its own full section below.
Client Responses
This is the list of individual bookings made against this service — it’s the closest thing Office-X has to a “bookings list,” and it’s always scoped to the one service you’re viewing; there’s no single page that shows every booking across every service at once.
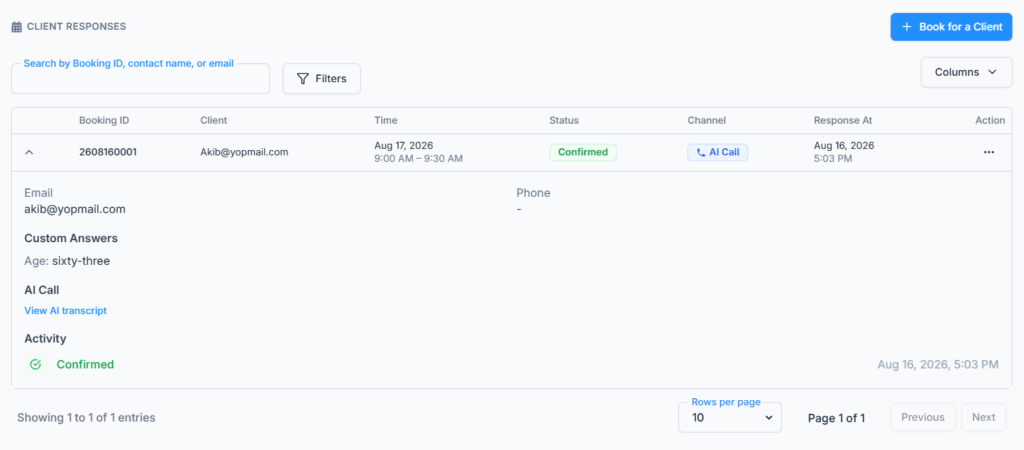
Columns: Booking ID, Client, Time, Status, how the booking came in (web or AI phone call), and when it was made. Expand any row for the full detail — contact info, custom question answers, notes, and its complete history of every event (confirmed, rescheduled, cancelled). Search by Booking ID, client name, or email; filter by Status or a date range. Paginated 10, 20, or 30 per page.
Good to know: Booking IDs are short, plain numbers rather than long mixed-letter codes — deliberately easy to read or say out loud, since a caller booking by phone may need to reference one.
A Word About Timezones #
Bookings works in one timezone: your company’s, set under Admin → Company. That single setting drives everything:
- When you type 9:00 AM into someone’s Weekly Hours, that means 9:00 AM your time.
- The slots your client sees on the public page are shown in your company’s timezone too — not converted to wherever they happen to be sitting.
- The times on their confirmation screen and calendar invite follow the same rule.
Good to know: If you book clients in different countries, clearly mention your timezone in the service Description or Location Details. This helps clients understand the correct time for their appointment. If your company time zone is incorrect, update it first and then check the employee’s availability again.
How Available Time Slots Are Calculated #
When a client opens the booking page, Office-X works out open slots by starting from the employee’s availability, then narrowing it down:
- Start with their Weekly Hours (or specific dates, in “Does Not Repeat” mode) for that day.
- Apply any Adjusted Availability overrides — subtracting blocked time, adding extra time.
- Remove anything that overlaps an existing confirmed booking for that employee — across all of their services, plus the Buffer Before/After padding around each one, since they can only be in one place at a time.
- Break what’s left into back-to-back slots matching the service’s Duration.
- Drop anything that falls outside the Minimum Notice / Maximum Advance window.
- If Max Bookings Per Day is set and already reached for that service that day, remove every remaining slot for that day entirely.
Every one of these rules is re-checked again the moment the client actually confirms a slot, so there’s no way to book something that became unavailable in the few seconds since the page loaded.
What the Client Sees and Does #
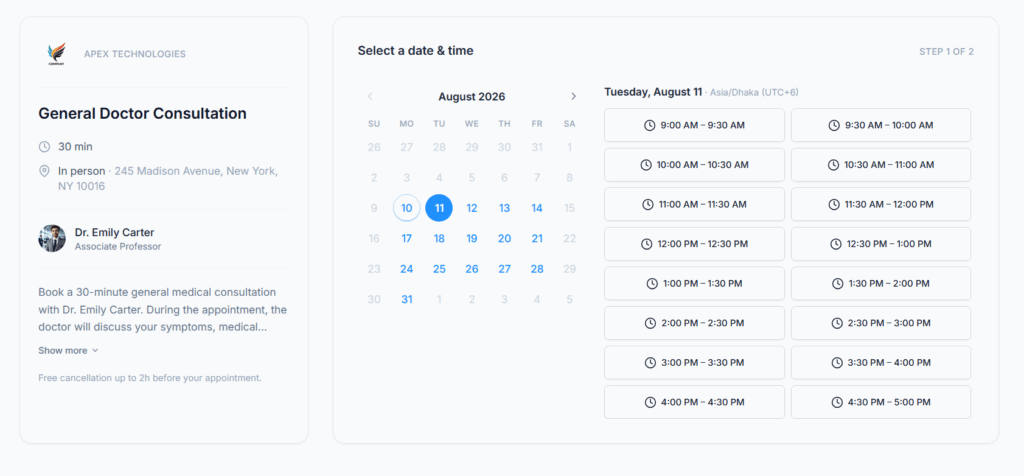
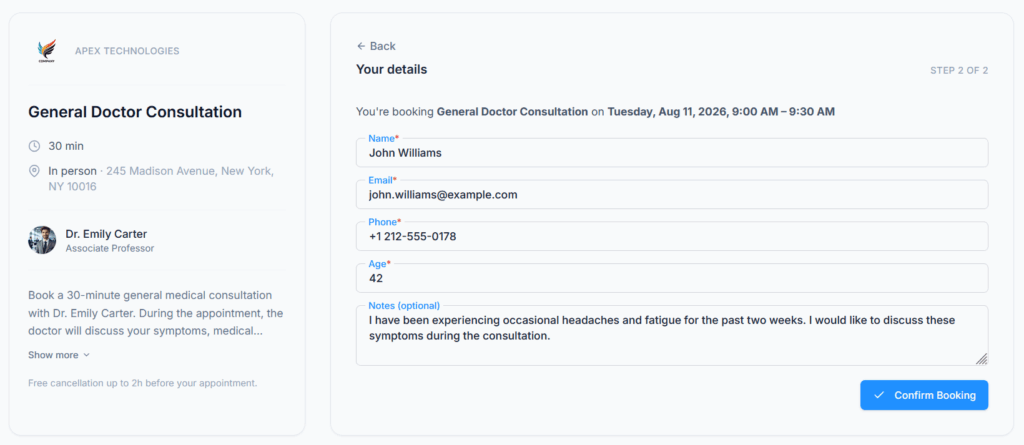
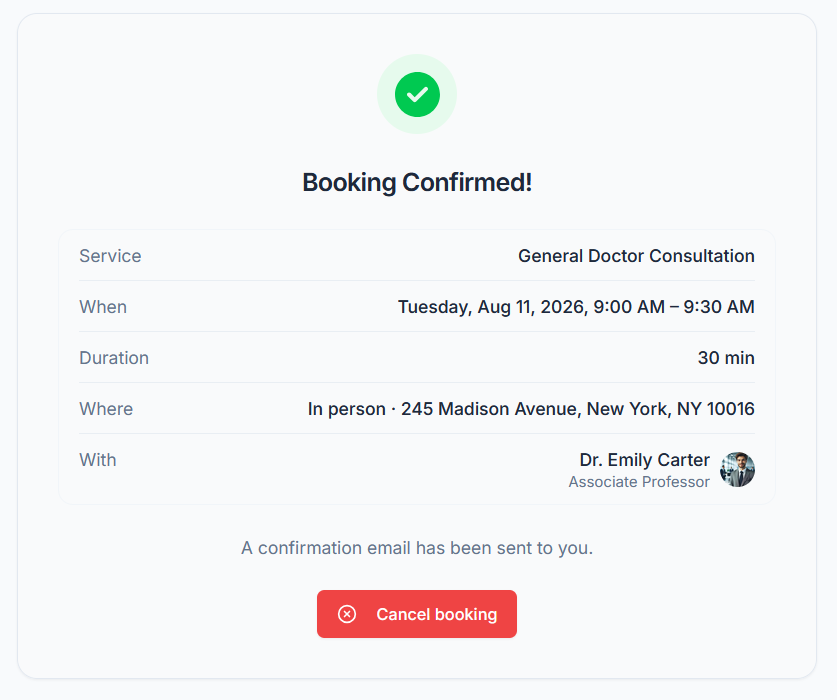
- They open your service’s public link and see a calendar of open slots.
- They pick a slot, then fill in their contact details and any custom questions you’ve set up.
- They confirm, and immediately see a confirmation screen with the appointment details and a Cancel booking option, plus a calendar invite emailed to them.
Good to know: A Client is automatically added to your Clients list when they make their first booking. Office-X matches them by email, so future bookings from the same person are linked to the existing Client instead of creating a duplicate.
The Client’s confirmation link only lets them view or cancel their booking. To change the time, they must cancel and book again, or you can reschedule it from the dashboard.
Booking for a Client Yourself #
Not every client will use your link. Some phone you, some walk in, some just prefer talking to a person. For all of them, you can make the booking yourself — you don’t have to ask them to go online.
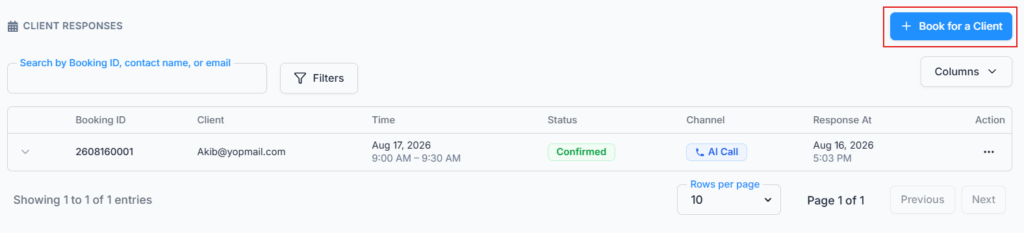
Open the service (Dashboard → CRM → Bookings → View) and click Book for a Client, at the top of the Client Responses section. It’s a short two-step form.
First, Pick the Time #
You get a month calendar with the service name and length at the top (for example, “Dental Consultation · 30 min”). Click a date, and the open times for that day appear beside it — 3:00 PM – 3:30 PM, 3:40 PM – 4:10 PM, and so on. The heading above the times spells out the date and the timezone you’re looking at, like Thursday, August 20 · Asia/Dhaka (UTC+6), so there’s never any doubt about which clock these times belong to.
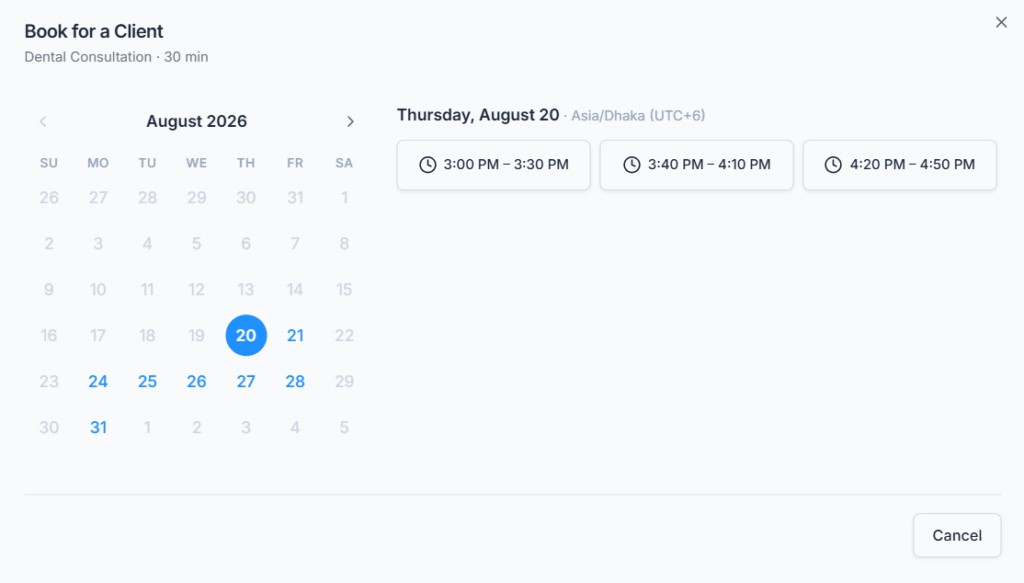
These are exactly the slots a client would see on the public page — worked out the same way, from the employee’s availability, their other appointments, the buffers, and the notice rules. Pick one and you move to step 2. If a date shows “No available times on this date”, that day is genuinely full or outside the employee’s hours.
Then, Fill In the Client’s Details #
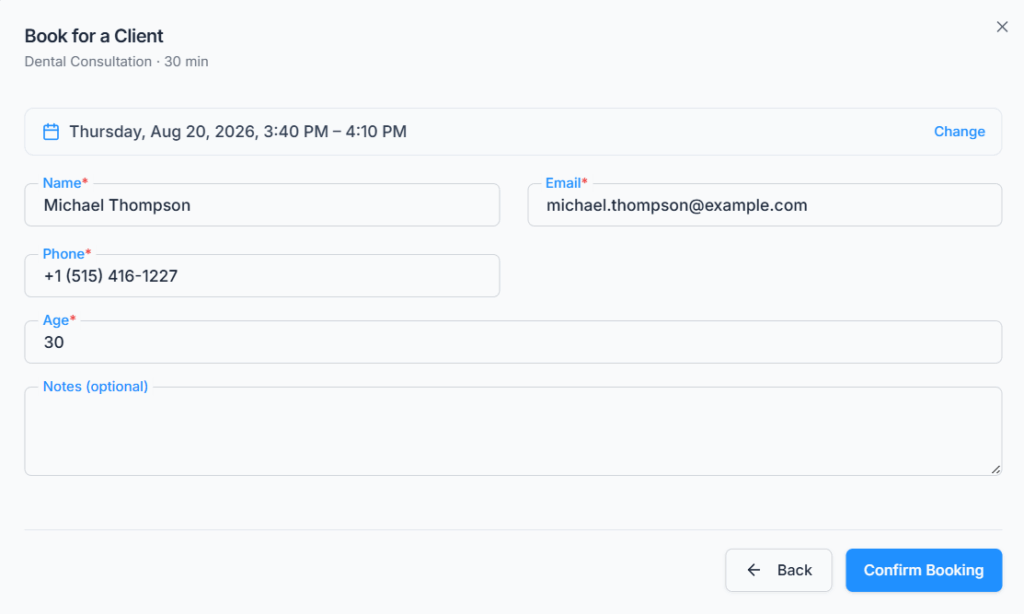
You type the details in yourself — there’s no list of existing clients to pick from, so you don’t have to look anyone up first:
- Email — always required. This is also how Office-X recognises them (see below), so it’s worth getting right.
- Name and Phone — asked for only if this service collects them, exactly as on your public form.
- Your Custom Fields — the same questions your public form asks. Anything marked required still has to be answered.
- Notes — a free-text box for anything useful (“called about a follow-up”, “prefers the afternoon”).
Use Back if you need a different time, or Cancel to close without booking anything — nothing is saved until you confirm.
What Happens Next #
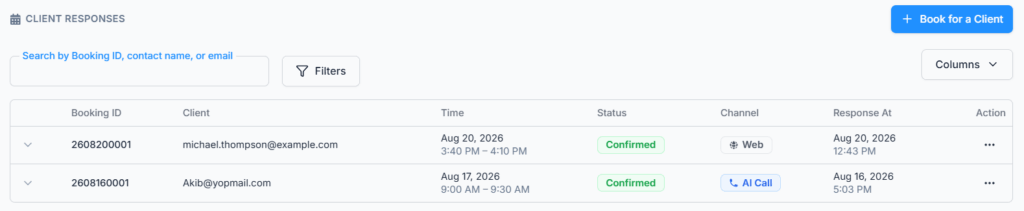
- The booking is Confirmed straight away and appears in the Client Responses list with everything else.
- The client still gets their email. They receive the same confirmation with a calendar invite and their own link to view or cancel the appointment — so booking it for them doesn’t leave them in the dark.
- A Client record is created for them, or their existing one is reused — matched on that email address, so you never end up with duplicates.
- The slot is blocked for everyone else immediately, and the booking’s history records you as the person who made it — not the client, since they weren’t the one clicking.
Good to know: this is a shortcut for the client, not around your own rules. Office-X checks everything again when you confirm — that the slot is still free, that it’s inside the notice window, and that the day hasn’t hit its Max Bookings Per Day. If someone booked that slot online while you were typing, you’ll simply be told “This slot is no longer available” and can pick another. Nothing is double-booked.
Who can do this: the Subscriber Admin always, and any employee with Manage Booking Response — the same permission that covers rescheduling, cancelling, and marking No-show. With the (For Own) version you can only book for services assigned to you; (For All) covers every service. Note that simply being the employee a service is assigned to isn’t enough on its own — you need the permission too.
Good to know: the button only appears on Active services — an Inactive service takes no bookings from the dashboard, just as it takes none from its public link. If you can’t see the button, check the service’s status first, then your permission.
Managing an Existing Booking #
From a service’s Client Responses list, staff and admins can:

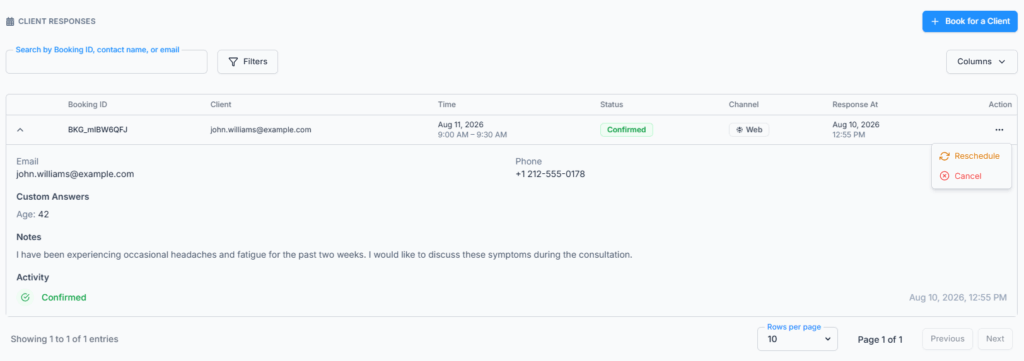
- Reschedule — move it to a different open slot. The client gets a new calendar invite reflecting the change, and their old confirmation link stops working in favor of a fresh one.
- Cancel — the client is emailed that their booking was cancelled.
- Mark No-show — only available once the appointment’s start time has already passed.
Good to know: when a client cancels their own booking through their confirmation link, no email is sent (they already know — they just did it themselves). It’s only when staff or an admin cancels on their behalf that Office-X emails the client to let them know.
Booking Status #
A booking is always exactly one of: Confirmed, Cancelled, or No-show. Rescheduling doesn’t change a booking’s status or create a new record — it stays Confirmed, just with an updated time and a note in its history of exactly what changed and when.
AI Call History #
Route: Dashboard → CRM → Bookings → AI Call History (you can also get there from the “View AI transcript” link on any phone booking).
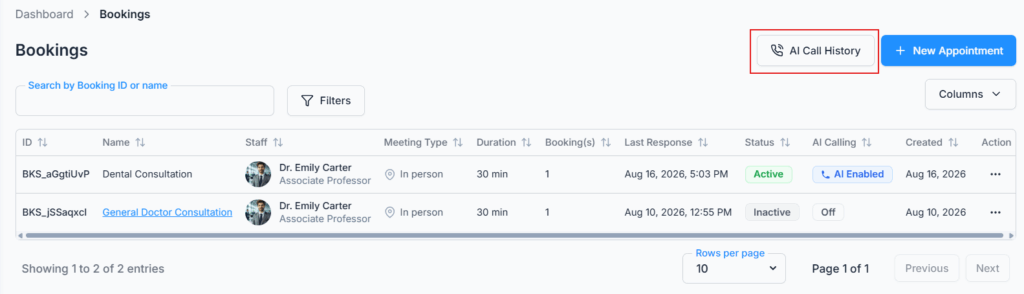
This page only matters if you’ve switched on AI Calling. It’s a complete record of every AI phone call that reached your number — whether or not it ended in a booking. That last part is the whole point of the page: your Client Responses list can only show you calls that worked. AI Call History also shows you the ones that didn’t — someone who called, heard the available times and hung up, or a call that dropped halfway through. That’s how you find out you’re losing calls, not just how many you won.
What Each Row Shows
Columns: Call Start – End, Caller (their phone number), Provider, Duration, Model, Cost, and Linked Booking.
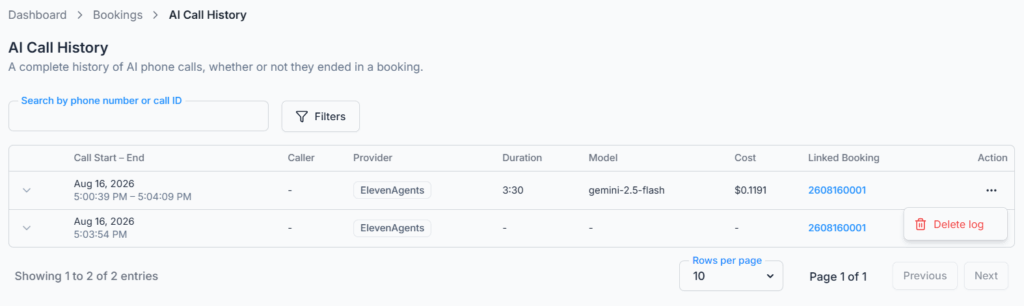
Linked Booking is the link between the two pages. If the call produced an appointment, that column takes you straight to it — the same booking you’d find in the service’s Client Responses list. If the column is empty, the call simply didn’t end in a booking, and the row is still here so you can listen back and find out why.
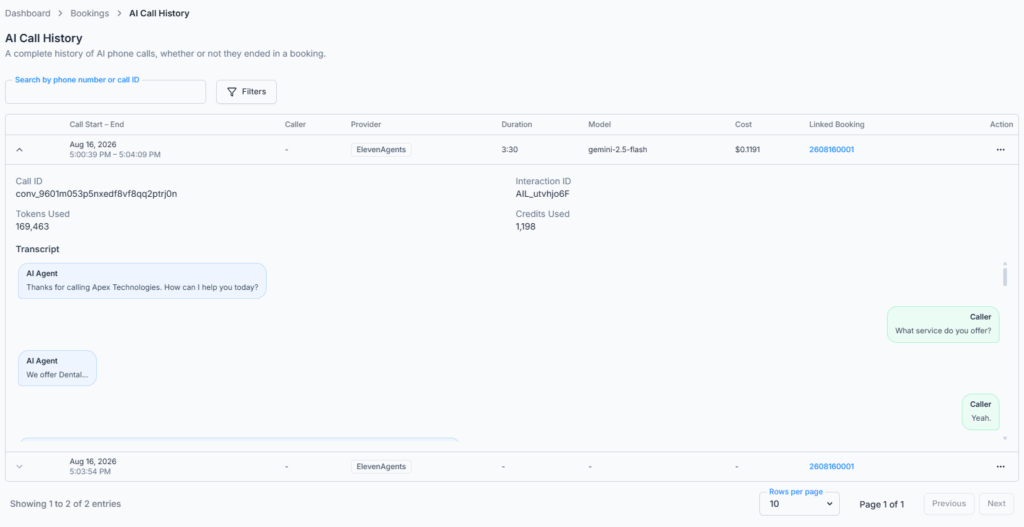
Expand any row for the full picture: Call ID and Interaction ID (useful if you ever need to raise something with ElevenLabs), Tokens Used and Credits Used, a Recording link where one is available, and the whole Transcript, laid out as a back-and-forth conversation so it reads like a chat rather than a wall of text.
To find a specific call, search by phone number or call ID, or narrow the list to a date range (From / To). Results are paginated, and each row has a Delete log action if you need to remove a single call record.
Two Things Worth Knowing
Transcripts depend on one setup step. The bookings themselves work without it, but transcripts, durations and recordings only appear if the post-call webhook was set up on ElevenLabs’ side (Step 8 in the Integrations guide). If your calls are booking fine but this page looks thin, that webhook is almost always the missing piece — and it needs setting up again after a disconnect and reconnect.
Call records are kept for 90 days. These rows hold your callers’ phone numbers, recordings and transcripts, so Office-X clears them out automatically 90 days after the call, every day in the background. The bookings themselves are never touched by this — only the call recordings and transcripts age out. If a particular call matters long-term, save what you need from it before then.
Good to know: who can open this page isn’t controlled by the Integrations permission. It follows your normal Bookings permissions — View All Bookings, or Manage Booking Response (For All) — so anyone you’ve trusted with the full booking list can also see the calls behind it. Subscriber Admins always can.
How Bookings Connect to the Rest of CRM #
- Clients — as noted above, every public booking automatically creates (or reuses) a Client record for the person booking, so you don’t need to set them up in Clients beforehand. These auto-created Clients are the one kind you can still delete even though a booking points at them — the booking keeps its own copy of the contact name and email, so it still reads correctly afterward.
- Admin → Integrations — this is where the AI phone route comes from. Connect ElevenLabs there, tick AI Calling on an Active service here, and clients get a second way to book: by calling and talking, instead of using your link. Phone bookings follow the exact same availability, buffer and limit rules described above, appear in the same Client Responses list, and create or reuse a Client the same way — so nothing about the rest of this guide changes. What you gain on top is AI Call History (see above), the record of every call, booked or not.
Activity Log #
Alongside each booking’s own history (in its expanded row), your company’s central log records the bigger changes: Booking Services created, edited, activated, inactivated and deleted, bookings rescheduled, cancelled, marked No-show, or created on a client’s behalf, and the availability overrides you add or remove for a staff member — each with who did it and when. A client cancelling their own booking is recorded too, as “Client cancelled booking”. You’ll find it under Dashboard → Admin → Activity Log, filtered to Booking or Booking Service. See the Activity Logs guide for how to search it.
Summary #
Bookings turns an employee’s real availability into a public scheduling page — clients pick a genuinely open slot themselves, Office-X keeps everyone from double-booking automatically, and every reschedule or cancellation is tracked and emailed to the client. Availability is set per employee (shared across all their services), while notice periods, daily limits, and what information to collect are all set per service, giving you fine control over each type of appointment you offer. Opening a service’s own page is also where you’ll find its full performance stats and every client who’s booked it — Office-X doesn’t have a single combined view across every service at once.
And you set all of that up only once. Share your link and clients book online; connect ElevenLabs under Admin → Integrations and tick AI Calling, and the same service also becomes bookable by phone, with an AI Call History keeping a record of every call — the ones that became appointments and the ones that didn’t. And when a client would simply rather talk to you, Book for a Client lets you take the appointment yourself, under exactly the same rules.
