
The Leave -> Approve Leaves module allows eligible approvers to review, approve, or reject leave requests submitted by employees.
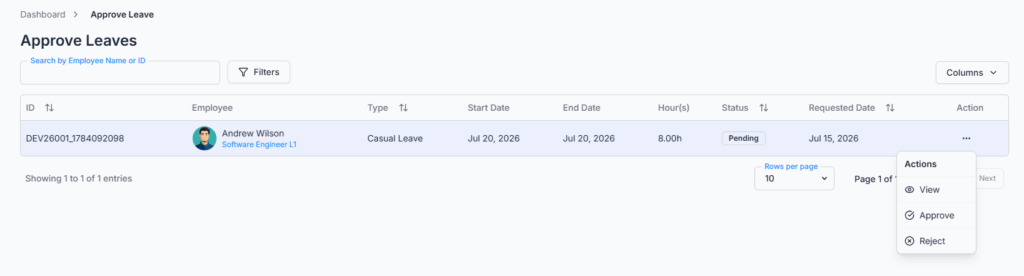
This module helps organizations manage leave approvals in a structured and traceable way. Depending on the company setup, leave requests may follow a single-step or multi-step approval flow — or, if nothing is configured, fall back to the Subscriber Admin.
Who Can Use This Feature #
Subscriber Admin can approve or reject any leave request in the company, at whichever step it currently sits on, without needing any specific permission.
Employees can approve or reject a leave request only when they’re the assigned approver for its current step and hold the matching permission below.
Permission Behavior
Two permissions control these actions:
- Approve Leave Request (For All)
Required action: Update
Shows the Approve option for leave requests where you’re the assigned approver. - Reject Leave Request (For All)
Required action: Update
Shows the Reject option for leave requests where you’re the assigned approver.
Both of the following must be true before an Approve or Reject option shows up for a given leave request:
- You’re assigned as the approver in the relevant approval flow step (Reporting Manager, Company Admin, or a Selected Employee named on that step) — or you’re acting as a substitute Reporting Manager per the fallback described above.
- You hold the matching permission for that action.
Being included in the approval flow alone is not enough — you also need the matching permission. Likewise, holding the permission alone is not enough if you’re not the assigned approver for that specific request’s current step. If either is missing, that action’s option simply won’t appear for you on that request.
Good to know: nobody can approve or reject their own leave request, even in the unusual case where they’d technically qualify as an approver for it (for example, being listed as their own reporting manager). That action is always blocked for the person the leave belongs to — someone else in the flow, or the Subscriber Admin, has to act on it instead.
These permissions can be assigned directly to an employee, or to an entire team at once (so everyone on that team inherits them) — including teams set up as “all employees” or “all reporting managers,” which count too. See the Permissions Management guide for how to assign permissions.
How Approval Flow Works With Leave Requests #
This is the part that trips people up the most, so here’s the full picture of what happens from the moment a leave request is submitted to the moment it’s finally settled.
The Moment a Leave Request Is Created
The instant an employee (or someone creating leave on their behalf) submits a request, Office-X checks the approval flows set up under Dashboard → Admin → Approval Flows to find the one that applies to that employee — based on the employee themselves, their team, gender, department, or designation. At most one flow applies to any single leave request.
From here, one of two things happens:
If an Approval Flow Applies
The leave request is saved as Pending and linked to that flow. Office-X builds a step-by-step checklist for it — one entry for every step the flow has, each starting out as “waiting.” This checklist travels with the leave request as its own permanent record of progress, separate from the flow’s setup itself.
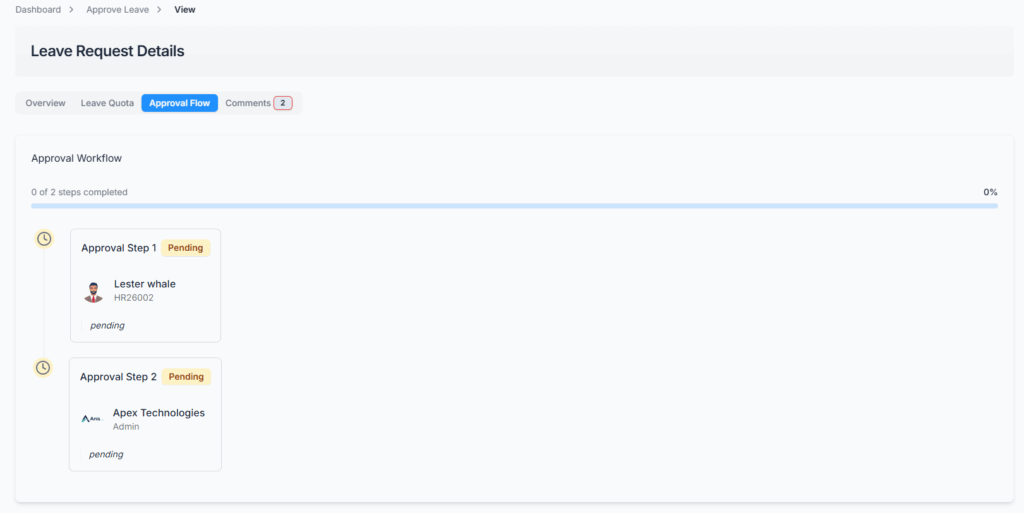
Only the first step’s approver(s) are contacted at this point — nobody assigned to a later step hears anything yet, since it isn’t their turn. Whether that first-step notice arrives as an in-app notification, an email, both, or neither depends on how that specific step was configured when the approval flow was set up. The employee who submitted the request always gets their own confirmation email regardless of any of this.
Good to know: if a step’s approver type is Reporting Manager but the employee doesn’t actually have one assigned, the Subscriber Admin automatically stands in as the approver for that step instead — so the request never gets stuck with nobody able to act on it.
If No Approval Flow Applies
The leave request is still created and still saved as Pending — but with no step checklist at all. It simply waits on the Subscriber Admin. Only the Subscriber Admin receives a notice about it (an in-app notification, not an email), and no other approver — not even someone who’d normally be an approver for other requests — can act on it. This continues until an approval flow is created that actually covers that employee; it never resolves itself automatically.
Step-by-Step Approval, In Detail #
When a flow has more than one step, the steps are always processed strictly in order — a later step can never be acted on before every step before it has been approved.
Approving a step does not approve the whole leave request. It only:
- Marks that one step as approved, recording who approved it and when.
- Moves the request on to the next step, if one exists.
- Notifies the next step’s approver(s) that it’s now their turn — this is a separate notice from the one the previous step’s approver got.
Only when the final step is approved does the leave request’s overall status actually change to Approved. Up until that point, the request stays Pending from the employee’s perspective, even though one or more steps have already said yes.
For example, in a 3-step flow (say, Reporting Manager → Department Head → Company Admin): once the Reporting Manager approves, the request is still Pending — it has simply moved on to the Department Head. Once the Department Head approves, it’s still Pending, now waiting on the Company Admin. Only once the Company Admin approves does the status finally become Approved, and the employee is notified that their leave is confirmed.
Rejecting Stops the Process Immediately #
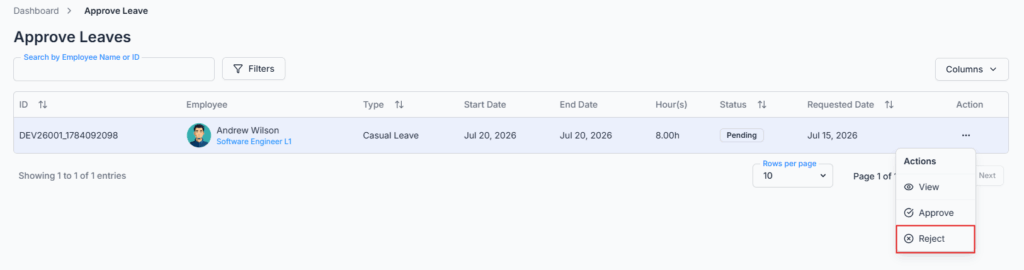
A Reject at any step — whether it’s the first step or the last — immediately sets the leave request’s overall status to Rejected. There’s no need for every step to weigh in; one rejection ends it. Whichever step and approver did the rejecting is permanently recorded on that step’s entry, so the trail always shows exactly where and by whom the request was turned down. Steps after the rejected one are simply never reached — nobody is notified about them, and no further action is possible on the request.
What Happens to a Step Once It’s Decided #
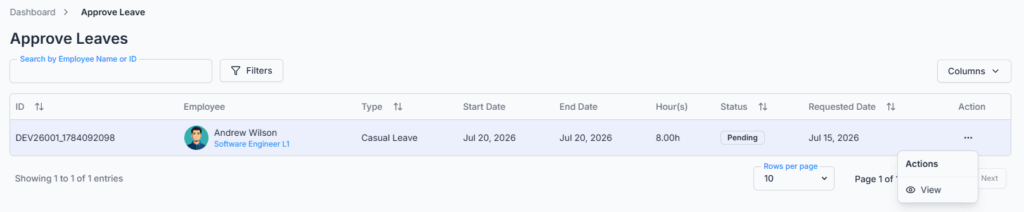
Once an approver has acted on their step (approved or rejected), they can’t act on that same leave request again — the buttons simply won’t be available to them a second time. If they happen to also be the assigned approver for a later step in the same flow, they’ll get another chance to act when the request reaches that step; otherwise, their involvement in taking action is finished.
That said, an approver who has already acted doesn’t lose access to the request entirely — they can always still open it to view its details and add comments, for as long as the request remains open for comments (see Comments & Communication below). Only the ability to Approve or Reject goes away once their step is resolved.
The Subscriber Admin’s Role in an Approval Flow #
This is worth spelling out clearly: the Subscriber Admin can always step in and approve or reject whichever step is currently pending on any leave request — even if they aren’t personally named as that step’s Reporting Manager, Company Admin, or Selected Employee. But this only lets them act on the current step; it does not let them skip ahead or finalize the whole request early.
In other words: if a 3-step approval flow is configured and the Subscriber Admin clicks Approve on step 1, the outcome is exactly the same as if the regularly assigned step-1 approver had clicked it — step 1 is marked approved, and the request moves on to step 2, still Pending. Steps 2 and 3 still need their own approval before the leave is finally Approved, whether that comes from their assigned approvers or from the Subscriber Admin acting on each of those steps in turn.
The only situation where the Subscriber Admin’s decision is instantly final is the one described above under If No Approval Flow Applies — because there, there’s no step structure at all, so a single Approve or Reject from the Subscriber Admin is the whole decision.
Action Options for Approvers #
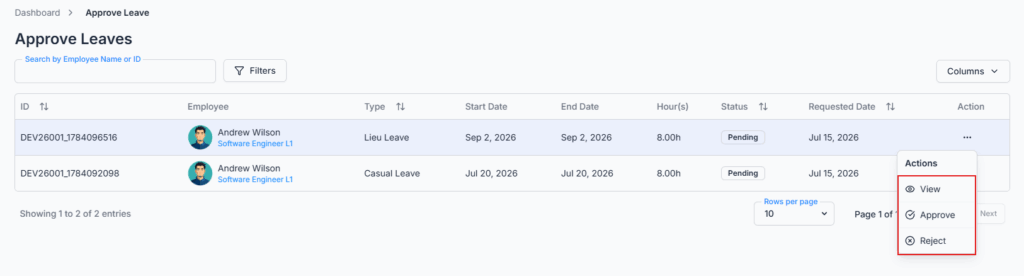
Eligible approvers can perform actions based on their approval flow assignment and permissions. The full set of things an approver can do on a leave request is: View, Approve, Reject, and Comment.
- Approve
Approves the leave request’s current step. If a multi-step approval flow is configured, the request moves to the next approval step. If it is the final step, the leave request status becomes Approved. This takes effect immediately when you click it — there’s no confirmation prompt. - Reject
Rejects the leave request immediately — the leave request status becomes Rejected right away, regardless of which step it was rejected at. There’s no built-in reason field on the Reject action itself; if you want to explain why you’re rejecting a request, add a Comment on it first (see Comments & Communication below) — comments can only be added while the request is still Pending, so leave your explanation before clicking Reject, not after. - View
Opens the leave request details so the approver can review the request before taking action.
Good to know: Approve and Reject each act on one leave request at a time — there’s currently no option to select multiple requests and approve or reject them together in bulk.
Good to know: an already-approved leave can later be cancelled by an eligible user — this is a separate action from Approve/Reject, covered in the Cancel Approved Leave guide, and (unlike Approve/Reject) does ask for confirmation before it takes effect.
Both the employee and the next step’s approver(s) are notified as a leave request moves through the flow: the employee gets an update at each step and a final notice once it’s Approved or Rejected, while the newly-responsible approver(s) get their own separate notification (and email, if enabled) asking them to act.
What Approvers Can View #
From the leave request details, approvers can review:
- Leave type, period, and requested hours
- Employee leave balance and entitlement
- Approval workflow steps
- Approval history
- Previous comments or communication
The Leave Quota Tab, Explained #
The Leave Quota tab on the leave request’s details page shows the requesting employee’s leave balance as it stands today — it’s calculated live each time you open it, not a snapshot from when the leave was originally requested. A few things make this view a little different from what the employee sees on their own Create Leave Request form:
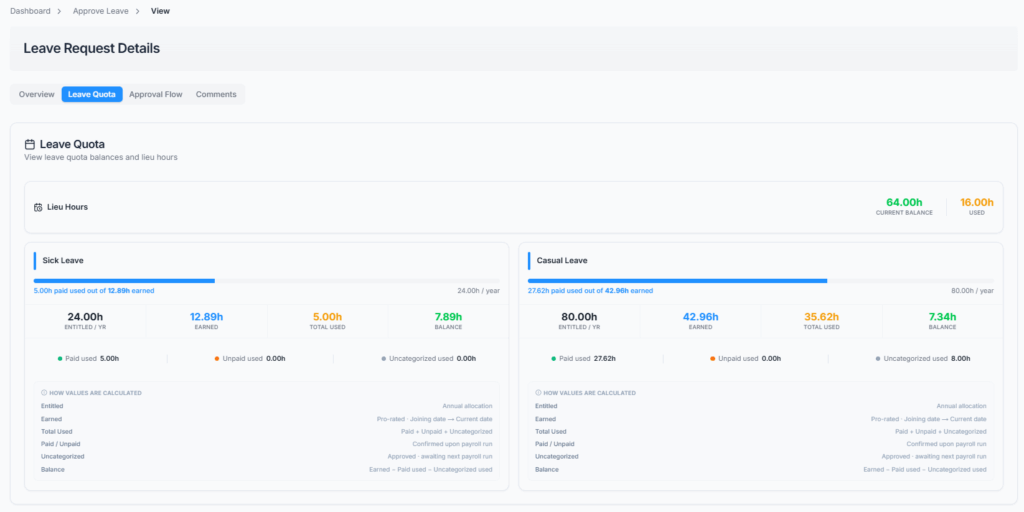
- It shows a card for every leave type the employee has a quota for — not just the leave type of the specific request you’re reviewing. This gives you a fuller picture of that employee’s overall leave standing while you decide.
For each regular (non-Lieu) leave type, the card shows:
- Entitled / yr — the full yearly hours set for this leave type in Employee Add/Edit → Leave Entitlements.
- Earned — the portion of that entitlement earned so far, pro-rated day by day from the employee’s joining date up to today (entitled hours ÷ 365 × days since joining).
- Total Used — all hours used from this employee’s fully approved leave requests of this type, combining paid, unpaid, and (where relevant) Uncategorized hours together into one figure.
- Balance — Earned minus what’s already been used (paid and Uncategorized). This is floored at zero and never shows as negative.
- Paid used / Unpaid used — the same Total Used figure broken down into the part that was covered by the employee’s earned balance versus the part that went beyond it and was recorded as unpaid.
- For companies with payroll enabled, an Uncategorized used figure may also appear — approved leave of this type that hasn’t been through a payroll run yet, so it isn’t yet finally classified as paid or unpaid.
The tab also includes a short “How values are calculated” note inline, explaining each of these figures directly on the page.
Good to know: the Leave Quota tab doesn’t show an “Overused” figure the way the employee’s own Create Leave Request form sometimes does. If usage has gone beyond what’s been earned, you’ll see that reflected in the Total Used / Unpaid used figures here, just not called out as its own separate “Overused” line.
Lieu Leave is shown differently: if the employee is eligible for Lieu Leave, a separate Lieu Hours card appears (regardless of whether the request you’re reviewing is itself a Lieu Leave request), showing just two figures — Current Balance (how many Lieu hours the employee has available right now) and Used (their total Lieu hours used to date). There’s no Entitled/Earned/Paid/Unpaid breakdown for Lieu Leave here, since it doesn’t accrue the same way regular leave types do.
If the employee is still within a probation period and isn’t yet eligible to earn paid leave, the figures for that leave type may show as zero until probation ends — this is expected, not an error.
The approval workflow steps / approval history view lists every step in order and, for each one, shows:
- Which step it is (its position in the sequence).
- Its current status — Pending, Approved, or Rejected.
- Who acted on it, once it’s been approved or rejected — or, while it’s still pending, who it’s currently waiting on.
- The date the step was acted on.
Good to know: if a request is rejected partway through a multi-step flow, the steps that would have come after it are never shown as “skipped” or acted on in any way — the timeline simply stops at the step where the rejection happened, since nothing beyond that point was ever reached.
Comments & Communication #
Approvers can add comments to leave requests to:
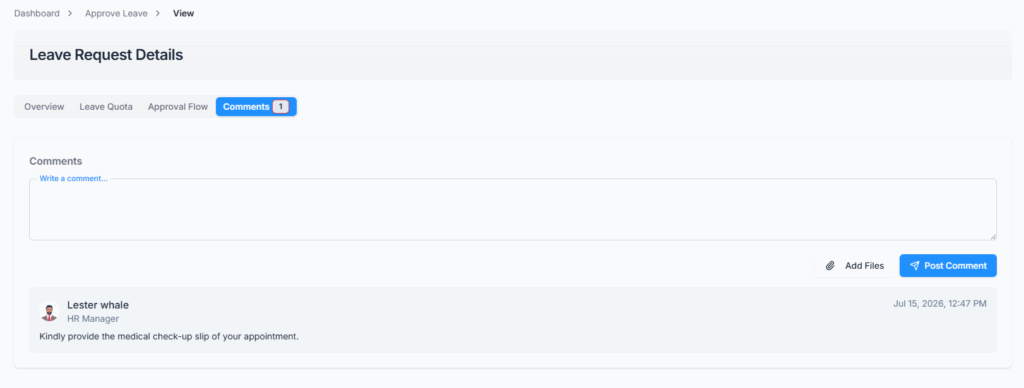
- Communicate instructions to the employee
- Ask for clarification regarding the request
- Provide feedback before final approval or rejection
- Explain a decision in advance, since there’s no reason field on the Approve/Reject action itself
Comments are a separate feature from the Approve/Reject action — clicking Approve or Reject doesn’t ask for or attach any comment automatically. Anyone who can already view the leave request can comment on it — which includes the requester, the Subscriber Admin, and every approver named anywhere in the flow (not just whoever’s step is currently active) — but only while it’s still Pending. As soon as it’s Approved, Rejected, or Cancelled, commenting closes — so any explanation you want on record needs to be posted before you (or anyone else) finalizes the request.
All comments are logged and remain visible in the leave request history for transparency, even after the request is closed out.
Summary #
The Approve Leaves module ensures that leave requests are reviewed accurately, efficiently, and according to company policy.
Every leave request either follows a configured approval flow step by step, or — if none applies — waits on the Subscriber Admin alone. In a step-by-step flow, each approval only clears one step and moves the request forward; only the final step’s approval actually sets the request to Approved, while a rejection at any step ends it immediately. The Subscriber Admin can always act on whichever step is currently pending as a safety net, but even they only complete one step at a time — the sole exception being when no approval flow applies at all, where their decision is immediately final.
Approval and rejection are further controlled by user permissions: only users assigned as approvers in the relevant approval flow step and holding the required Approve Leave Request (For All) or Reject Leave Request (For All) permission can take action. This keeps the leave approval process structured, secure, transparent, and traceable.