
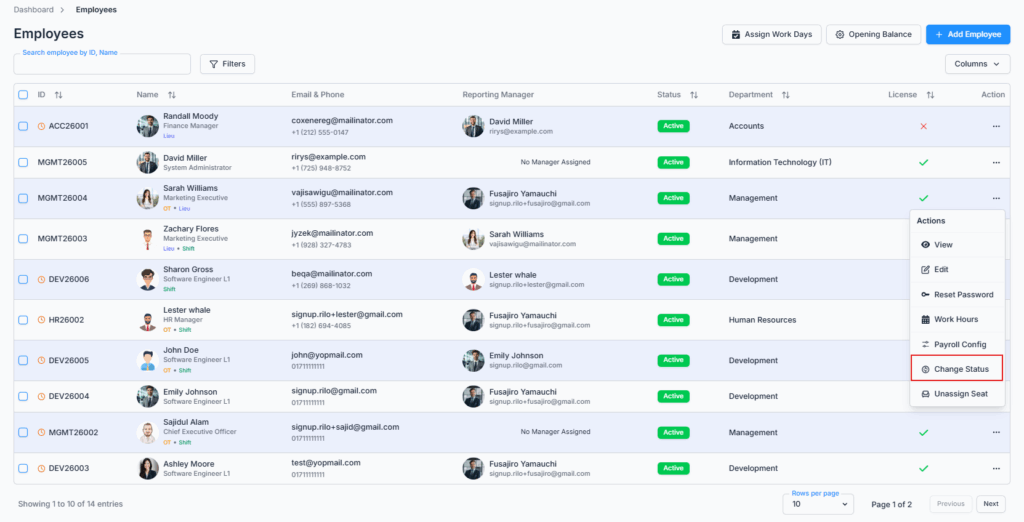
The Change Status dialog is opened from the Action Menu of the Employee Table under the Employees route. It lets admins and permitted users update an employee’s current employment status quickly, without leaving the Employees list.
Who Can Use This Feature #
Subscriber Admin can always change any employee’s status, without needing any specific permission.
Employees can change another employee’s status only if they hold the permission below.
Permission Behavior
This is controlled from: Admin → Permission → Employee → Change Employee Status (For All)
- Change Employee Status (For All)
Required action: Update
Lets you open Change Status and update any employee’s status.
Without this permission (and without being the Subscriber Admin), the Change Status option doesn’t appear in the employee’s Action Menu.
Good to know: unlike Edit Employee, Reset Password, and Work Hours, Change Status is not restricted to employees who have a license/seat assigned — it works the same whether or not the employee currently has a seat. That’s intentional: this is one of the tools you’d reach for to manage an employee’s status precisely when their seat situation is changing.
This permission can be assigned directly to an employee, or to an entire team at once. See the Permissions Management guide for how to assign permissions.
Overview #
You can change an employee’s status to any of the options your company has defined under Admin → Employment Status — this dropdown always reflects your own company’s list, not a fixed set built into Office-X. Common examples include Active, Inactive, On Leave, or Suspended.
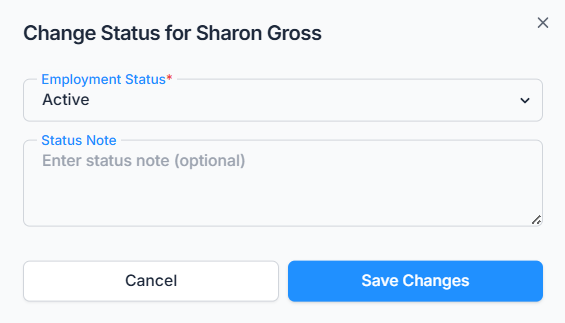
You can also add a Status Note whenever you update an employee’s status — optional, up to 250 characters — to record the reason or context behind the change. This note doesn’t appear on the employee’s profile page, but it is saved: opening that change afterward in the Activity Log will show your note alongside the old and new status.
Statuses That End Employment #
Five specific statuses are treated as ending the employee’s time at the company: Resigned, Terminated, Suspended, Retired, and Deceased. Choosing any of these behaves differently from choosing something like Active or On Leave:
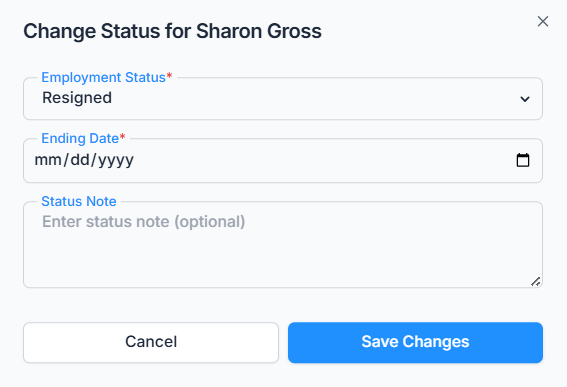
- An Ending Date field appears, and you’re required to set one before you can save.
- That Ending Date is saved to the employee’s record and will show up later on their profile’s Employment tab.
- If you later move the employee back to Active, their Ending Date is automatically cleared.
Good to know: choosing one of these five statuses only sets the status and the Ending Date — it does not automatically do anything else. It doesn’t unassign the employee’s license/seat, doesn’t cancel their pending leave requests, and doesn’t ask for or record an exit reason. If you’re ending someone’s employment, you’ll still want to unassign their seat yourself (Assign/Unassign Seat) as a separate step.
Status changes aren’t a one-way door — you can move an employee back and forth between any statuses as many times as needed (for example, Terminated back to Active), and the dropdown always shows every status your company has configured, regardless of the employee’s current one.
Effect on Login #
An employee’s status genuinely controls whether they can log in — this isn’t just a label for reporting. Only these statuses allow login: Active, Maternity Leave, Paternity Leave, Sick Leave, and Vacation Leave. Every other status blocks login on their next attempt — including Inactive, even though it isn’t one of the five “ending employment” statuses above.
Good to know: changing an employee’s status to a login-blocking one doesn’t immediately sign them out of a session they’re already in — it only stops their next login attempt. It also doesn’t need to be one of the five “ending employment” statuses to block login — moving someone to Inactive blocks their login exactly the same way Terminated does.
Saving a Status Change #
After selecting the new status (and an Ending Date, if required) and optionally adding a Status Note, click Save. You’ll see “Employee status updated successfully,” the dialog closes, and the Employees list refreshes to show the new status right away — there’s no page redirect since this is a dialog, not a separate page.
Summary #
Change Status lets the Subscriber Admin, or anyone holding Change Employee Status (For All), update any employee’s status and optionally leave a note explaining why — available regardless of whether that employee currently has a seat. Five statuses (Resigned, Terminated, Suspended, Retired, Deceased) additionally require an Ending Date, and status genuinely gates login: only Active and the four leave-related statuses let an employee sign in, while everything else — including Inactive — blocks their next login attempt.