
The View Employee Details page lets authorized users review an employee’s full profile from one place, organized into tabs: personal information, employment details, assets, benefits, leave quota, attendance overview, work hours, and payroll configuration.
Who Can Use This Feature #
Subscriber Admin can always open any employee’s profile, without needing any specific permission.
Employees can open a profile only if they hold one of the permissions below.
Permission Behavior
This is controlled from: Admin → Permission → Employee
- View Employee Profiles (For All)
Required action: View
Lets you open any employee’s profile page. - View Profile & Account (For Own)
Required action: View
Lets you open only your own profile page — it doesn’t unlock anyone else’s.
Without either of these (and without being the Subscriber Admin), opening a profile page — even your own — shows Access Denied.
A few individual tabs have their own extra permission on top of the two above, and can show up empty even for someone who can otherwise open the page:
- Manage Payroll Config (For All)
Required to see another employee’s Payroll Config tab content. Viewing your own is never blocked by this. - Manage Work Hours (For All)
Required to see the “Assigned Work Days” list on the Work Hours tab — even for your own profile. - View All Work Shift
Required to see the “Shift Work Schedule” section on the Work Hours tab for a shift-worker employee (this one has its own separate exception if you’re the employee’s Reporting Manager or it’s your own schedule). - Manage Bank Deposit Forms (For All)
Required to activate/deactivate, add a note to, or delete a bank deposit form on the Employment tab. Viewing and downloading an already-uploaded form is not restricted by this permission — anyone who can open the tab can do that.
Good to know: the Assets tab isn’t gated by a permission at all — it depends on whether your company’s subscription plan includes Asset Tracking. If it doesn’t, the tab simply shows no assets for everyone, regardless of permissions.
This permission can be assigned directly to an employee, or to an entire team at once. See the Permissions Management guide for how to assign permissions.
Access / Navigation #
- Go to Dashboard → Employees.
- Find the employee.
- Click the row or open the three-dot Action menu.
- Click View.
Navigation path:
Dashboard → Employees → View
Page Overview #
The Employee Details page includes:
- Employee profile header
- Edit Employee button, if permitted and the employee currently has a license/seat
- Profile tabs

Here’s what each tab is for, at a glance:
- Personal Info — the employee’s personal and contact details.
- Employment — job details, pay setup, and bank information.
- Assets — company equipment currently assigned to this employee.
- Benefits — salary benefits this employee receives.
- Leave Quota — this employee’s leave balances for the year, and how they were used.
- Att. Overview — this employee’s attendance summary.
- Work Hours — the schedule this employee is expected to work.
- Payroll Config — payroll-specific settings for this employee, such as bonuses and (where applicable) tax details.
Employee Header #
The header shows:

- Avatar or initials
- Employee name
- Work email
- Phone number
- Joined date
- Designation
- Department
- Employee ID
- Employment status badge, and an “On Probation” badge if applicable
Personal Info Tab #
Shows the employee’s personal, contact, address, and emergency contact information — this is the same information collected in Steps 1 and 2 of Add Employee.
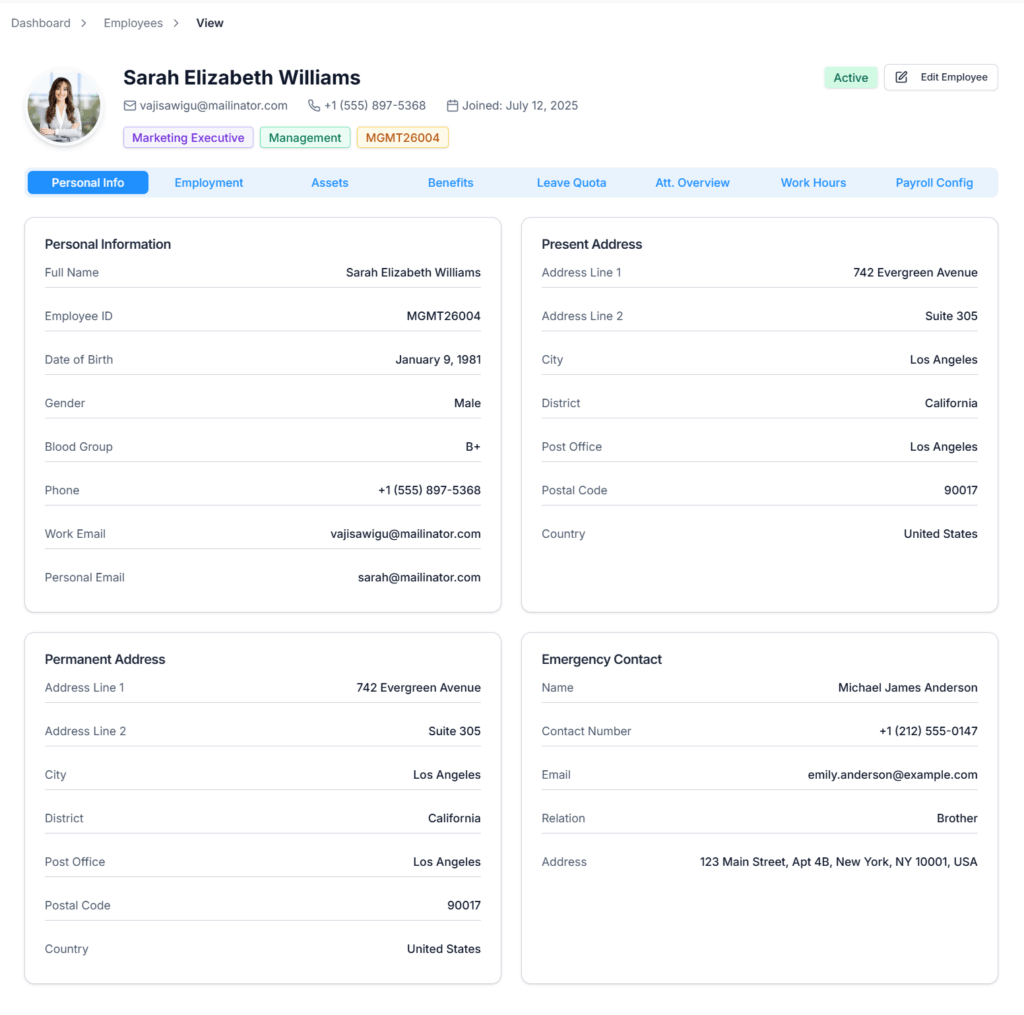
Includes:
- Full Name
- Employee ID
- Date of Birth
- Gender
- Blood Group
- Phone
- Work Email
- Personal Email
- Present Address
- Permanent Address
- Emergency Contact (name, phone, email, relation, address)
Employment Tab #
Shows the employee’s job and employment-related details.
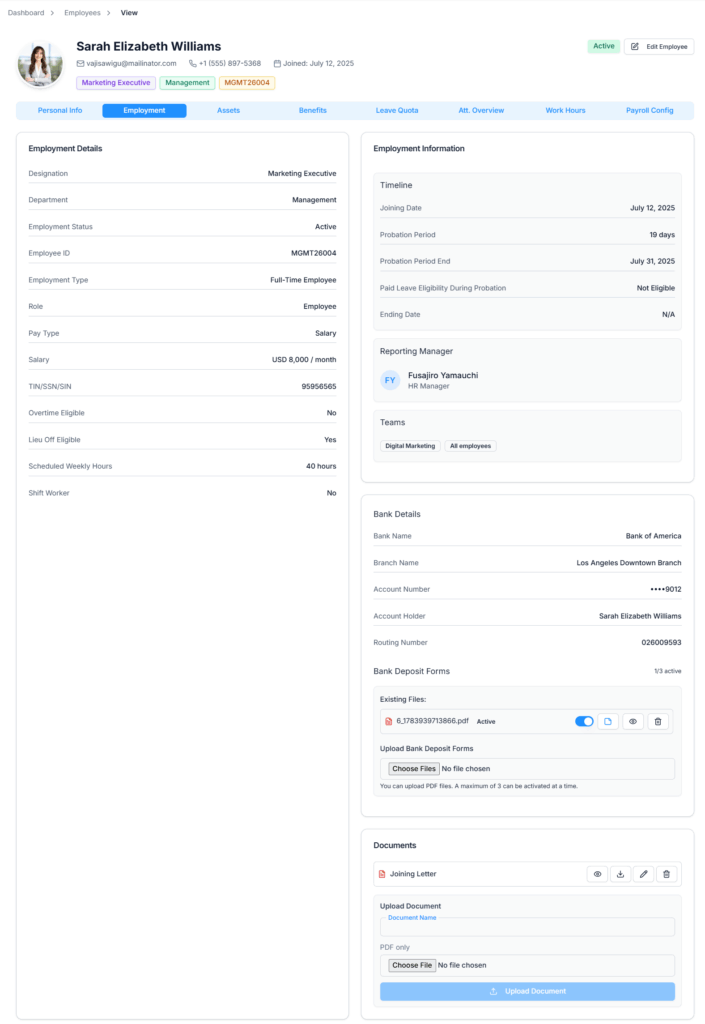
Includes:
- Designation
- Department
- Employment Status
- Employee ID
- Employment Type
- Role — this is the employee’s system access level (for example, Employee or Tenant Admin), not a job title.
- Pay Type
- Salary or Pay Amount
- TIN / SSN / SIN
- Overtime and Lieu Leave eligibility, plus their configured details when eligible
- Scheduled Weekly Hours
- Shift Worker status
- Joining Date, Probation End, Ending Date, and exit reason (if applicable)
- Reporting Manager
- Teams the employee belongs to
- Bank Details, if any have been added
Bank Details includes bank name, branch, account number (shown with only the last 4 digits visible), account holder, and routing number.
Bank Deposit Forms #
The Employment tab also includes a Bank Deposit Forms section, for uploading supporting documents like a bank deposit slip.
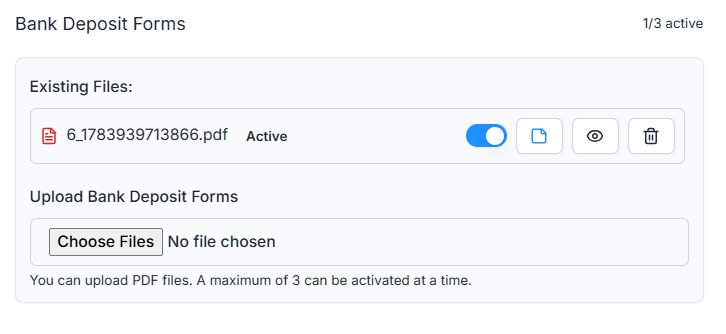
Rules:
- Only PDF files are allowed, up to 2 MB each.
- You can upload up to 3 files at a time in one go.
- Only up to 3 forms can be marked Active at once, shown as a counter like 2/3 active. A newly uploaded form starts out Inactive — it has to be switched to Active manually.
- Activating/deactivating a form, adding a note to it, and deleting it all require the Manage Bank Deposit Forms (For All) permission (see Permission Behavior above).
- Viewing and downloading an already-uploaded form is available to anyone who can open this tab — it doesn’t need that extra permission.
Assets Tab #
Shows every asset this employee is currently the owner of, according to the Tracking → Asset Tracking module — for example, a laptop, phone, or ID card currently checked out to them. As soon as an asset is reassigned to someone else, it disappears from here and appears on the new owner’s profile instead.
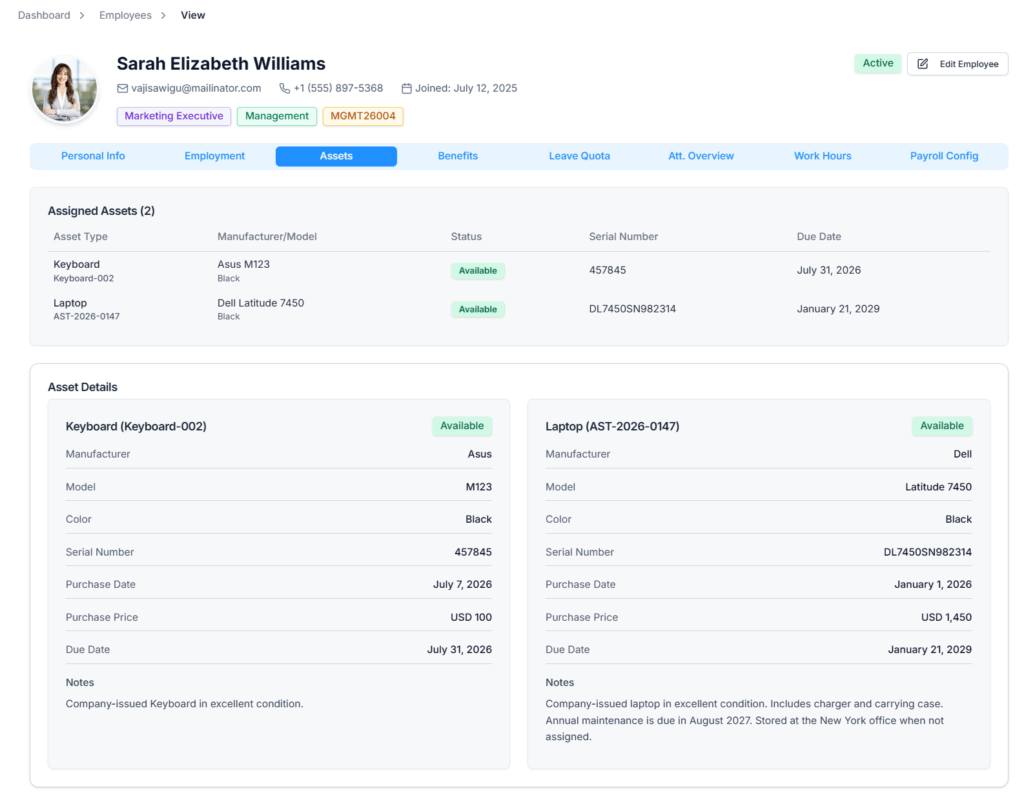
Includes, per asset:
- Asset Type
- Manufacturer / Model
- Serial Number
- Status
- Due Date
- Color, Purchase Date, Purchase Price, and Notes, shown in the asset’s detail view
If no asset is assigned, the tab shows: “No assets assigned to this employee.”
Benefits Tab #
Shows benefits assigned to the employee — the same ones assigned during Add Employee (or added afterward).
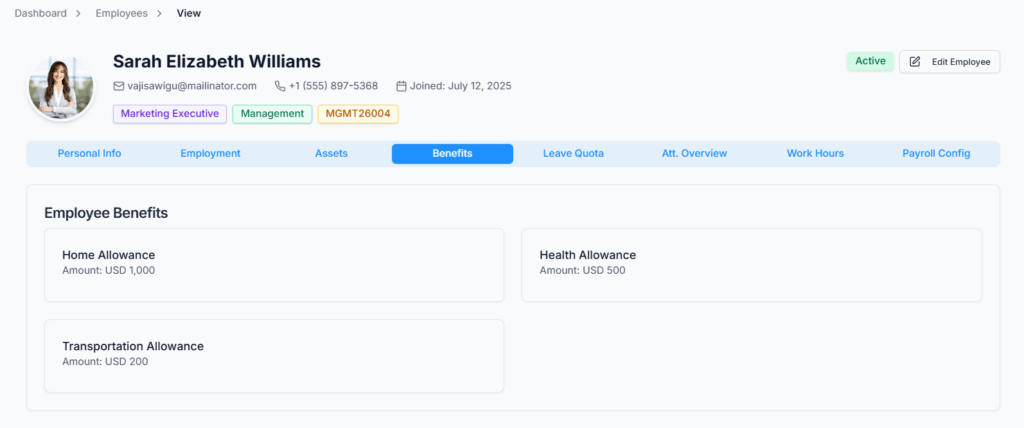
Each benefit shows its name and its amount together with the currency, for example “USD 200”.
Examples: Home Allowance, Health Insurance, Travel Allowance.
If no benefit is assigned, the tab shows: “No benefits assigned to this employee.”
Leave Quota Tab #
Shows the employee’s leave entitlements, usage, and balances for the year.
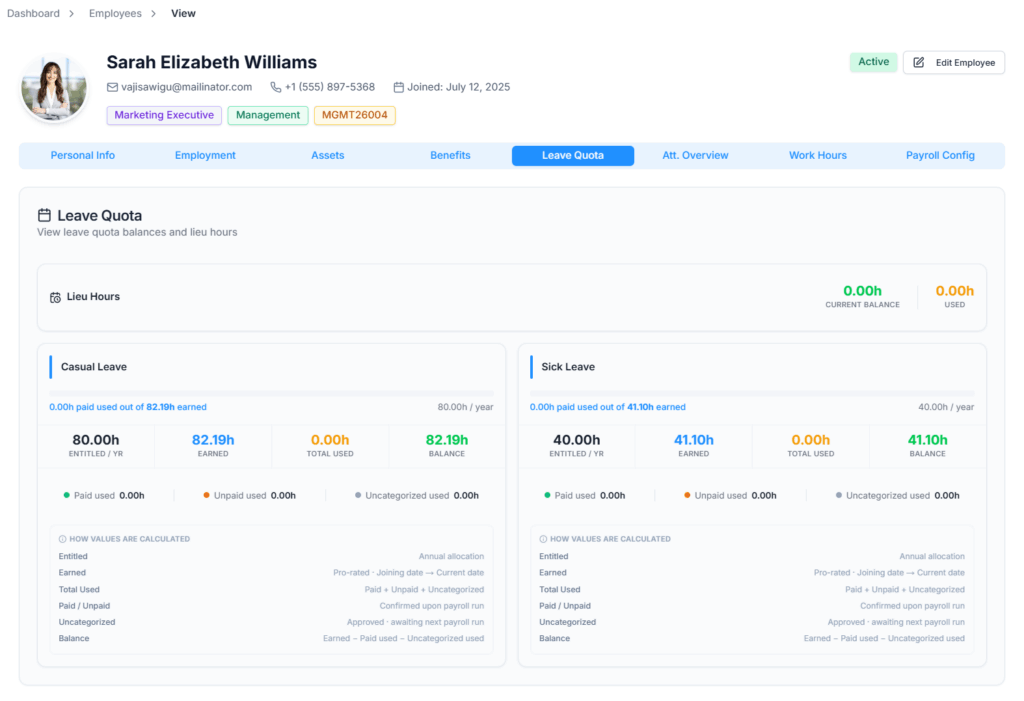
If the employee is marked Eligible for Lieu Leave, a Lieu Hours card appears at the top with their current balance and hours used so far.
For each assigned leave type, the tab shows:
- Entitled / yr — the employee’s yearly quota for that leave type.
- Earned — the portion of that quota earned so far, prorated day-by-day from their joining date to today.
- Total Used — how many days of that leave type have been taken.
- Balance — what’s left to use.
- Paid Used and Unpaid Used — a breakdown of the days used.
- Uncategorized Used — see below.
How “Earned” is calculated: it’s not a lump sum granted all at once at the start of the year — it grows day by day as the employee stays with the company, based on how much of the year has passed since they joined. For example, an employee entitled to 12 days a year who joined exactly 6 months ago will show roughly 6 earned days — half the year has passed, so half the entitlement has been earned so far. By the time a full year has passed, “Earned” reaches the full 12 days.
What “Uncategorized Used” means: this only appears for companies using Office-X’s Bangladesh payroll feature (a Bangladesh-registered company on the Advanced plan). For these companies, an approved leave request doesn’t get sorted into Paid or Unpaid the moment it’s approved — that sorting actually happens when payroll is run for that period. So between approval and the next payroll run, the used days sit in Uncategorized; once payroll processes them, they move into Paid Used or Unpaid Used and Uncategorized drops back down.
For every other company (not using Office-X’s Bangladesh payroll feature), there’s no such waiting period — approving a leave request immediately works out whether it’s Paid or Unpaid, so Uncategorized Used always stays at 0 for these companies.
Attendance Overview Tab #
Shows this employee’s attendance summary for a date range you choose — the exact same summary you’d see on Attendance → Individual Attendance Summary, just already scoped to this one employee so there’s no need to search for them again.
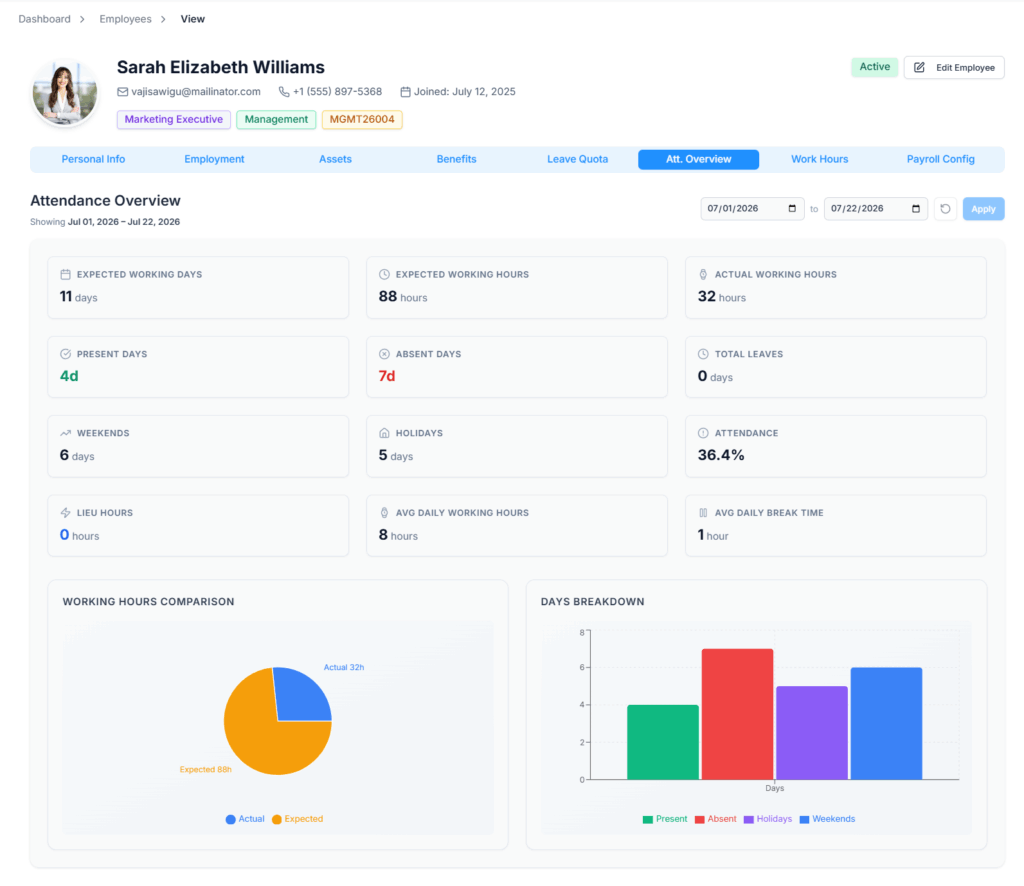
By default it opens showing the 1st of the current month through today. You can pick a different Start and End date and click Apply to recalculate, or Reset to snap back to the current month. You can’t pick a start date earlier than when your company’s Office-X account was created, since there’s no attendance data before that.
Once loaded, you’ll see a line confirming exactly which period the numbers below cover (for example, “Showing Jul 1, 2026 – Jul 22, 2026”), followed by a set of summary cards and two charts, all recalculated for that date range.
Summary Cards
These appear for every employee:
- Expected Working Days —> how many days in the selected range this employee was scheduled to work, based on their own work schedule (weekends and holidays are excluded, unless they were specifically assigned to work on one).
- Expected Working Hours —> the total hours they were scheduled to work over that period, adding up each day’s own shift length (so it’s accurate even if their hours vary day to day).
- Actual Working Hours —> hours they actually worked and had approved, not counting any overtime or premium hours.
- Present Days —> how many of the expected working days they actually attended. A half-day attendance counts as 0.5.
- Absent Days —> expected working days where they neither attended nor had approved leave.
- Total Leaves —> approved leave days taken in the period (a partial-day leave counts as a fraction of a day).
- Weekends and Holidays —> how many weekend days and company holidays fell within the range (excluding any they were specifically assigned to work).
- Attendance % —> Present Days ÷ Expected Working Days. This shows what percentage of the expected working days the employee was present.
- Avg Daily Working Hours and Avg Daily Break Time —> averaged only across the days they actually attended.
Good to know: which extra cards appear beyond these depends on how this specific employee’s overtime/lieu policy is set up — the tab looks slightly different from one employee to the next.
- If the employee is eligible for Overtime, an extra Hours Breakdown card appears (see below), and a Lieu Hours card too if they’re also Lieu-eligible.
- If the employee is eligible for Lieu Leave only (not Overtime), a Lieu Hours card shows their current banked-hours balance and how many they’ve used, plus a Night Premium Hours card if your company pays a night premium.
- If the employee is eligible for neither, and they’ve worked any extra hours beyond their schedule, an Unauthorized Extra Hours card appears with a warning icon — this flags hours worked that won’t be paid as overtime or credited as lieu time, since this employee isn’t set up for either.
Hours Breakdown (Overtime-eligible employees only)
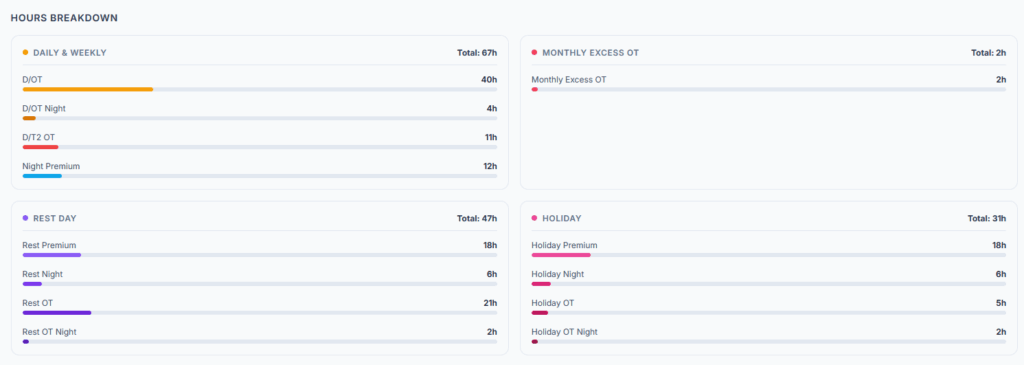
For an employee eligible for Overtime, this card shows exactly where their extra hours came from — since each source is typically paid at a different rate:
- Daily & Weekly —> regular daily overtime, overtime worked at night, and (if your company calculates it) weekly overtime and higher-tier overtime.
- Monthly Excess OT —> overtime that went past a monthly cap, if your company has this configured.
- Rest Day — hours worked on a scheduled rest day, including any that were also worked at night or crossed into overtime on that rest day.
- Holiday —> the same breakdown, but for hours worked on a public holiday.
Each category shows a small progress bar indicating what share of the employee’s total extra hours it makes up.
Charts
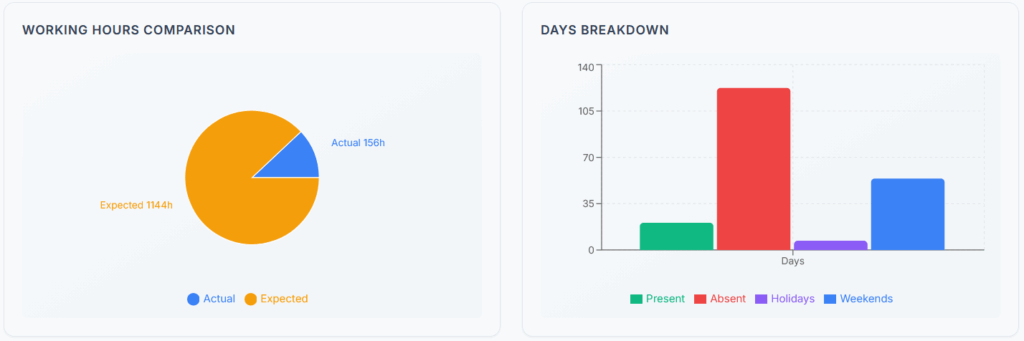
- Working Hours Comparison —> a pie chart comparing Actual hours worked against Expected hours, so you can see at a glance whether this employee worked roughly as scheduled, more, or less.
- Days Breakdown —> a bar chart splitting the period’s days into Present, Absent, each leave type taken (for example Sick Leave, Casual Leave, shown separately), Holidays, and Weekends. Only categories that actually have days in them are shown.
Hovering over either chart shows the exact number behind each slice or bar.
Good to know: this tab only shows totals and charts for the date range you’ve selected — it doesn’t include a day-by-day punch-in/punch-out list or a trend-over-time view. For individual clock-in/out records, use the main Attendance section instead.
Work Hours Tab #
Shows the schedule this employee is expected to work, pulled together from up to three different places depending on how they’re set up:
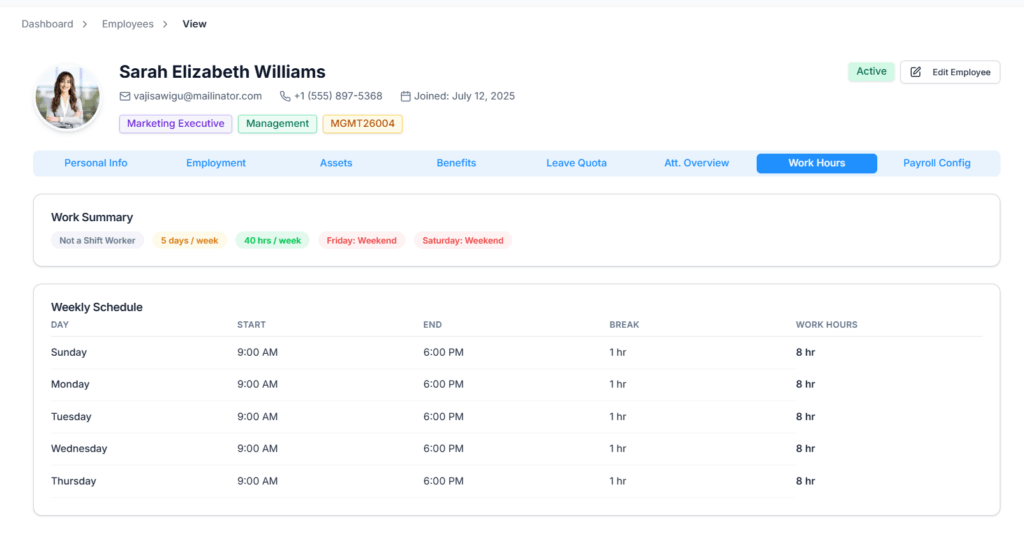
- Weekly Schedule — this employee’s own regular weekly hours, set individually for them (there’s no company-wide default schedule that employees automatically inherit — every employee has their own). Set from Employees → [row action menu] → Work Hours.
- Shift Work Schedule — for employees marked as Shift Workers, their actual assigned shifts by date, coming from the separate Work Shifts feature.
- Assigned Work Days — any extra days added on top of the regular schedule (for example, an extra Saturday), coming from the Assign Work Days feature.
Which of these you see depends on whether the employee is a Shift Worker or Non-Shift Worker.
Non-Shift Worker
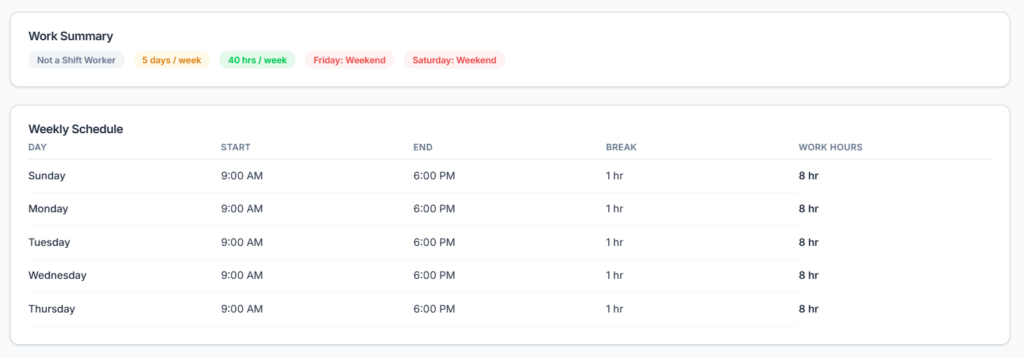
Shows:
- Work Summary
- Weekly Schedule
- Assigned Work Days, if any exist and you hold the Manage Work Hours permission
Weekly Schedule includes day, start time, end time, break duration, and work hours.
Shift Worker
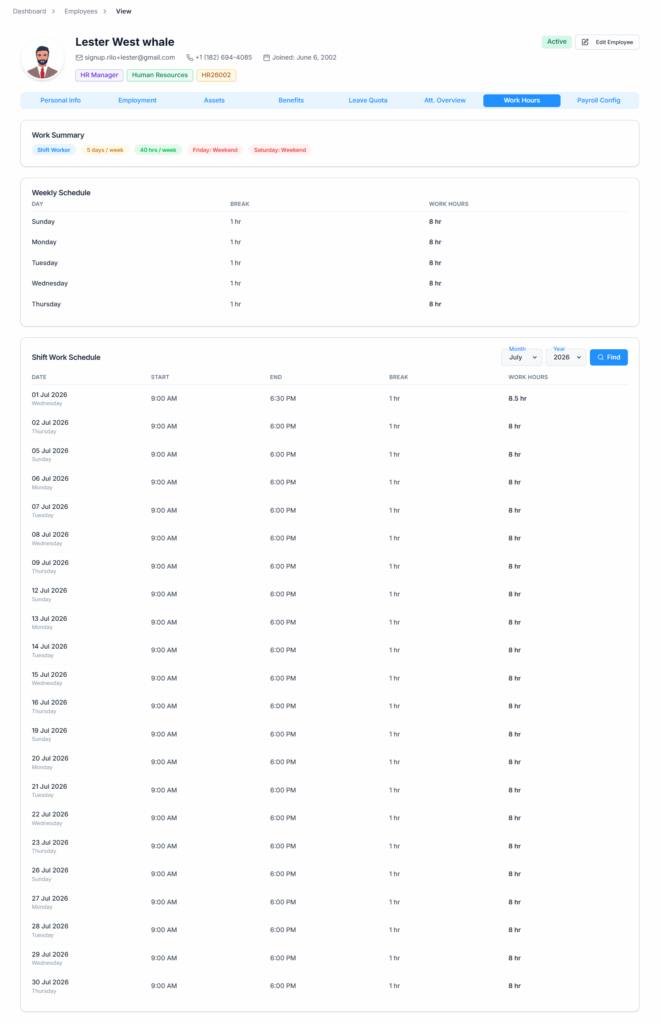
Shows Shift Work Schedule with a month and year filter (visible if you hold the View All Work Shift permission, or it’s your own schedule, or you’re the employee’s Reporting Manager).
Filter controls:
- Month
- Year
- Find
Shift schedule shows date, day name, start time, end time, break duration, and work hours.
Work hours are calculated as end time minus start time minus break duration — and if the shift crosses midnight (end time is earlier than start time), the calculation automatically accounts for the overnight wrap so the hours still come out correct.
Payroll Config Tab #
Shows payroll-related configuration assigned to the employee. This is a read-only view — it’s set from a dedicated page at Employees → [row action menu] → Payroll Config, not from here.
Includes:
- Bonus information (bonus type and amount) — shown for every company, regardless of country.
- Tax information and Work Location information — shown only for companies registered in Bangladesh. If your company is registered elsewhere, you won’t see these two sections at all, but Bonus information still shows normally.
If nothing has been configured for the employee, the tab shows: “No payroll configuration found for this employee.”
Good to know: viewing your own Payroll Config never requires any permission. Viewing someone else’s requires the Manage Payroll Config (For All) permission — without it, this tab will simply show no configuration for that employee, even if one exists.
Summary #
The View Employee Details page gathers everything about one employee into a single tabbed view. Opening it at all needs either View Employee Profiles (For All) or View Profile & Account (For Own), or being the Subscriber Admin — but a few tabs (Payroll Config, parts of Work Hours) layer an additional permission on top, so it’s possible to open someone’s profile and still see specific tabs come up empty depending on what else you hold.