
The Employee Table in Office-X provides a complete overview of everyone in the workplace. From this page you can browse the company directory, search and filter it, customize which columns you see, and — depending on what you’re allowed to do — add new employees, assign work days, manage opening balances, and act on individual employees.
Who Can Use This Feature #
Anyone who can log in to Office-X can open Dashboard → Employees and see the full company directory — every coworker’s name, photo, designation, contact details, department, reporting manager, employment status, and license indicator. There’s no permission that hides the roster itself; opening the page and seeing everyone in it doesn’t require any Employee-management permission.
Subscriber Admin additionally gets every button and every row action described below, without needing any specific permission.
What permissions actually control is what you can do from this page — which of the top buttons you see, and which actions appear in each employee’s row menu. See Permission Behavior below.
Permission Behavior
Each permission below independently unlocks one piece of this page — holding one doesn’t grant the others.
- Create Employee
Required action: Create
Shows the + Add Employee button. - Assign Work Days (For All) or Assign Work Days (For Subordinate)
Required action: any of View/Create/Update/Delete on either one
Shows the Assign Work Days button. “For All” covers every employee; “For Subordinate” limits it to employees in your reporting chain. - Manage Opening Balance (For All)
Required action: Update
Shows the Opening Balance button. - View Employee Profiles (For All)
Required action: View
Shows View in the row action menu for every employee’s row. - View Profile & Account (For Own)
Required action: View
Shows View in the row action menu, but only on your own row — it doesn’t unlock anyone else’s. - Edit Employee (For All)
Required action: Update
Shows Edit in the row action menu. - Reset Employee Password (For All)
Required action: Update
Shows Reset Password in the row action menu. - Manage Work Hours (For All)
Required action: Create
Shows the work-hours action in the row action menu. - Manage Payroll Config (For All)
Required action: Create
Shows the payroll configuration action in the row action menu. - Change Employee Status (For All)
Required action: Update
Shows Change Status in the row action menu. - Assign/Unassign Seats (For All)
Required action: Create
Shows the Assign/Unassign Seat action in the row action menu. - Bulk RM Change (For All)
Required action: Update
Shows the Change Reporting Manager button that appears once you tick the checkbox on one or more rows, letting you reassign the Reporting Manager for all selected employees at once.
Good to know: Edit, Reset Password, Work Hours, and Payroll Config only appear on a row for an employee who currently has an active license/seat assigned — this is separate from your own permissions. Even a fully-permissioned Subscriber Admin won’t see these actions on an unlicensed employee’s row; assign them a seat first (via Assign/Unassign Seat) and the actions will appear.
This permission can be assigned directly to an employee, or to an entire team at once. See the Permissions Management guide for how to assign permissions.
Access / Navigation #
To access the Employee Table:
Dashboard → Employees
After opening the route, the system displays the Employees page with search, filter, column customization, the employee table, and (where permitted) employee management actions.
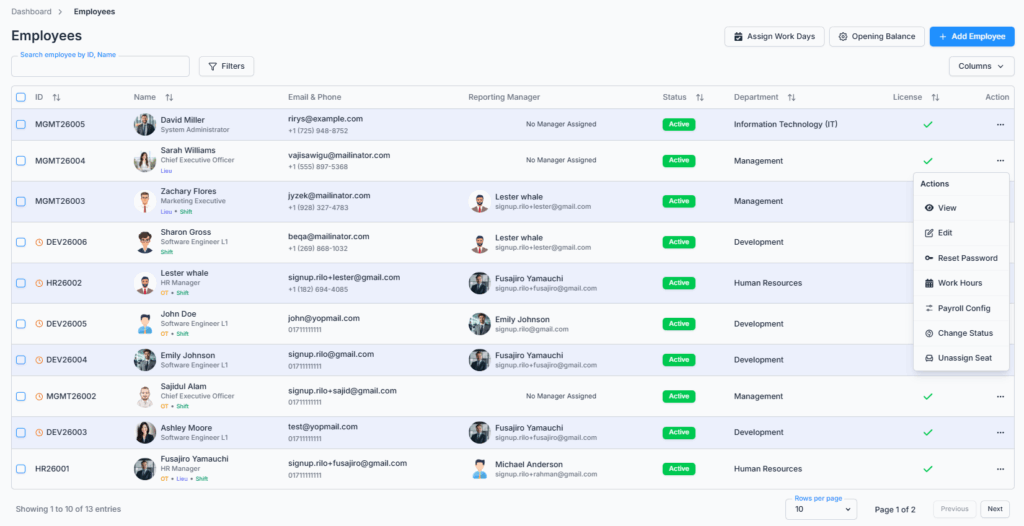
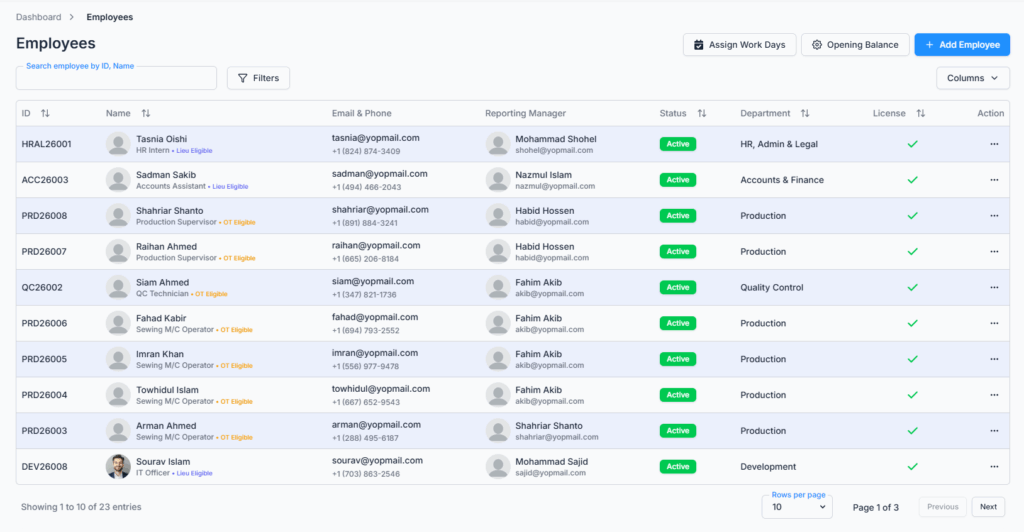
Employee Table Overview #
The employee table displays employee information in a structured list. Each row represents one employee.
The default table view includes:
- ID
- Shows the unique employee ID assigned by the system.
- Example:
HRAL26001,PRD26008,DEV26008
- Name
- Shows the employee avatar.
- Shows the employee first name and last name.
- Shows the employee designation.
- Shows eligibility badges when applicable, such as Lieu Eligible or OT Eligible.
- Email & Phone
- Shows the employee’s official email address.
- Shows the employee’s phone number.
- Reporting Manager
- Shows the reporting manager’s avatar.
- Shows the reporting manager’s name.
- Shows the reporting manager’s email address.
- Employment Status
- Shows the current employee status.
- Example: Active / Inactive
- Department
- Shows the employee’s assigned department.
- Example: HR, Admin & Legal, Production, Quality Control, Development
- License
- Shows whether the employee has an assigned license or seat.
- A checkmark indicates that the employee currently has an active license.
- Actions
- Shows the three-dot action menu for employee-specific actions.
Search Employee #
Users can search employees from the search field labeled:
Search employee by ID, Name
The employee table updates based on the entered search keyword.
Good to know: the field is labeled “Search employee by ID, Name,” but it also matches against email address — so searching an employee’s email works too, even though it isn’t mentioned in the label.
Filter Employees #
Clicking the Filters button opens the filter panel.

The filter panel allows users to narrow down employee records using specific employee-related criteria.
The filter panel includes:
- Employment Status
- Dropdown default value: Status: All
- Used to filter employees by employment status.
- Pay Type
- Dropdown default value: Pay Type: All
- Used to filter employees by assigned pay type.
- Department
- Dropdown default value: Department: All
- Used to filter employees by department.
- Eligibility Type
- Dropdown default value: Eligibility: All
- Used to filter employees by eligibility — OT + Lieu (Both), Overtime Only, Lieu Only, or None.
- Reporting Manager
- Dropdown default value: All
- Used to filter employees by their assigned reporting manager.
- Employment Type
- Dropdown default value: All
- Used to filter employees by employment type — Full-Time, Part-Time, or Contractor.
- Worker Type
- Dropdown default value: All
- Used to filter employees by worker type — Shift Worker or Regular Worker.
- This filter only appears if your company has at least one shift-worker employee set up — if no one is on a shift schedule yet, this option won’t be there.
The filter panel also includes:
- Clear All
- Resets all selected filters to their default values.
- Apply Filters
- Applies the selected filter values and updates the employee table.
- Close Icon
- Closes the filter panel.
Column Visibility #
The Columns dropdown allows users to control which columns are visible in the employee table.
The dropdown includes the following column options:
- Employee Id
- Shows or hides the employee ID column.
- Name
- Shows or hides the employee name, avatar, designation, and eligibility badge.
- Email & Phone
- Shows or hides the employee email and phone number.
- Reporting Manager
- Shows or hides reporting manager information.
- Employment Status
- Shows or hides the employee status column.
- Department
- Shows or hides the department column.
- Pay Type
- Shows or hides the employee pay type column.
- Joining Date
- Shows or hides the employee joining date column.
- Probation End
- Shows or hides the probation end date column.
- Ending Date
- Shows or hides the employee ending date column.
- Salary
- Shows or hides the salary column.
- License
- Shows or hides the license status column.
- Actions
- Shows or hides the row-level action menu column.
By default, the selected visible columns are:
- Employee Id
- Name
- Email & Phone
- Reporting Manager
- Employment Status
- Department
- License
- Actions
Optional columns that can be enabled when needed:
- Pay Type
- Joining Date
- Probation End
- Ending Date
- Salary
When a column is selected, a checkmark appears beside it. When a column is deselected, that column is hidden from the table.
Good to know: the Salary column can only ever be turned on by the Subscriber Admin — it doesn’t even appear as an option in the Columns dropdown for anyone else, regardless of what Employee-management permissions they hold (including Manage Payroll Config).
Assign Work Days #
The Assign Work Days button is available at the top-right side of the Employees page, for those who hold the permission (see Permission Behavior above).
This option is used to assign specific work days to employees when they need custom work-day schedules. See the Assign Work Days guide for details.
Opening Balance #
The Opening Balance button is available beside the Assign Work Days button, for those who hold the permission (see Permission Behavior above).
This option is used to manage employee opening balance information, such as initial balance-related setup depending on company configuration. See the Opening Balance guide for details.
Add Employee #
The + Add Employee button is used to create a new employee record, for those who hold the permission (see Permission Behavior above).
Clicking + Add Employee starts the employee creation flow, where authorized users can enter required employee information such as:
- Personal information
- Contact information
- Department
- Designation
- Reporting manager
- Employment details
- Salary or pay-related details
- License or seat assignment details
See the Adding a New Employee guide for the full step-by-step flow.
Row-Level Action Menu #
Each employee row includes a three-dot Action menu.

The available actions depend on the logged-in user’s permissions (see Permission Behavior above), and on whether the employee in that row currently has a license. Possible actions are:
- View — opens the employee’s profile.
- Edit — opens the employee’s information for editing.
- Reset Password — resets the employee’s password.
- Change Status — changes the employee’s employment status.
- Assign/Unassign Seat — manages the employee’s license/seat assignment. The label changes depending on whether the employee currently has a seat.
- Work Hours / Shift Hours — manages the employee’s work schedule.
- Payroll Config — manages the employee’s payroll configuration.
Good to know: Edit, Reset Password, Work Hours, and Payroll Config only appear on a row if that employee currently has an active license/seat assigned. If you don’t see one of these actions on a particular employee’s row even though you normally have that permission, check whether they have a seat assigned yet — assign one first via Assign/Unassign Seat, and the action will appear.
The action menu helps users perform employee-specific operations directly from the table without leaving the main Employees page.
Bulk Change Reporting Manager #
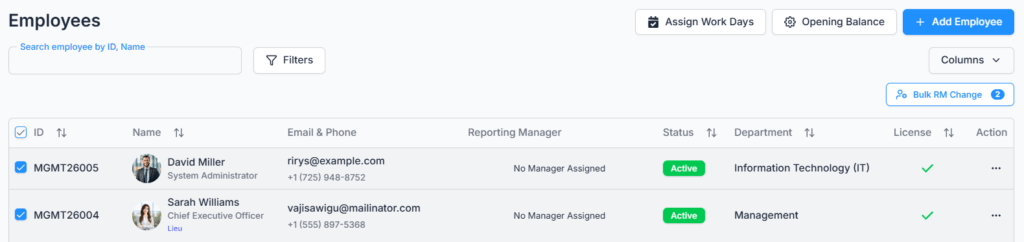
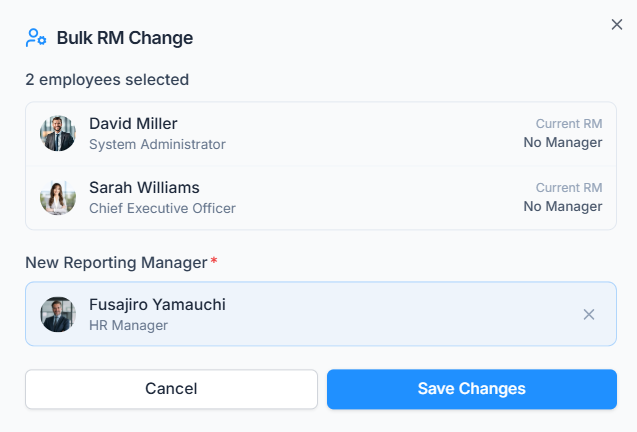
Ticking the checkbox on one or more rows reveals a Change Reporting Manager button, for those who hold the Bulk RM Change (For All) permission (see Permission Behavior above). It reassigns the Reporting Manager for every selected employee at once, instead of editing them one by one.
Summary #
The Employees page is a shared company directory — anyone with dashboard access can browse it, search it, filter it, and customize its columns. Permissions don’t restrict who’s visible in the list; they control what you can do from it: which top buttons appear (Add Employee, Assign Work Days, Opening Balance, and the bulk Change Reporting Manager button), and which actions show up in each employee’s row menu, with Edit/Reset Password/Work Hours/Payroll Config additionally requiring the employee to already have a license.