The Create Travel Request module lets employees submit business travel requests with details such as destination, travel mode, dates, and estimated costs. Authorized users can also submit travel requests on behalf of other employees.
It helps ensure travel requests include the required information and follow the company’s approval process before the trip is confirmed.
Where to Find It #
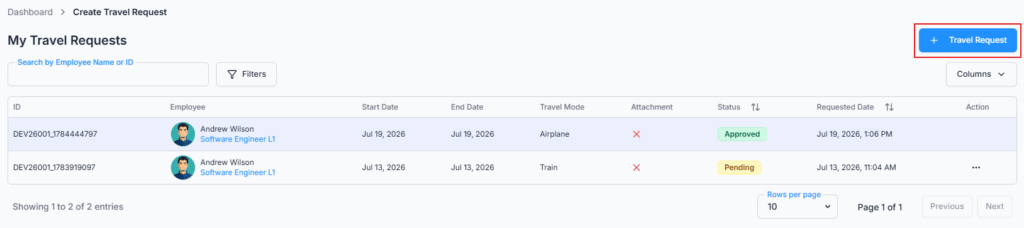
Go to Dashboard → Travel → Create. The page has two parts: a button that opens the travel request form, and below it a table of the requests you can see — your own, plus any you submitted on someone else’s behalf. Everything in this guide happens on that one page.
Related Setup and Navigation #
Before employees submit travel requests, admins should make sure the following is set up.
- Currency Setup
Route: Dashboard → Admin → Currency
Used to configure which currencies are available on the travel form, and which one is the default. - Permission Setup
Route: Dashboard → Admin → Permission → Employee Permission / Team Permission
Used to assign travel-related permissions, such as creating travel requests for yourself or on behalf of others, editing, deleting, viewing, approving, or rejecting travel requests. Please check the Permissions Management guide for a better understanding. - Approval Flow Setup
Route: Dashboard → Admin → Approval Flows
Used to configure single-step or multi-step approval workflows for travel requests. Please check the Approval Flows (Workflow Management) for a better understanding. - Create Travel Request
Route: Dashboard → Travel → Create Travel Request
Used by employees to submit travel requests for themselves, or by permitted users to submit travel requests on behalf of other employees.
Who Can Use This Feature #
Subscriber Admin can create a travel request for any employee in the company, at any time, without needing any specific permission.
Employees need permission even to submit a travel request for themselves — this isn’t automatic just from being an employee. Submitting a travel request on behalf of someone else requires a separate permission on top of that.
Permission Behavior
Two permissions control who can create a travel request at all, and for whom:
- Create Travel Request (For Own)
Required action: Create
Required just to submit a travel request for yourself. Without this, the Create Travel Request option won’t appear at all — not even to request your own travel. - Create Travel Request (For Others)
Required action: Create
Shows the Search Employee field in the Create Travel Request form, letting you pick another employee and submit the request on their behalf instead of your own. This is on top of, not instead of, Create Travel Request (For Own).
Without Create Travel Request (For Others), the Search Employee field doesn’t appear, and the form can only submit a travel request for yourself (assuming you hold Create Travel Request (For Own)).
Good to know: The Create Travel Request permissions only control who can create a travel request. They do not give permission to edit, delete, or view its details.
Editing and deleting a request created on behalf of someone else require separate permissions: Edit Travel Request (For On Behalf) and Delete Travel Request (For On Behalf). To open and view the details of a travel request, the user also needs View Travel Request Details permission. These permissions only apply to the requests they are allowed to access, not to every travel request in the company.
Beyond creating a travel request, several other permissions control the rest of the travel lifecycle, each covered in the section of this guide (or a related guide) where that action is explained:
- Edit Travel Request (For Own) / Edit Travel Request (For On Behalf) — see Edit Travel Request below.
- Delete Travel Request (For Own) / Delete Travel Request (For On Behalf) — see Delete Travel Request below.
- View Travel Request Details — To open and view the details of a travel request, the employee also needs the View Travel Request Details permission.
All of these permissions can be assigned directly to an employee, or to an entire team at once (so everyone on that team inherits them). See the Permissions Management guide for how to assign permissions.
Create Travel Request Form #
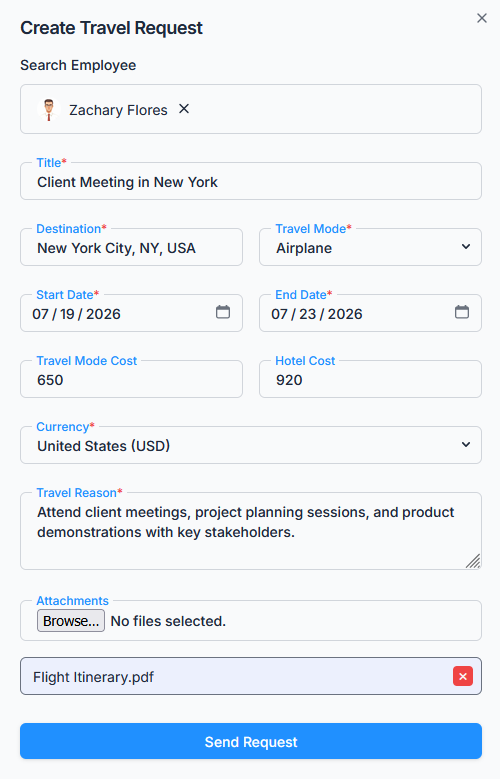
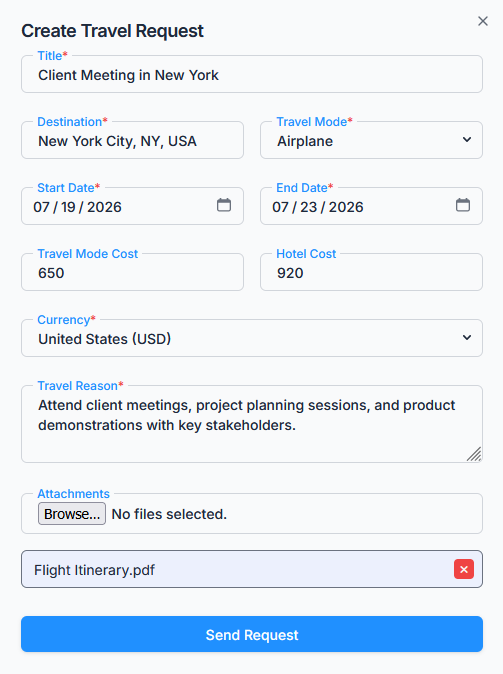
The form includes the following fields:
- Search Employee
Appears only for users with Create Travel Request (For Others) permission (or the Subscriber Admin). Used to select another employee when creating a travel request on behalf of someone else. - Title
A short title describing the travel (e.g., “Client Visit – Dhaka Branch”). Limited to 100 characters. - Destination
The city or location of travel. Limited to 200 characters. - Travel Mode
Select the type of travel: Airplane, Train, Bus, Car, or Other. - Start Date / End Date
Select the travel period. The Start Date can’t be in the past — it must be today or later — and the End Date can’t be earlier than the Start Date. - Travel Mode Cost
The transportation cost. Optional (defaults to 0), can’t be negative, and can’t exceed 9,999,999. - Hotel Cost
Optional accommodation cost, with the same limits as Travel Mode Cost — can’t be negative, can’t exceed 9,999,999. - Currency
Select the applicable currency, from the currencies configured under Dashboard → Admin → Currency. Defaults to your company’s default currency, but can be changed per request. - Travel Reason
State the purpose of the travel. Limited to 500 characters. - Attachments
Upload tickets, bookings, or other travel documents — up to 5 files per request. Each file must be a JPG, PNG or PDF and no larger than 2 MB. A file outside those rules is refused as you pick it, with a short message saying why, so check the size before uploading a screenshot or a phone photo of a ticket. - Submit
Sends the travel request for approval.
Tip: Admins or authorized users can create travel requests for other employees, making it ideal for HR or travel coordinators managing multiple team trips.
Approval Flow Assignment #
If your organization has an approval flow configured for travel requests (from Dashboard → Admin → Approval Flows), every submission follows that workflow before final approval. The applicable flow is chosen based on the employee, their team, gender, department, or designation — the same criteria used for other approval-based modules in Office-X.
Good to know: Travel approval flows can include exceptions, so you can create one company-wide flow and exclude specific employees from it. Only active flows are used. If no active flow applies to an employee, the travel request is still created as Pending and goes directly to the Subscriber Admin. If an approval step is assigned to the Reporting Manager but the employee has no Reporting Manager, the Subscriber Admin is notified instead, so the request does not get stuck.
A travel request follows the configured approval flow step by step. Each approval moves the request to the next step, and it becomes Approved only after the final step is approved. If any approver rejects it, the request is Rejected immediately. The Subscriber Admin can also act on any currently pending step.
What Happens After Submission? #
After a travel request is submitted successfully:
- The travel request status becomes Pending.
- If an approval flow applies, the first step’s approver(s) are notified (in-app and/or by email, depending on how that step is configured). If no flow applies, the Subscriber Admin is notified instead.
- The employee whose travel it is always receives a confirmation email, separately from whatever goes to approvers.
- The travel request appears in the employee’s travel request list.
Finding Your Travel Requests #
The table below the button is where you track what you have submitted. Each row shows the ID, Employee, Start Date, End Date, Travel Mode, Attachment (a tick or cross, not a download link), Status, Requested Date, and the Action menu (View, Edit, Delete — whichever are available to you). Newest requests come first.
To narrow it down:
- Search — type an employee name or a Request ID.
- Filters — the Filters button opens Status (All, Pending, Approved, Rejected), Travel Mode and a Requested Date From/To range. The button shows how many filters are active, each appears as a small badge, and Clear removes them all at once.
- Columns — hide any columns you do not need so the table fits your screen.
- Pages — 10 rows per page by default, switchable to 20 or 30, with a “go to page” box for long lists.
Action Options (Permission-Based) #
All actions are controlled by user permissions:
Edit Travel Request #
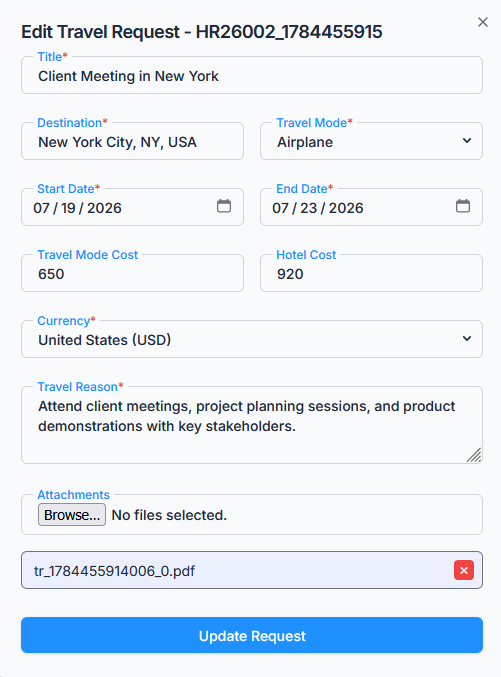
A travel request can be edited only while its status is Pending. Approved or rejected travel requests cannot be edited.
- Subscriber Admin can edit any pending travel request in the company.
- Users with Edit Travel Request (For Own) permission can edit their own pending travel requests.
- Users with Edit Travel Request (For On Behalf) permission can edit a pending travel request only if they personally created it on that employee’s behalf in the first place — not just any employee’s request.
When editing, you can add or remove attachments, still capped at 5 in total.
Delete Travel Request #
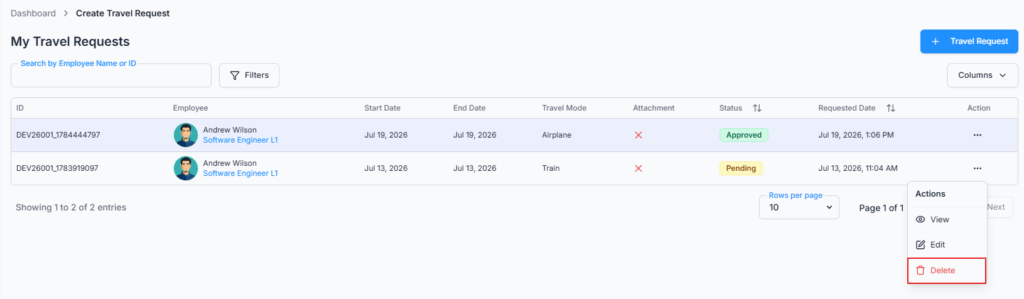
A travel request can be deleted only while its status is Pending. Approved or rejected travel requests cannot be deleted.
- Subscriber Admin can delete any pending travel request in the company.
- Users with Delete Travel Request (For Own) permission can delete their own pending travel requests.
- Users with Delete Travel Request (For On Behalf) permission can delete a pending travel request only if they personally created it on that employee’s behalf in the first place — same rule as editing.
Deleting a travel request also removes its uploaded attachments and any comments (along with their attachments) on that request.
View Travel Request #
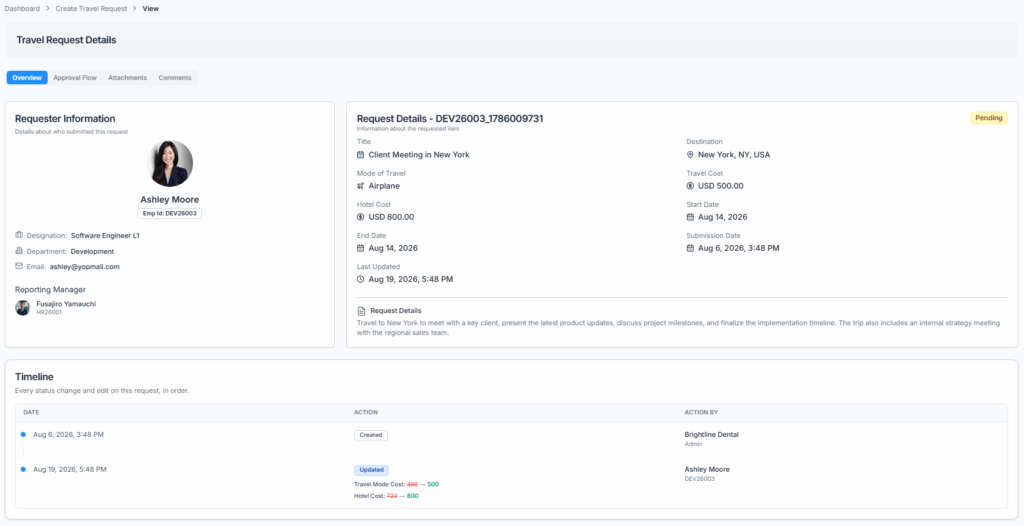
Users with the required access can open the travel request’s details page to review the full information — request details, attachments, approval flow, and comments.
The details page also carries a Timeline — a plain Date / Action / Action By table of everything that has actually happened to this request, in date order: Created (and who filed it, which matters when a travel coordinator submitted it for you), any edits with the exact fields that changed from old value to new value, and every approval or rejection with the person who did it. If you ever need to answer “who changed these dates, and when?”, the Timeline is where to look.
Comments #
Users can use comments to communicate with approvers — to ask for clarification, provide additional information, or explain a decision — with up to 5 file attachments per comment (same rules as the request’s own attachments: JPG, PNG or PDF, 2 MB each).
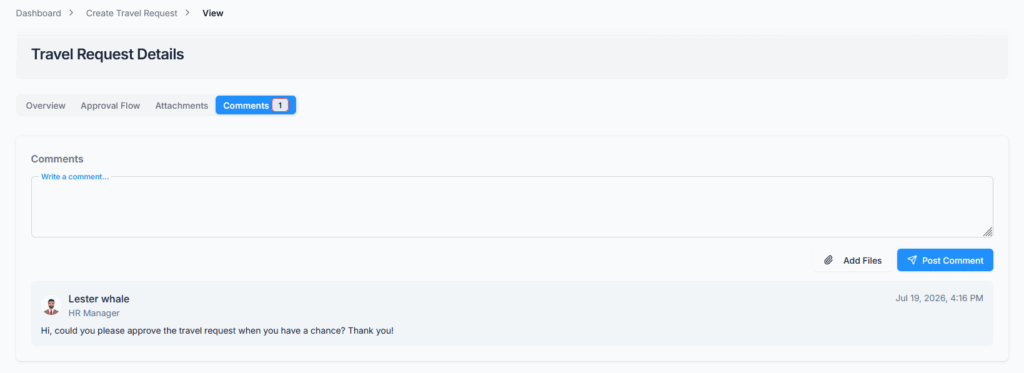
Who can comment: the requester, the requester’s reporting manager, the Subscriber Admin, any approver named in the travel request’s approval flow, or anyone holding View Travel Request Details permission.
How long you can comment: only while the travel request is still Pending. As soon as it becomes Approved or Rejected, commenting closes — comments made while it was still pending remain visible afterward.
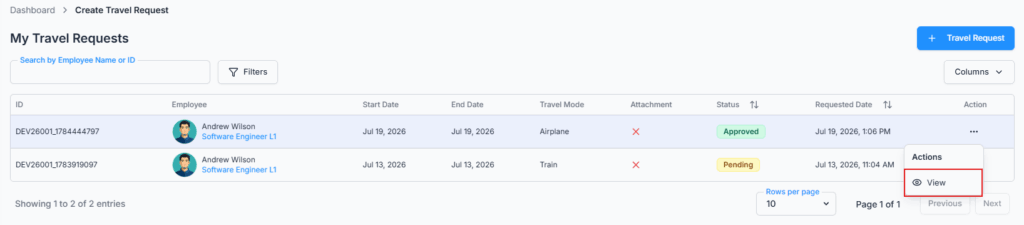
Approved or rejected travel requests cannot be edited or deleted.
Your Daily Routine #
Requesting a business trip, start to finish:
- Go to Dashboard → Travel → Create and open the travel request form.
- If you are filing for someone else, pick them in Search Employee first.
- Give it a clear Title and a Destination — this is what approvers see in their list.
- Pick the Travel Mode and set the Start Date and End Date. The start date cannot be in the past, so raise the request before the trip rather than after it.
- Enter the Travel Mode Cost and Hotel Cost if you know them (both optional), and check the Currency.
- Explain the purpose in Travel Reason, attach any tickets or bookings under 2 MB each, then click Submit.
- Find the new row in the table below and watch the Status column. While it is still Pending you can edit it, delete it, or add a comment.
Good to know: submit travel requests early. Because the start date cannot be in the past, a trip that has already begun cannot be entered afterwards — and once the request is Approved or Rejected it can no longer be edited or commented on.
Notifications and Activity Log #
- You (or the employee the request belongs to) get a confirmation email as soon as it is created, an update each time it clears a step, and a final notice once it is Approved or Rejected.
- The approvers whose turn it is get their own notice asking them to act — in-app, by email, both, or neither, depending on that step’s switches in the approval flow.
- If no approval flow covers the employee, only the Subscriber Admin is told, and only in-app.
- Notification emails link straight to the specific request, so you do not have to hunt for it in the list.
Activity Log: creating, editing, deleting, approving and rejecting a travel request are all recorded in Dashboard → Activity Log, along with who did it and when. Comments are recorded too. So even if a request is later deleted, the fact that it existed and who removed it stays traceable.
Summary #
The Create Travel Request module ensures employees can submit travel requests accurately and in accordance with company policy. Permission-based access — including the base permission just to create a travel request for yourself — allows authorized users to create, edit, or delete travel requests for others while maintaining control, traceability, and accountability. Pending requests can be edited, deleted, or commented on based on permission, while approved and rejected requests are protected from further changes.
Note: If your organization has an approval flow configured for travel requests, all submissions will follow the defined workflow before final approval — see the Approve & Reject Travel Request guide for exactly how that works.
