
Overview #
The Approval Flow module, also known as Workflow Management, helps your organization manage requests through a structured approval hierarchy.
With Office-X, you can create approval workflows dynamically, from simple one-step approvals to complex multi-step approval chains. These workflows help ensure that every request goes to the right approver and follows the correct approval process.
You can create approval flows for exactly four request types — one feature per flow:
- Leave Requests
- Bill Approvals
- Purchase Requests
- Travel Requests
Video Guide #
You can watch the video guide here:
What You Can Do #
With Approval Flow, you can:
- Create approval workflows for different request types.
- Define who the approval flow applies to.
- Define who should be excluded from the flow.
- Configure step-by-step approval hierarchy.
- Assign approvers dynamically.
- Send in-app notifications and emails to approvers.
- Route requests automatically across multiple approval levels.
- Allow selected Leave Request approvers to cancel already approved leave when required.
Supported Features #
You can create approval flows for:
- Leave Requests – Employee leave applications.
- Bill Approval – Bill or payment approvals.
- Purchase Requests – Purchase order approvals.
- Travel Requests – Travel expense approvals.
Note: The Can Cancel Approved Leave option is available only when the selected feature is Leave Request.
Who Can Use This Feature #
Subscriber Admin can create, view, edit, and delete approval flows for their company.
Good to know: unlike most other features in Office-X, Approval Flow has no delegable permission at all — there’s nothing to grant here from Admin → Permission, not even View-only. Regular employees can never access Admin → Approval Flow no matter what permissions they’re given; managing approval flows is Subscriber Admin only.
Access Approval Flow #
To open Approval Flow:
- Log in to Office-X.
- Go to Admin.
- Open Approval Flow.
- Click Add New Flow to create a new approval workflow.
Navigation path:
Admin → Approval Flow → Add New Flow
How the Approval Flow Works #
Creating an approval flow follows a guided 5-step process:
- Select Feature
- Applicability
- Exceptions
- Approval Steps
- Review & Create
Step 1: Select Feature #
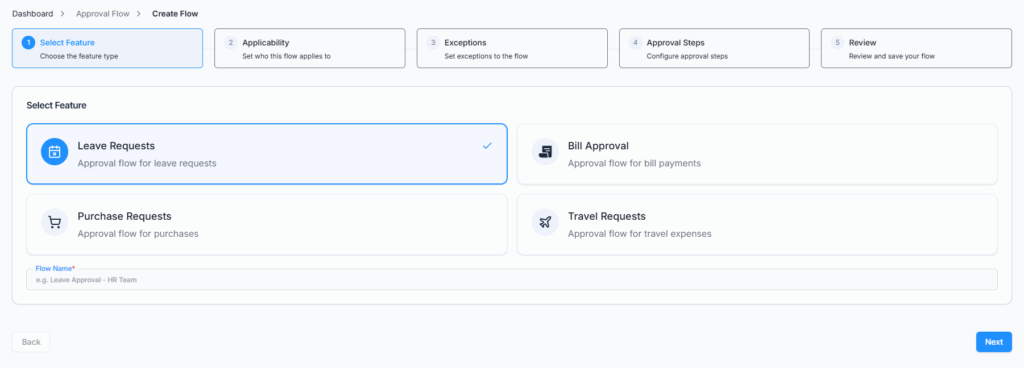
In this step, select the request type for which you want to create the approval flow, and give the flow a name.
Available features:
- Leave Requests
- Bill Approval
- Purchase Requests
- Travel Requests
Only one feature can be selected per approval flow, and both the feature and a flow name are required before you can continue.
Step 2: Applicability #
In this step, define who this approval flow applies to.
You can apply the flow based on:
- Gender
- Department
- Designation
- Team
- Individual Employee
Important: Office-X does not actually block you from leaving this step empty and moving on — there’s no “at least one rule required” error. But a flow saved with no applicability rules at all won’t match any employee’s requests, so it will sit there having no effect. Always set at least one rule here so the flow actually applies to someone.
Step 3: Exceptions #
In this step, define who should be excluded from the approval flow. This step is entirely optional.
Exception types available (the same five as Applicability):
- Gender
- Department
- Designation
- Team
- Employee
If a user matches both Applicability and Exceptions, the Exception rule takes priority — they are excluded from the flow entirely, regardless of how they match Applicability.
Step 4: Approval Steps #
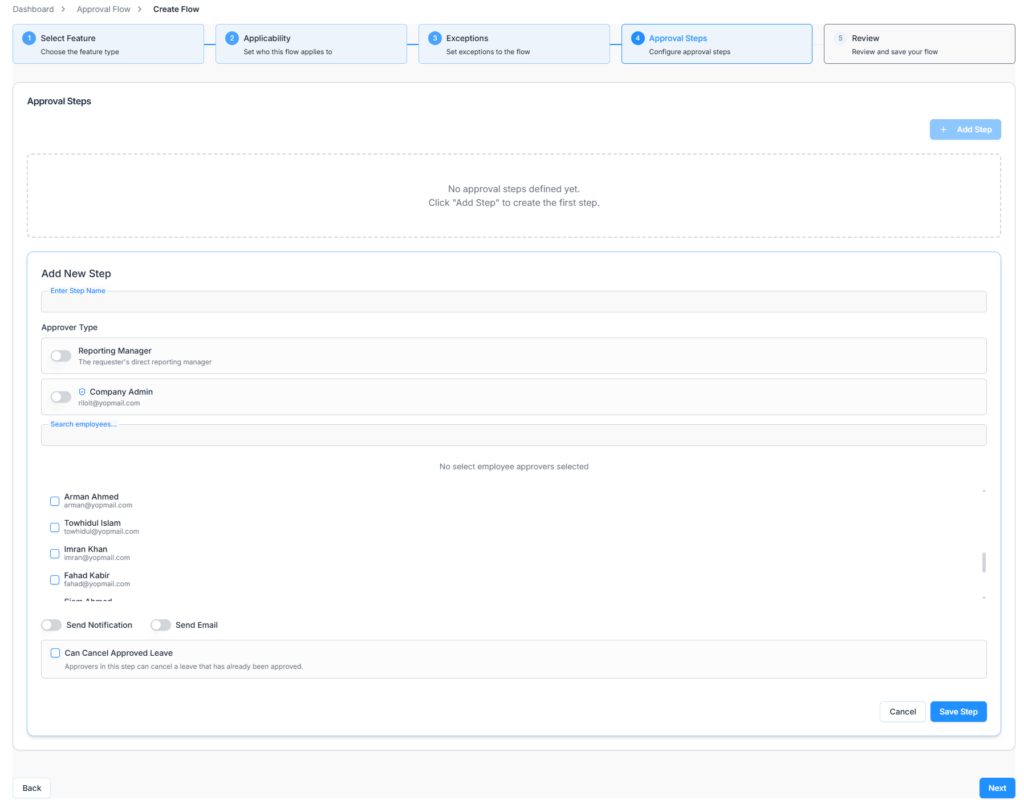
In this step, define the approval hierarchy step by step. At least one approval step is required before you can finish.
Each approval step includes:
- Step Name
- Approver Type
- Notification settings
- Email settings
- Leave cancellation eligibility, only for Leave Request flows
Add Step Name #
Enter a clear step name that explains the purpose of the approval step. This is required.
Select Approver Type #
You can select who will approve the request in each step. Available approver types:
Approver Types #
- Select Employees: Search and manually choose one or more employees as approvers for this step.
- Reporting Manager: Select this option when the requester’s direct Reporting Manager should approve the request. When selected, Office-X automatically routes the request to the requester’s Reporting Manager.
- Company Admin: Select this option when the company-level admin should approve the request.
These three options are mutually exclusive — choosing one hides the other two for that step. Selecting Reporting Manager or Company Admin clears out any employees you’d already picked, and picking any employee clears out Reporting Manager/Company Admin. Exactly one approver type must be set per step before you can save it.
Send Notification #
Enable Send Notification when you want the approver to receive an in-app notification for the approval request.
If enabled:
- The approver receives an in-app notification.
- The notification helps the approver quickly identify pending approval work.
Send Email #
Enable Send Email when you want the approver to receive an email notification for the approval request.
If enabled:
- The approver receives an email about the request.
- The email helps ensure the approver is informed even when they are not actively using the system.
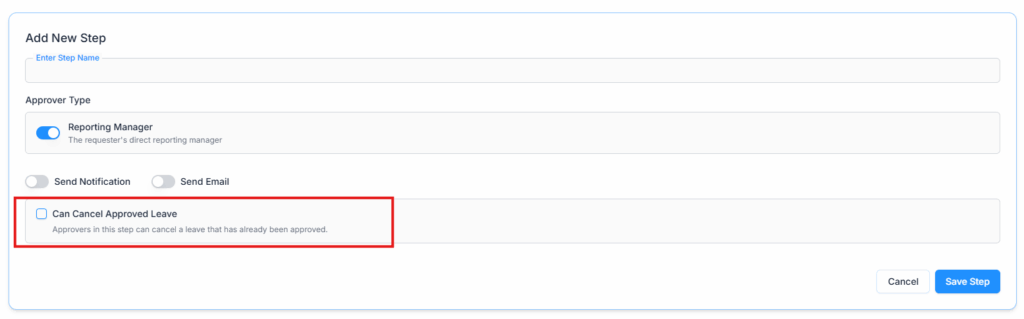
Can Cancel Approved Leave #
The Can Cancel Approved Leave option appears only when the selected feature is Leave Request.
This option allows approvers in that specific approval step to cancel a leave request after it has already been approved.
Enable this option when the approver in the step should have authority to cancel approved leave.
If this option is disabled, approvers in that step can approve or reject the leave request based on the normal approval process, but they cannot cancel an already approved leave.
Important Notes #
- This option is available only for Leave Request approval flows.
- This option does not appear for Bill Approval, Purchase Requests, or Travel Requests.
- The option applies only to the approver or approvers configured in that specific step.
- A user must still be an eligible approver for that step to cancel approved leave.
Multi-Step Approval Flow #
You can add one or multiple approval steps. Approval steps are executed sequentially. A request moves to the next step only after the current step is approved.
Step 5: Review & Create #
Before saving the approval flow, the system displays a full summary.
The summary includes:
- Selected feature
- Applicability rules
- Exception rules
- Approval steps
- Approver types
- Notification settings
- Email settings
- Can Cancel Approved Leave setting, if the feature is Leave Request
Review the details carefully before creating the approval flow — as noted in Step 2, an empty Applicability list will save successfully but won’t route anything.
Click Create Approval Flow to save the workflow.
After Creating an Approval Flow #
After an approval flow is created, it appears in the Approval Flow list.
From the list, authorized users can:
- View workflow details
- Edit workflow rules or steps
- Delete the approval flow
View Approval Flow #
Use View to review the full workflow in read-only mode.
The details page shows:
- Feature
- Applicability rules
- Exception rules
- Approval steps
- Approver information
- Notification and email settings
- Can Cancel Approved Leave setting for Leave Request flows
Edit Approval Flow #
Use Edit to update an existing approval flow.
You can modify:
- Applicability rules
- Exception rules
- Approval steps
- Approver type
- Notification settings
- Email settings
- Can Cancel Approved Leave setting, if the feature is Leave Request
Important: Editing an approval flow does not affect requests that are already in progress. When a request is submitted, Office-X saves its own copy of that flow’s approval steps onto the request itself — so updated rules apply only to new requests submitted after the edit, and nothing changes retroactively for requests already awaiting approval.
Delete Approval Flow #
Use Delete to remove an approval flow when it is no longer needed. Before deleting, make sure the flow is not required for future requests.
Important: Deletion is immediate and permanent — there’s no confirmation warning about existing requests, and no built-in check for whether the flow is still relevant. Existing in-progress requests are unaffected either way (they already carry their own frozen copy of the approval steps, per the note above), but if you delete a flow that new requests still need, those new requests simply won’t match any approval flow going forward — so double-check before deleting.