
The Create Leave Request module allows employees to submit leave requests for themselves. Permitted users, such as HR or managers, can also create leave requests on behalf of other employees when they have the required permission — and the employee being requested for must be an active, licensed employee.
This module helps ensure that leave requests are submitted correctly based on employee work schedules, leave type rules, leave balance, attendance records, holidays, and approval flow configuration.
Related Setup and Navigation #
Before employees submit leave requests, admins should make sure the required setup is completed.
- Leave Type Setup
Route: Dashboard → Admin → Leave Type
Used to create and manage leave types such as Casual Leave, Sick Leave, Annual Leave, or Lieu Leave. Leave type rules such as past leave limit and future leave limit are configured from here. Please check the Admin module → Leave Type for a better understanding. - Permission Setup
Route: Dashboard → Admin → Permission → Employee Permission / Team Permission
Used to assign leave-related permissions, such as creating leave on behalf of others, editing leave, deleting leave, viewing leave, approving leave, or rejecting leave. Please check the Permissions Management for a better understanding. - Approval Flow Setup
Route: Dashboard → Admin → Approval Flows
Used to configure single-step or multi-step approval workflows for leave requests. Approval flow decides who will review and approve the leave request. Please check the Approval Flows (Workflow Management) for a better understanding. - Work Schedule Setup
Route: Dashboard → Employees → Employee Table → Action Menu → Work Hours
Used to set an employee’s working days, working hours, break time, and shift-related schedule. Employees cannot request leave if their work schedule is not set. Please check the Work Hours/Shift Hours for a better understanding. - Attendance Records
Route: Dashboard → Attendance
Used to track employee check-in, check-out, worked hours, and attendance status. Attendance records are checked when creating leave to prevent conflicts. - Create Leave Request
Route: Dashboard → Leave → Create Leave Request
Used by employees to submit leave requests for themselves or by permitted users to create leave on behalf of other employees.
Who Can Use This Feature #
Subscriber Admin can create a leave request for any employee in the company, at any time, without needing any specific permission.
Employees can always create leave requests for themselves. Creating a leave request on behalf of someone else requires permission.
Permission Behavior
One permission controls creating leave on someone else’s behalf:
- Create Leave Request (For All)
Required action: Create
Shows the Search Employee field in the Create Leave Request form, letting you pick another employee and submit the request on their behalf instead of your own.
Without this permission, the Search Employee field doesn’t appear at all, and the form can only submit a leave request for yourself.
Good to know: Subscriber Admin never needs Create Leave Request (For All) — that requirement only applies to regular employees.
Good to know: this permission only controls creating a request on someone’s behalf — it has no effect on editing or deleting one afterward. Editing and deleting a request created on behalf of someone else are each controlled by their own separate permission (Edit Leave Request (For On Behalf), Delete Leave Request (For On Behalf)), covered later in this guide, and those only ever apply to requests you personally created — not to every employee’s leave in general.
This permission can be assigned directly to an employee, or to an entire team at once (so everyone on that team inherits it). See the Permissions Management guide for how to assign permissions.
Create Leave Request Form #
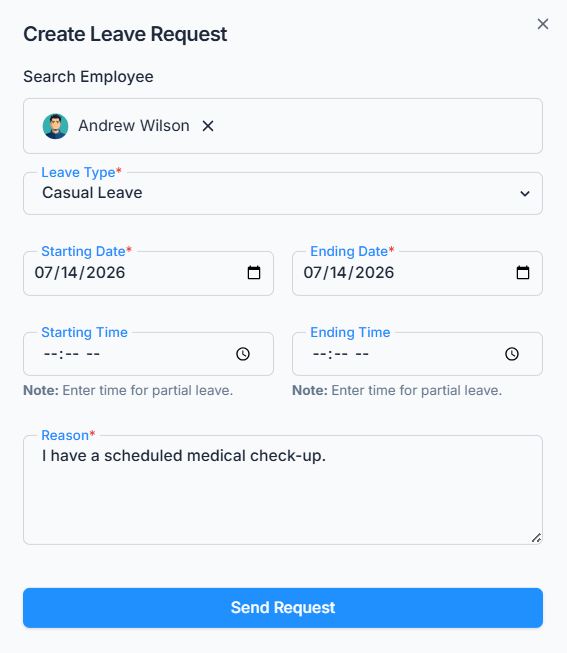
The form includes the following fields:
- Search Employee
Appears only for users with Create Leave Request (For All) permission (or the Subscriber Admin). This is used to select another employee when creating leave on behalf of someone else. - Leave Type
Displays leave types configured by the admin from Dashboard → Admin → Leave Type. - Lieu Leave
The Lieu Leave type is available for selection if the employee is eligible (In Employee Add/Edit, you’ll see the “Eligible for Lieu Off” option) for it — this depends on their eligibility setting, not on whether they currently have any Lieu hours banked, so an eligible employee with zero Lieu hours will still see the option (and would then be blocked at submission if they try to request more hours than they’ve actually earned — see Leave Balance Rules below). Once Lieu Leave is selected, the Starting/Ending Date fields won’t let you pick a date earlier than the day after your Lieu hours became available — you can’t back-date a Lieu Leave request to before you actually earned the hours.
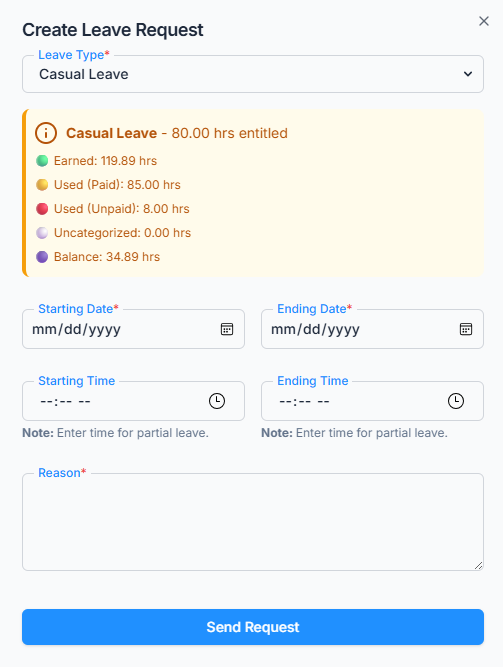
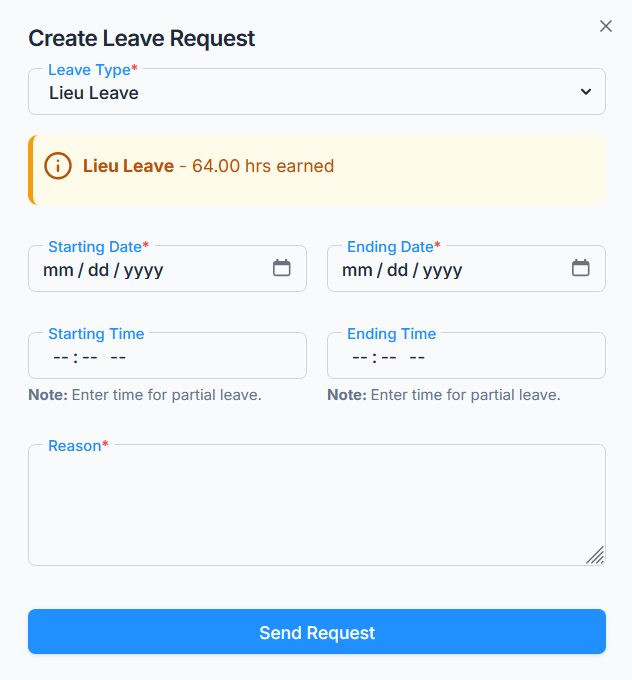
- Leave Balance & Calculation
This section is displayed only when a regular employee creates a leave request for themselves — it’s hidden for the Subscriber Admin and for anyone using the Search Employee field to create leave on someone else’s behalf. It’s recalculated live every time the form is opened, so the numbers always reflect today. What it shows depends on the leave type:- For Lieu Leave, it simply shows the total hours earned so far.
- For every other leave type, it shows the fuller breakdown:
- Entitled leave hours or days — the hours set in Employee Add/Edit → Leave Entitlements for this leave type. This is the full yearly amount exactly as configured — nothing is prorated at this stage yet.
- Earned leave — the portion of that entitlement earned so far, based on joining date. Office-X grows this a little every single day rather than crediting it all at once: it takes the entitled hours, divides by 365, and multiplies by the number of days since the employee’s joining date. This daily accrual applies the same way whether or not the employee is currently in a probation period.
- Used paid leave — hours from this employee’s fully approved leave requests of this type that have been paid out of their earned balance. Pending requests don’t reduce this figure yet.
- Used unpaid leave — the portion of approved leave that went beyond what the employee had actually earned at the time, so it’s recorded as unpaid instead of being deducted from the paid balance.
- Remaining balance — Earned leave minus Used paid leave (and minus Uncategorized hours, if any — see below). This never shows as a negative number: once usage catches up with and passes what’s been earned, the shortfall is reflected in Overused hours instead of a negative balance here.
- Overused hours, if applicable — how far total approved usage (paid, unpaid, and Uncategorized combined) has gone beyond what’s been earned so far. This line only appears once that amount is greater than zero.
- For companies with payroll enabled, an additional Uncategorized figure may also appear alongside the breakdown above — this is approved leave of this type that hasn’t been run through a payroll cycle yet, so Office-X can’t yet say whether it will ultimately count as paid or unpaid. It’s held here separately so it isn’t counted twice, and it clears into Used paid or Used unpaid once payroll processes it.
- Starting Date / Ending Date
Used to select the leave period. - Starting Time / Ending Time
Used for partial-day leave requests, remains empty for full-day leave requests. - Reason
Explanation for the leave request. - Send Request
Submits the leave request for approval.
Work Schedule Requirement #
Employees cannot request leave if their work schedule is not set.
Work schedule can be managed from:
Dashboard → Employees → Employee Table → Action Menu → Work Hours
If the employee does not have a work schedule, the system blocks the request and shows a message explaining that the work schedule must be set before requesting leave.
Leave Date Rules #
The system validates the selected leave dates before creating the request.
- The Starting Date cannot be later than the Ending Date.
- Past leave requests are allowed only if the selected leave type allows past leave (checked against the Starting Date).
- Future leave requests are allowed only if the selected leave type allows future leave (checked against the Ending Date).
- Each leave type can define how many days back or ahead an employee can request leave.
Leave type date rules can be configured from:
Dashboard → Admin → Leave Type
For example:
- If past days is set to
0, past leave is not allowed for that leave type. - If past days is set to
5, the employee can request past leave only up to 5 days back. - If future days is set to
0, future leave is not allowed for that leave type. - If future days is set to
30, the employee can request future leave only up to 30 days ahead.
Working Day and Holiday Rules #
Leave can be requested only for valid working days.
The system checks the employee’s work schedule and work assignments to decide whether leave can be taken on a selected date.
Leave is allowed for:
- Regular working days based on the employee’s work schedule
- Assigned work days for employees (From employees -> Assign Work Days)
- Partial leave on a day where the employee has already worked, if remaining shift hours are still available
Leave is not allowed for:
- Weekends or non-working days, unless a work assignment exists for that day
- Public holidays, unless a work assignment exists for that holiday
- Days where the employee already worked the full scheduled hours
Good to know: the weekend/non-working-day and public-holiday checks above only look at the Starting Date. So a multi-day leave that starts on a normal working day is never blocked just because a holiday or non-working day falls somewhere in the middle of the range — but see Leave Hours Calculation below for how those in-between days actually affect the hours you’re credited.
Attendance Conflict Rules #
Attendance records are checked from the employee’s attendance data.
Attendance can be reviewed from:
Dashboard → Attendance
This check only looks at the Starting Date of the leave request. If the employee already has attendance recorded (checked in and checked out) on that date, the system checks how many hours the employee has already worked.
The employee can request leave only for the remaining available hours of that day.
For example, if the scheduled working time is 8 hours and the employee already worked 5 hours, they can request leave for a maximum of 3 hours for that day.
Leave Balance Rules #
Leave balance is calculated based on the employee’s entitlement, joining date, used leave, and company rules.
For regular leave types, the system allows the request even if the employee exceeds the earned balance. The exceeded hours may be treated as unpaid leave based on company rules.
For Lieu Leave, the system checks the employee’s available Lieu Leave balance before creating the request. Employees must first be eligible for Lieu Leave, and their Lieu Leave hours must be approved through Attendance to build an available balance. If the requested Lieu Leave hours exceed the available balance, the request is blocked. Lieu Leave hours are only actually deducted once the request is fully approved — see Payroll and Leave Balance Impact below.
Overlap Restriction #
An employee cannot create a new leave request if they already have a pending or approved leave request within the same date range. Rejected and cancelled leave requests don’t count, so they never block a new request for the same dates.
If an overlapping leave exists, the system prevents duplicate leave requests for the same period.
Leave Hours Calculation #
The system calculates leave hours automatically based on the selected date and time range.
During calculation, the system goes day by day across your selected range and:
- Counts only valid working days
- Skips weekends or non-working days
- Skips every public holiday that falls inside the range, unless the employee has a work assignment for that day
- Uses work assignment hours for assigned shift days
- Uses regular schedule hours for normal workdays
- Calculates partial-day leave correctly using the selected start and end time
- Excludes break time where applicable
The calculated leave hours are saved with the leave request.
Approval Flow Assignment #
Approval flow can be configured from:
Dashboard → Admin → Approval Flows
After the leave request passes all validations, the system assigns the correct approval flow.
The approval flow may be selected based on:
- Employee
- Team
- Gender
- Department
- Designation
Good to know: when an approval flow is scoped to a Team, that also includes teams set up as “all employees” or “all reporting managers” (configured under Admin → Teams) — so a Team-based approval flow can automatically cover everyone in one of those dynamic teams, not just teams with a manually picked member list.
Once the approval flow is assigned, the leave request is saved with Pending status.
The first-step approvers receive notifications and, if enabled for that step, email alerts.
Important — if no approval flow matches: the leave request is still created and saved as Pending, and the Subscriber Admin gets an in-app notification about it — but the request has no assigned approver. In this situation, only the Subscriber Admin can approve or reject it; any employee holding Approve/Reject Leave permission is blocked from acting on it. Make sure every employee is covered by an approval flow to avoid requests getting stuck this way.
What Happens After Submission? #
After a leave request is submitted successfully:
- The leave request status becomes Pending.
- The request is sent to the first approver in the approval flow.
- The approval workflow is saved with the request, as a snapshot — later changes to the approval flow’s setup won’t retroactively change how this specific request gets approved.
- Notifications (and, if enabled, emails) are sent to the first-step approvers.
- The employee whose leave it is always receives a confirmation email, separately from whatever goes to approvers.
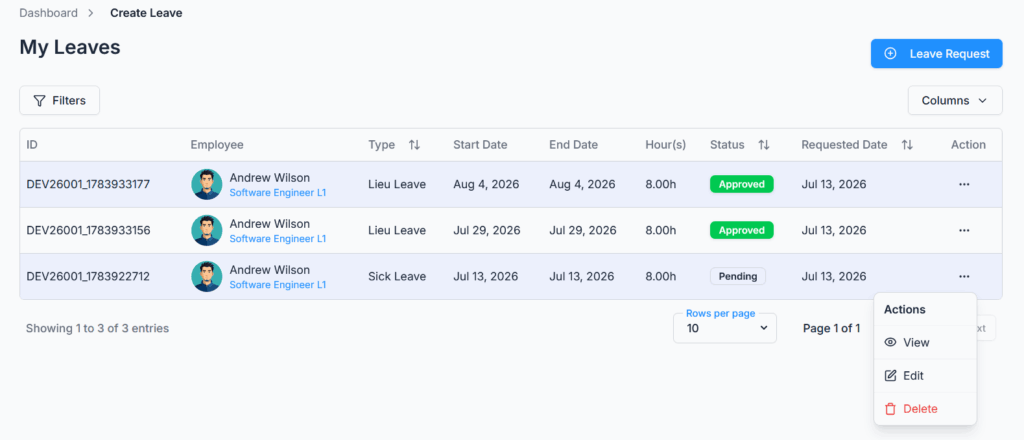
- The leave request appears in the employee’s leave request list.
- Every leave request is given its own Request ID, shown as an “ID” column wherever leave requests are listed and in the request’s own detail view. Notification emails also link straight to that specific request instead of just the general leave list.
If the organization uses a multi-step approval flow, the request moves step by step until all required approvers approve it. Nobody can approve or reject their own leave request, even in the unusual case where they’d technically qualify as an approver (for example, being their own reporting manager) — that action is always blocked for the person the leave belongs to.
Action Options #
Available actions depend on the leave status, the logged-in user, and user permissions.
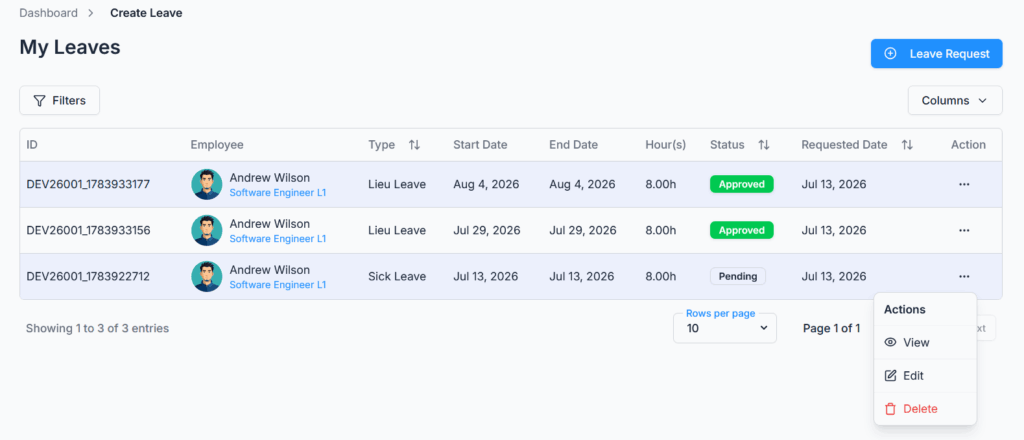
Edit Leave Request #
A leave request can be edited only when its status is Pending.
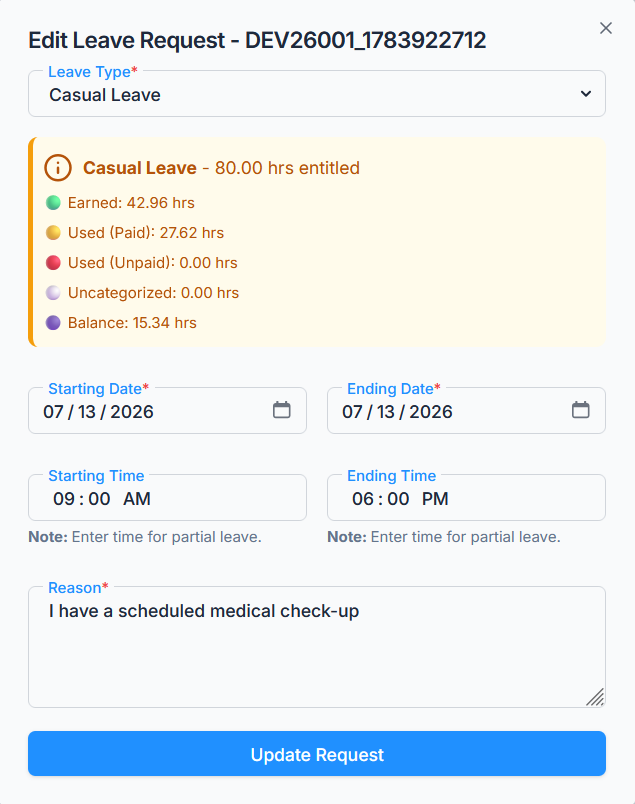
Approved, rejected, or cancelled leave requests cannot be edited.
When a pending leave request is edited:
- The same validation rules from create leave are applied again (work schedule, date limits, holidays, attendance conflicts, leave balance, and overlap — checked against every other request, so the leave being edited never blocks itself).
- Leave hours are recalculated.
- The existing approval flow state is preserved.
- The request remains traceable.
Permission behavior:
- Subscriber Admin can edit any pending leave request in the company, regardless of who requested it or who created it.
- Users with Edit Leave Request (For Own) permission can edit their own pending leave requests.
- Users with Edit Leave Request (For On Behalf) permission can edit a pending leave request only if they personally created it on that employee’s behalf in the first place. This permission does not let you edit just any employee’s leave — only the specific requests you created for someone else.
Delete Leave Request #
A leave request can be deleted only when its status is Pending.
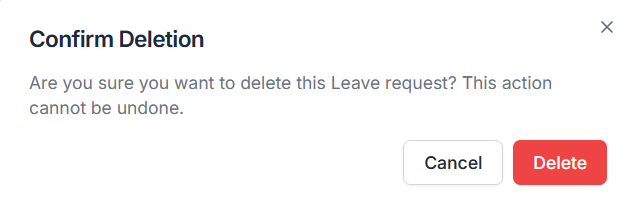
Approved, rejected, or cancelled leave requests cannot be deleted.
When a pending leave request is deleted:
- The leave request is removed.
- Related comments are deleted.
- Related attachments (from those comments) are also deleted.
Permission behavior:
- Subscriber Admin can delete any pending leave request in the company, regardless of who requested it or who created it.
- Users with Delete Leave Request (For Own) permission can delete their own pending leave requests.
- Users with Delete Leave Request (For On Behalf) permission can delete a pending leave request only if they personally created it on that employee’s behalf in the first place — same rule as editing.
View Leave Request #
Users with the required access can open the leave details page to review the full leave information.
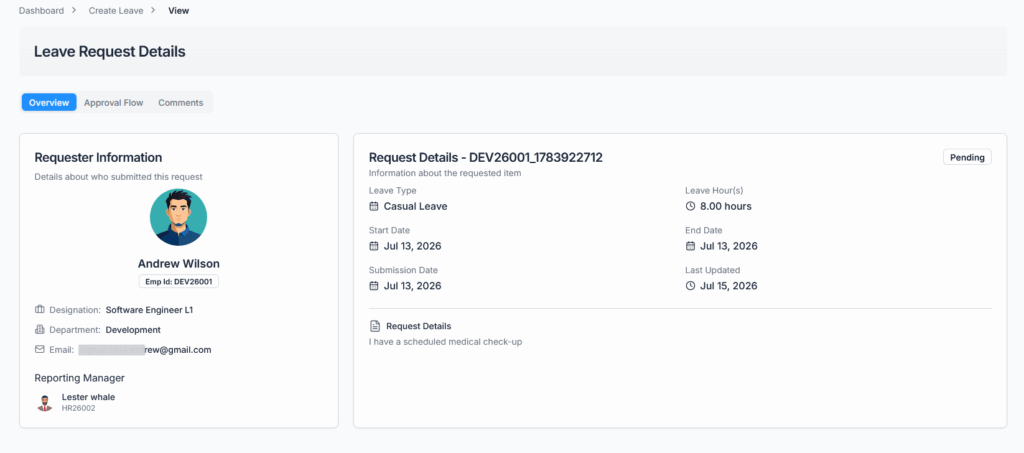
The details page may include:
- Employee information
- Leave type
- Leave period
- Requested leave hours
- Leave balance and quota information
- Reason
- Attachments (uploaded via comments — see below)
- Approval flow steps
- Approval history
- Comments
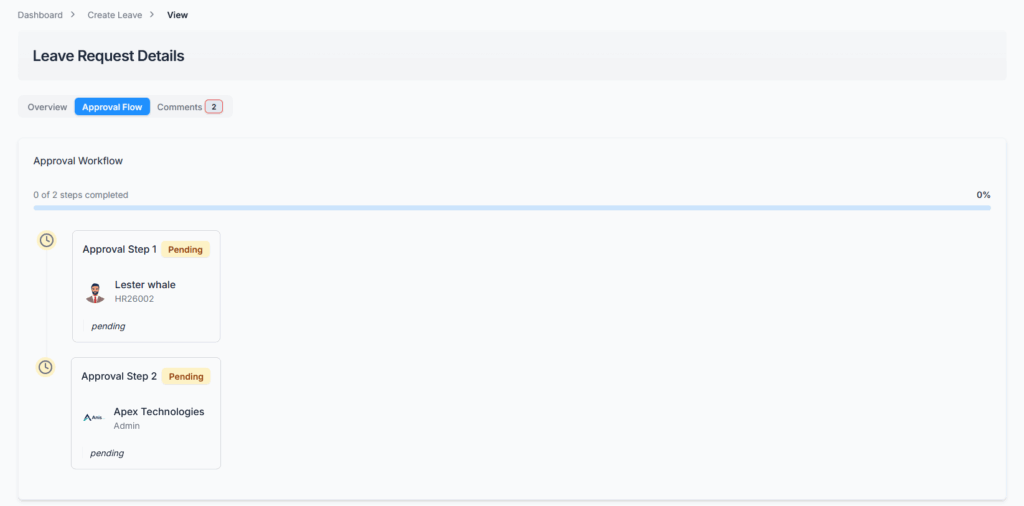
Approval Flow:
The approval workflow follows exactly the sequence configured by the Subscriber Admin. Each approval step remains in the Pending status until the assigned approver takes action. As approvers approve or reject the request, the status of each step is updated accordingly. On this page, employees can track the approval progress and clearly see which step is currently pending, which steps have been approved, and if the request is rejected, the exact step at which it was rejected.
Comments:
Users can use comments to communicate about a leave request.
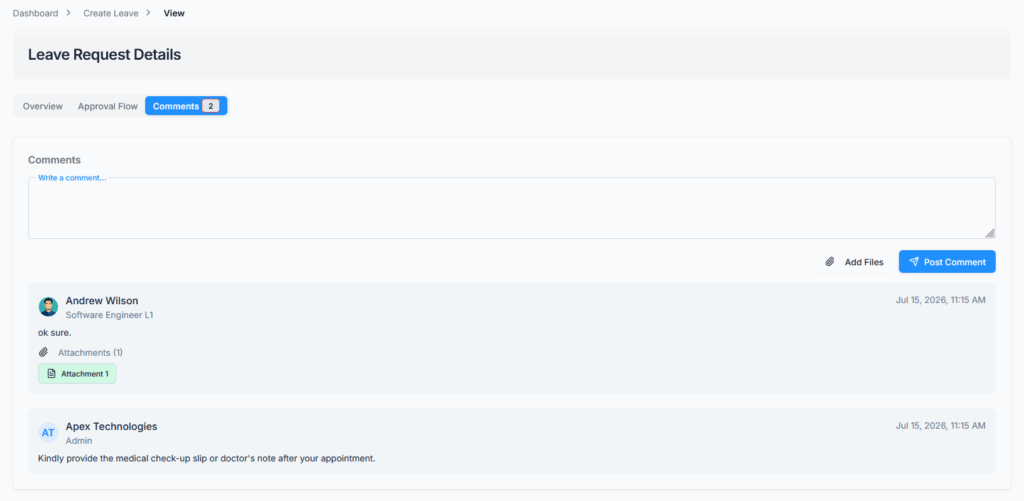
Comments can be used to:
- Ask for clarification
- Provide additional information
- Communicate with approvers or admins
- Keep a record of discussion related to the leave request, with up to 5 file attachments per comment
Who can comment: anyone who can already view that leave request — the requester, the Subscriber Admin, the assigned approvers, the requester’s reporting manager (even if not named as an approver in the flow), or anyone holding View Leave permissions for it.
How long you can comment: only while the leave request is still Pending. As soon as it becomes Approved, Rejected, or Cancelled, commenting is closed off — trying to add a comment on a closed-out request is blocked with a message explaining it’s no longer open for comments. Comments made while it was still pending remain visible afterward.
All comments remain visible in the leave request history for transparency.
Leave Status Workflow #
A leave request follows this basic status flow:
- Pending — Created and waiting for approval.
- Approved — All required approval steps are completed.
- Rejected — Any approver rejects the request.
- Cancelled — An approved leave is cancelled later by an eligible user.
Rejected and cancelled leave requests are final and cannot be changed back to pending.
Deleting a leave request is different from the statuses above — it’s not a status the request ever holds, it’s a permanent removal. Only a still-Pending request can be deleted, and once deleted, the record (and its comments/attachments) are gone rather than being marked with a “Deleted” status.
Payroll (if applicable) and Leave Balance Impact #
Leave balance is not finalized at the time of creation.
When the leave is finally approved (the last step in its approval flow, or approved directly by the Subscriber Admin):
- Paid leave usage is updated based on available earned balance.
- Unpaid leave is recorded if leave exceeds the earned balance.
- Backdated leave may be adjusted for payroll-related calculations.
- Lieu Leave hours are deducted only after final approval — not at intermediate approval steps, and not while still Pending.
If payroll has already processed an approved leave period, that leave cannot be cancelled later. There are a couple of other situations that also block cancelling an approved leave — for example, once its end date has already passed, or once a payroll run covering that period exists — and cancelling a still-cancellable approved leave reverses its balance effects (used hours, unpaid-leave amounts, backdated adjustments, and Lieu hours are all restored). See the Cancel Approved Leave guide for the full rules on who can cancel and when.
Summary #
The Create Leave Request module ensures that employees can submit leave requests accurately and according to company policy.
The system checks work schedule, date limits, working days, holidays, attendance conflicts, leave balance, Lieu Leave availability, overlapping leave, and approval flow rules before saving a request.
Admins can manage related setup from Leave Type, Permission, Approval Flows, Work Hours, and Attendance routes. After submission, the leave request follows the assigned approval flow (or waits on the Subscriber Admin if none matches). Pending requests can be edited, deleted, or commented on based on permission, while approved, rejected, and cancelled requests are protected — locked from further edits and closed to new comments — to keep leave records accurate, traceable, and payroll-compliant.