The Clients module keeps all your customers and vendors in one place. You can link Clients to Estimates and Agreements, add vendors to Items, and let Bookings create a client automatically. Start here to keep your CRM contacts organized and ready to use.
Where to Find It #
Route: Dashboard → CRM → Clients
Good to know: Clients is part of the CRM feature set, which is available as a paid add-on. If your company’s plan doesn’t include CRM, you can purchase the CRM add-on from Business → Billing & Payment. Once added, Clients and the other CRM features become available to your organization, including the Subscriber Admin.
Customer vs. Vendor #
Every Client is one of two types:
- Customer — someone you sell to. This is the type you’ll pick when creating an Estimate or Agreement, and it’s also the type Office-X automatically creates (or reuses, by matching email) when someone books an appointment with you through the public Booking page.
- Vendor — someone you buy from. This is the type that shows up when you mark an Item as “purchased from a vendor” (see the Items guide), only Active Vendor-type clients appear in that picker.
Example: a US-based company’s CRM has Sarah Mitchell set up as a customer (she receives Estimates and signs Agreements) and James Carter set up as a Vendor (his company, Precision Audio Supply Co., supplies the equipment behind a “Home Theater System” Item).
Good to know: Office-X does not always prevent you from using a Vendor-type client for an Estimate or Agreement. However, keeping the Customer/Vendor type consistent with how you use each client makes your CRM data easier to manage and filter.
Who Can Use This Feature #
Subscriber Admin can always create, view, edit, delete, and activate/inactivate any Client, without needing any specific permission.
Employees need one of the permissions below, each controlled independently from Admin → Permission → CRM – Clients:
- Create Client
Required action: Create
Lets you add a new Client. - View All Clients
Required action: View
Lets you open the Clients list and see every client company-wide. - Edit Client (For All)
Required action: Update
Lets you edit any client’s details. - Delete Client (For All)
Required action: Delete
Lets you permanently remove a client. - Activate / Inactivate Client (For All)
Required action: Update
Lets you flip a client between Active and Inactive, separately from editing its other details.
These permissions can be assigned directly to an employee, or to an entire team at once. See the Permissions Management guide for how to assign permissions.
Good to know: A client’s bank and financial details are only visible to the Subscriber Admin or users with Edit Client (For All) permission. Users with only View All Clients can see the client’s other information, but not the financial details.
Creating a Client #
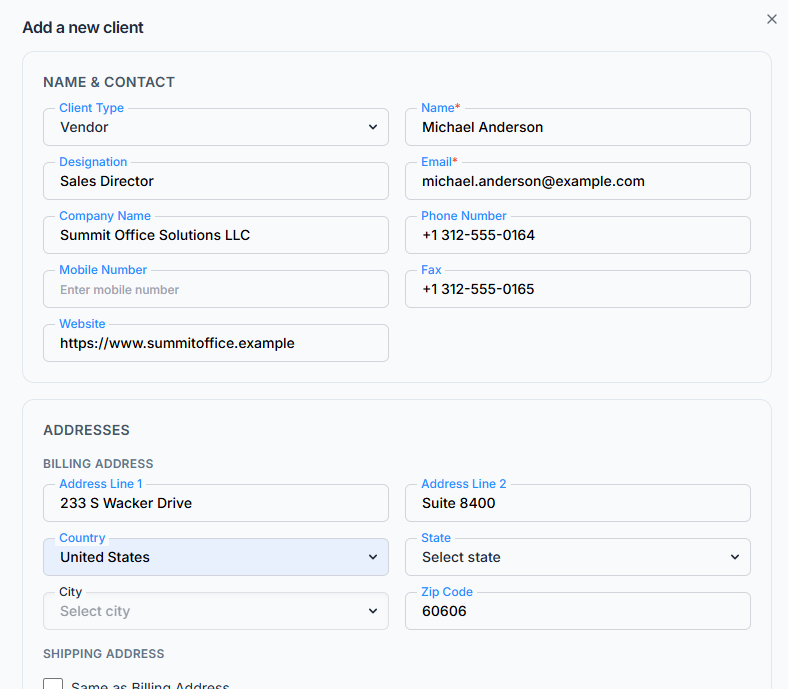
Click Add Client and fill in the form, organized into a few logical groups:
Basic Information #
- Client Type — Customer or Vendor. Defaults to Customer.
- Status — Active or Inactive. Defaults to Active.
- Name — required, up to 100 characters.
- Designation — optional, up to 100 characters.
- Email — required, must be a valid email address, and must be unique across your company (case-insensitive — “[email protected]” and “[email protected]” count as the same email).
- Phone, Mobile Number, Fax — all optional, up to 20 characters each.
- Company Name — optional, up to 100 characters.
- Company Website — optional, up to 200 characters. This is a plain text field — Office-X doesn’t check that it’s a properly formatted URL.
Billing & Shipping Address #
Both addresses share the same fields, all optional: Street 1, Street 2, City, State, Zip Code, Country (Street 1/2, City, State, and Country allow up to 100–200 characters; Zip Code up to 20).
Check Shipping same as Billing to copy your Billing Address into the Shipping Address fields automatically as you type — this is purely a convenience toggle in the form; unchecking it afterward doesn’t clear what was copied.
Tax #
- Tax Exempt — a checkbox. Checking it hides the Tax Rate field and clears it.
- Tax Rate — a percentage from 0 to 100, only shown when Tax Exempt is unchecked.
Bank & Financial Details #
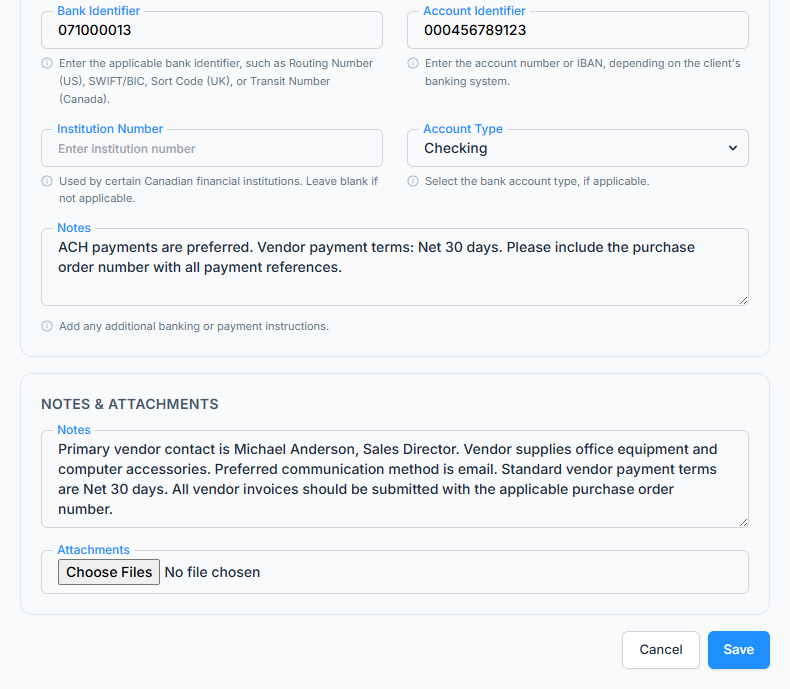
All optional: Account Holder Name, Bank Name, Bank Identifier, Account Identifier, Institution Number, Account Type (Checking or Savings), and Bank Notes (up to 1000 characters).
Good to know: Bank Identifier and Account Identifier are encrypted when stored, keeping your financial data secure. On the client’s View page, the Account Identifier is hidden by default and can be revealed when needed. Other bank details are shown normally.
Notes & Attachments #
- Notes — optional, up to 500 characters.
- Attachments — optional, up to 6 files, images or PDFs, up to 2 MB each.
Worked example: a Vendor client “James Carter” is set up with Client Type: Vendor, Company Name: “Precision Audio Supply Co.”, separate Billing (Denver, CO) and Shipping (Boulder, CO) addresses since “Shipping same as Billing” was left unchecked, Tax Exempt checked, plus two attachments (a W-9 PDF and a business card PNG) and a note: “Preferred vendor for home theater equipment”.
Active vs. Inactive Status #
Use the Action menu’s Activate / Inactivate option to flip a client’s status without opening the full edit form.
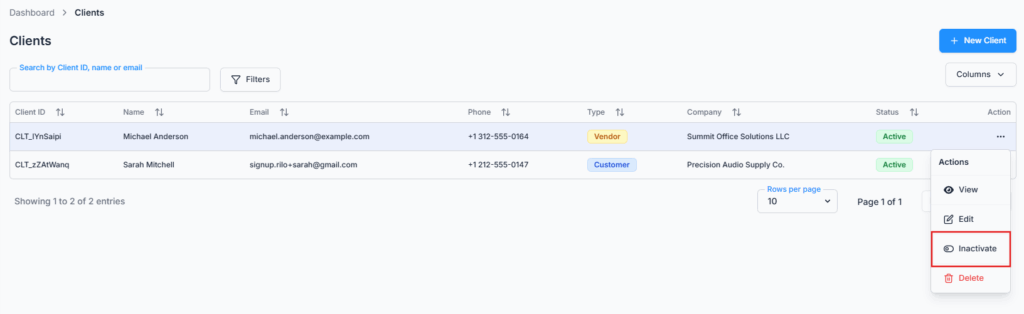
Status controls whether a client can be newly selected elsewhere in the CRM:
- An Inactive Vendor no longer appears in the vendor picker when adding or editing an Item.
- An Inactive Customer no longer appears in the client picker when creating a new Estimate or Agreement.
Good to know: Setting a client to Inactive does not affect any existing records linked to them. Items, Estimates, and Agreements already connected to that client remain unchanged. It only prevents the client from being selected for new records.
Editing a Client #
Use the Action menu’s Edit option to open the same form used for creation, pre-filled with the client’s current details. All fields — including Client Type, Status, and financial details — can be changed here (Status can also be changed faster via the dedicated Activate/Inactivate action above).
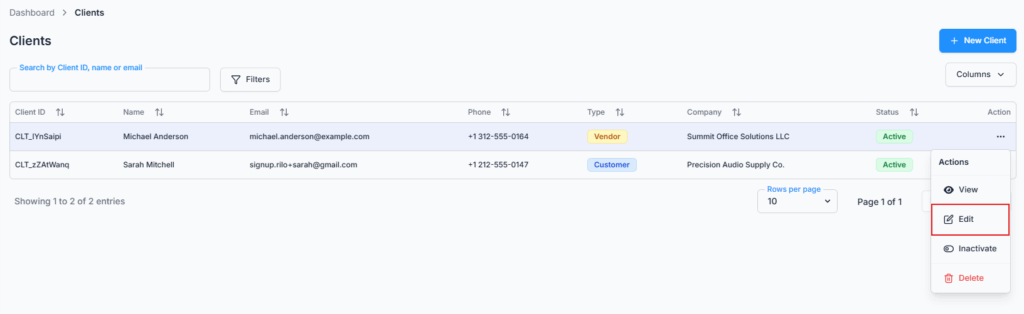
Removing an attachment during an edit deletes that file from storage; adding new ones works the same as on creation, and the 6-file limit still applies to the total.
Deleting a Client #
Use the Action menu’s Delete option. You’ll be asked to confirm, and the client — along with any of its attachments — is permanently removed.
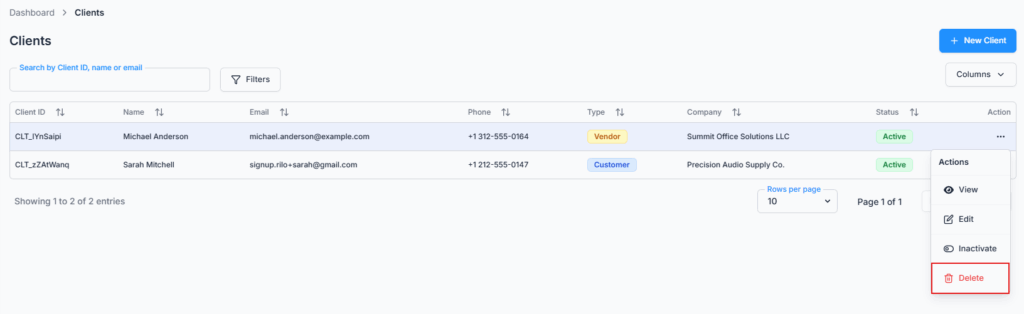
Important: You cannot delete a client if they are linked to an Item, Estimate, or Agreement. Office-X will block the deletion and show a message explaining where the client is still in use.
Bookings are an exception: if a client is only linked to a Booking, you can still delete them. The Booking will remain, but the client information will no longer be available.
If you’re unsure, it’s safer to set the client to Inactive instead of deleting them.
The Client List #
Route: Dashboard → CRM → Clients
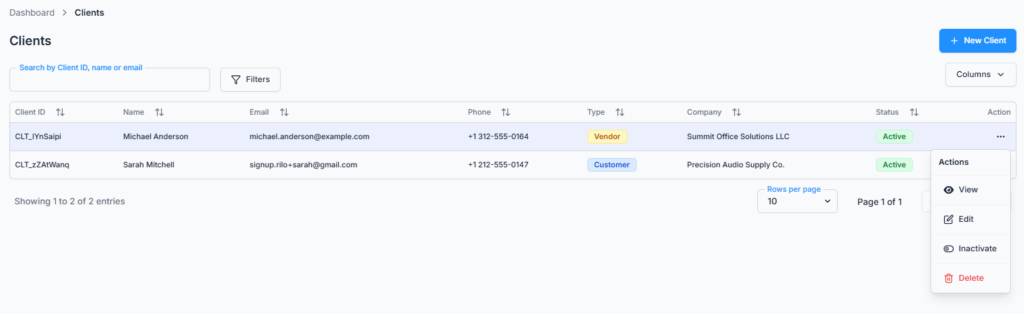
The table shows: Client ID, Name, Email, Phone, Type, Company, Status, and an Action column. You can show or hide any column except Action using the Columns option.
- Search — by Client ID, name, or email.
- Filters — Client Type (All/Customer/Vendor) and Status (All/Active/Inactive).
- Sort — click most column headers to sort by that column.
Results are paginated (10, 20, or 30 per page), newest first by default.
How Clients Connect to the Rest of CRM #
A Client record is the hub the rest of the CRM hangs off of:
- Estimates — every Estimate is created for exactly one Client. This one is required: you can’t save an Estimate without picking a Client.
- Agreements — An Agreement can be linked to a Client, but it doesn’t have to be. You can send the Agreement to the Client or add other people as signers using their name and email. The Client link is mainly for keeping your records organized.
- Items — an Item you buy in can name the Vendor-type Client you buy it from. Only Active Vendors show up in that picker.
- Bookings — when someone books an appointment through your public Booking page, Office-X automatically creates a Customer-type Client for them (matching by email, so the same person booking twice reuses their existing record rather than creating a duplicate) — you don’t need to create these clients manually first.
Activity Log #
Every client you add, edit, activate, inactivate, or delete is recorded for you, along with who did it and when — and an edit lists exactly which fields changed. The two sensitive numbers — Bank Identifier and Account Identifier — appear only partly masked in the log, so the audit trail shows you that they changed without turning into a second way to read a full account number. Look under Dashboard → Admin → Activity Log, filtered to Client. See the Activity Logs guide for how to search it.
Summary #
Clients is the address book behind Office-X’s CRM — every Customer you send an Estimate or Agreement to, and every Vendor an Item is purchased from, starts here. Records can be freely created, edited, and deactivated; deletion itself is blocked while a client is still referenced by an Item, Estimate, or Agreement (Bookings are the one exception), so prefer Inactive over Delete whenever a client might still be referenced elsewhere. Bank details are encrypted at rest and only visible to those with edit rights or the Subscriber Admin, keeping sensitive financial information appropriately restricted even among people who can otherwise see the client list.
