Create Support Request is how you ask your own company for help. For example: an HR question, a laptop problem, or an access issue. You raise a ticket, and your company’s support people pick it up and answer it.
Good to know: this is your company’s own internal help desk. Your ticket goes to your own admin or support staff. It is not the same as Business Support. Business Support is where your company asks Office-X for help. They are two different pages — don’t mix them up.
Where to Find It #
- Raise a ticket, and see your own tickets
Route: Dashboard → Support → Create - Open one ticket
Click any row in that list, or use Action → View. - Support Category setup
Route: Dashboard → Admin → Support Category
This is where the categories are made, and where the Resolvers — the people who answer tickets — are chosen. See the Support Category guide. - Permission setup (admin only)
Route: Dashboard → Admin → Permission → Support
This is where you give someone the right to raise or edit a ticket for another employee. See the Permissions Management guide.
Who Can Use This Feature #
Every employee can raise a ticket for themselves. No permission is needed. An employee needs a permission only to work on behalf of someone else.
Subscriber Admin — the company’s owner account — can raise a ticket for any employee and does not need any permission.
Permission Behavior
- Create Support Request (For On Behalf)
Required action: Create
Adds a Support For box to the form. You can then pick another employee and raise the ticket for them instead of for yourself. It also lets you change who a ticket belongs to while editing it. - Edit Support Request (For On Behalf)
Required action: Update
Lets you edit a ticket that belongs to someone else.
Without these two, you can still raise and edit your own tickets. You just can’t touch anyone else’s.
Good to know: the employee you pick must be active and licensed. You cannot raise a ticket for someone who has left, is blocked, or has no seat.
Both permissions can be given to one employee, or to a whole team at once. See the Permissions Management guide.
Before You Start #
Three things must be ready, or nobody can raise a ticket.
- Your plan must include Support. Support is a paid feature. If your subscription plan does not include it, every Support page shows a lock screen instead of the ticket list. Your admin also cannot give out the Support permissions until the plan includes Support.
- At least one Support Category must exist and be Active. The Support Category box only shows Active categories. If there are none, there is nothing to pick and you cannot submit the form.
- Every Active category should have at least one Resolver. Resolvers are the people who get told about new tickets. If a category has no Resolver, your ticket is still saved, but nobody is notified — it just sits there.
Raising a Ticket #
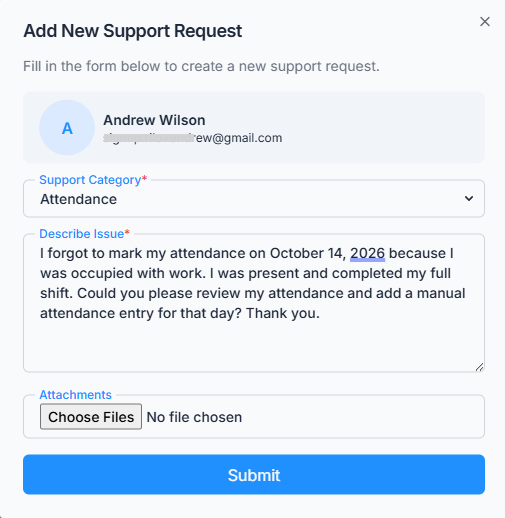
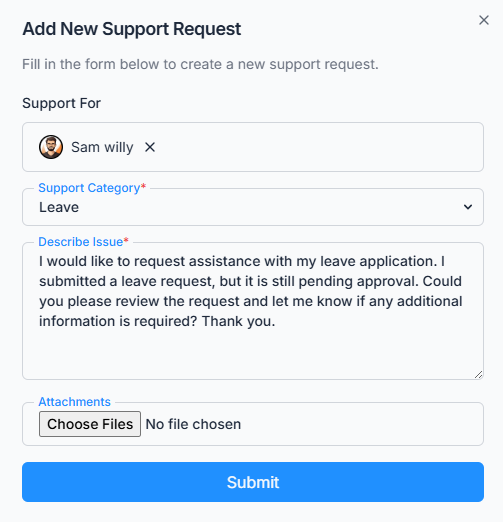
The form is short on purpose.
- Support For
You only see this box if you have Create Support Request (For On Behalf), or if you are the Subscriber Admin. Use it to pick the employee the ticket is for. Leave it alone to raise the ticket for yourself. - Support Category
Required. Only Active categories appear here. - Describe Issue
Required. Up to 1000 characters. Say what you need help with, in plain words. - Attachments
Optional. Up to 5 files. Only JPG, JPEG, PNG and PDF are allowed, and each file must be 2 MB or smaller.
Good to know: a photo taken on a phone is often bigger than 2 MB. If it is, you will see “File is too large. Maximum size is 2MB.” Make the picture smaller, or take a screenshot instead, then upload again.
Good to know: Every new ticket starts with Normal priority. Only the Support Team can change the priority later.
What Happens After You Submit #
- The ticket gets a Request ID and its status becomes Created.
- The employee the ticket is for gets an in-app notification called “Support Request Submitted”, plus a confirmation email.
- Every Resolver on that category gets their own notification called “New Support Request”, plus an email. The message names the person who raised it.
- The ticket appears in the list on this same page, ready for a Resolver to pick up.
Finding Your Tickets #
The same Dashboard → Support → Create page also shows a list of tickets. Two kinds of ticket appear here:
- Tickets that are about you — ones you raised yourself, and ones someone else raised for you.
- Tickets you raised for other people. So if you have the on-behalf permission and file a ticket for a colleague, it stays in your list too, and you can follow it up.
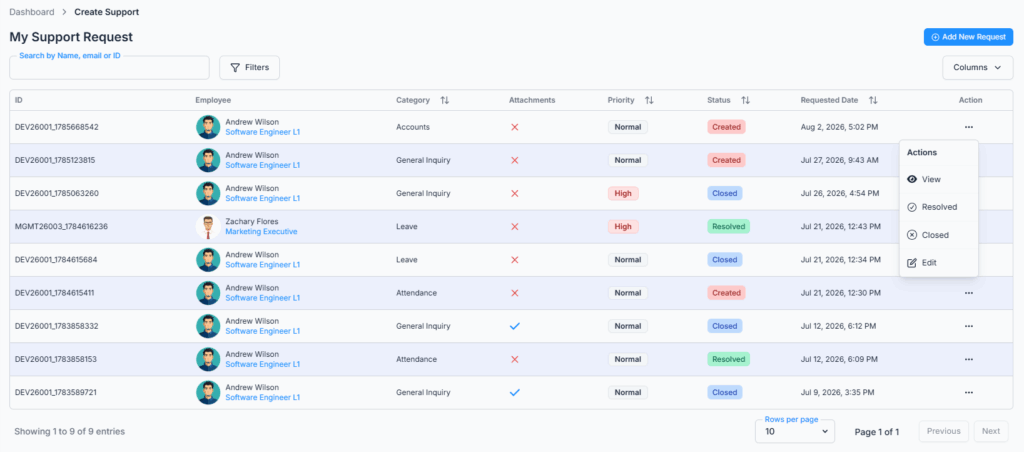
The columns are:
- ID — the Request ID of the ticket.
- Employee — the person the ticket is for, with photo and designation.
- Category — the Support Category it was filed under.
- Attachments — shows whether any files were added.
- Priority — Normal, Medium or High.
- Status — Created, In Progress, Resolved or Closed.
- Requested Date — when the ticket was submitted.
- Action — View, Resolved, Closed and Edit. You only see the ones you are allowed to use.
To find one ticket quickly:
- Search — the box is labelled Search by Name, email or ID. Type a Request ID, or the employee’s name or email.
- Filters — the Filters button opens Priority, Status and a Requested Date range. Click Apply to use them, or Clear to remove them all.
- Columns — the Columns button lets you hide the columns you don’t need.
- Rows per page — choose 10, 20 or 30 at the bottom.
Viewing Ticket Details #
Click any ticket to open its full page. The title is “Support Request Details” followed by the Request ID. There are three tabs.
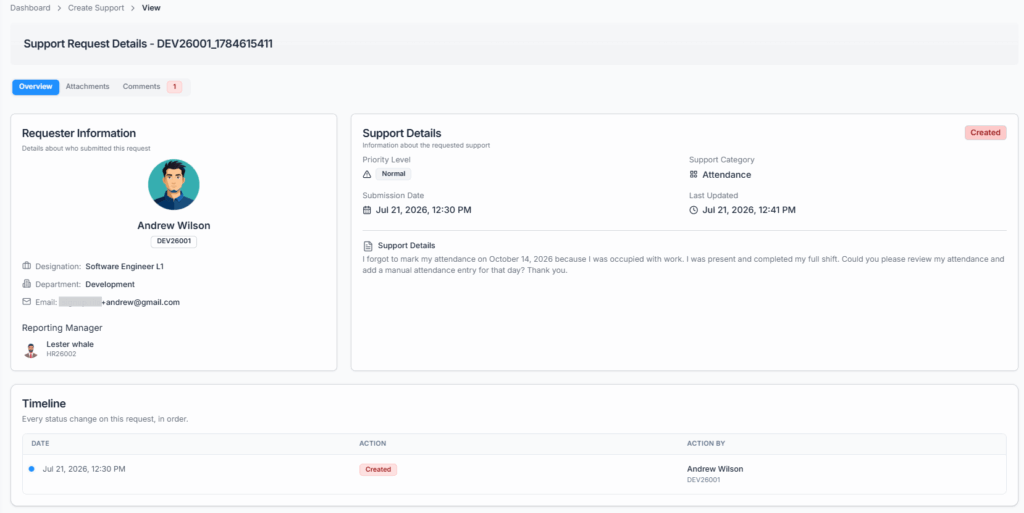
- Overview — holds three cards. Requester Information shows the name, photo, employee ID, designation, department, email and reporting manager. If there is no manager, it says “No reporting manager assigned”. Support Details shows the Status, Priority Level, Support Category, Submission Date, Last Updated, and the full issue description. Timeline is explained just below.
- Attachments — the files sent with the ticket.
- Comments — the whole comment thread. A small red number shows how many comments there are.
The Timeline card is the history of the ticket. It is a small table with three columns: Date, Action and Action By. A new row appears each time the status changes:
- Created — always there. It shows the person who actually filed the ticket. If a colleague raised it for you, their name is here, not yours.
- In Progress — added when a Resolver starts working on it.
- Resolved — added when the ticket is marked Resolved.
- Closed — added when the ticket is Closed.
Each row keeps its own date and its own name. A later step never overwrites an earlier one, so you can always see who did what and when. If nothing has happened yet, the card says “No action taken yet.”
Editing a Ticket #
Choose Action → Edit on any row. A small window opens, called Edit Support Request with the Request ID.
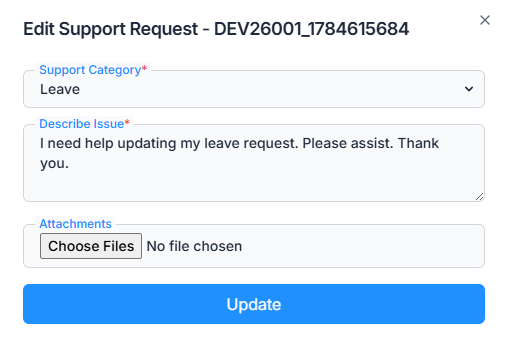
You can change the Support Category, issue description, and attachments while the ticket is Open or In Progress. Once it is Resolved or Closed, you can no longer edit it.
The ticket can be edited by the employee it belongs to, the Subscriber Admin, or anyone with Edit Support Request (For On Behalf) permission.
Good to know: Saving an edit sends a “Support Request Updated” notification and email to the employee the ticket belongs to and all Resolvers for that category.
The category can only be changed to an Active category. If the current category was later made inactive, you can still edit the description and attachments without changing the category.
If you have Create Support Request (For On Behalf) permission, you can also change who the ticket belongs to.
Good to know: Support tickets cannot be deleted. If a ticket is no longer needed, mark it Closed instead.
Resolving or Closing Your Own Ticket #
You don’t have to wait for a Resolver. From your own list, use Action → Resolved or Action → Closed at any time — for example, if you sorted the problem out yourself. This works even though you are not a Resolver. You always have this right over your own ticket.
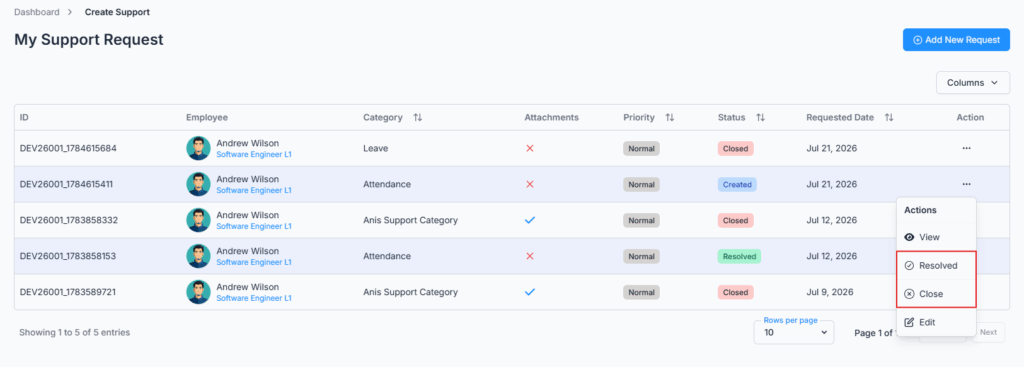
There is no confirmation question. The moment you click, the status changes.
Good to know: Resolved and Closed are final. There is no way to reopen a ticket — not by you, not by a Resolver, not even by the Subscriber Admin. If the same problem comes back, raise a new ticket. If you try anyway, you will see “This support request is already Resolved and can no longer be updated.”
Good to know: you cannot set your own ticket to In Progress. That option belongs to the support team.
Comments #
Use the Comments tab to add more detail, or to answer a Resolver. This is the normal way to talk about a ticket.
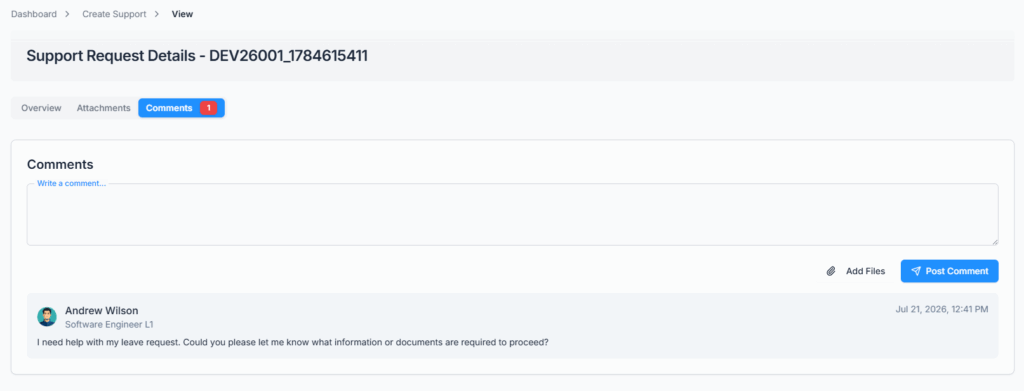
- Length — up to 2000 characters per comment.
- Files — up to 5 files per comment. Only JPG, PNG and PDF, and each file must be 2 MB or smaller.
- Who can comment — you (the ticket’s owner), the person who raised it for you, the Subscriber Admin, that category’s Resolvers, and anyone holding Create Support Request (For On Behalf).
- How long — only while the ticket is still open. Once it is Resolved or Closed, commenting stops for everyone. Older comments stay visible.
When anyone leaves a comment, everyone else on the ticket gets a “New Comment Added” notification. The person who wrote it does not get one.
Good to know: stick to JPG, PNG or PDF. The file picker may let you choose a GIF or a WEBP, but it is rejected as soon as you pick it.
Good to know: if the button says “Commenting disabled”, the ticket is already Resolved or Closed, or you are only allowed to read this ticket, not reply to it.
Your Daily Routine #
- Go to Dashboard → Support → Create.
- Pick a Support Category, write your problem, and add files if they help. Keep each file under 2 MB.
- Submit, then check that the new row appears with status Created.
- Watch the notification bell. You will be told when the ticket is Resolved or Closed, and whenever someone comments.
- Answer questions in the Comments tab, not by editing the description.
- If you solve the problem yourself, mark the ticket Resolved so the support team can stop looking at it.
Notifications and Activity Log #
These are the messages the Support module sends:
- Support Request Submitted — to the employee the ticket is for, when it is raised. Notification and email.
- New Support Request — to every Resolver on the category. Notification and email.
- Support Request Updated — to the employee and the Resolvers, when the ticket is edited. Notification and email.
- Support Request Resolved or Support Request Closed — to the employee and the Resolvers. Notification and email.
- New Comment Added — to everyone on the ticket except the writer. Notification only, no email.
Good to know: moving a ticket to In Progress sends nothing at all. If you want the employee to know work has started, leave a comment.
Good to know: emails use your company’s Support Request email template if one is Active in Dashboard → Admin → Email Template. If there is none, Office-X sends a plain default email instead.
Activity Log. Raising a ticket, editing it, changing its status and adding a comment are all written to Dashboard → Activity Log, with the date and the person who did it. A status change is recorded like this: “Support Request Status Updated: created → Resolved”. This is useful when you need to show what happened and when.
Summary #
Any employee can raise an internal support ticket straight away, with no permission needed. The ticket goes to the Resolvers of the category you choose. You can edit it, comment on it and upload files until it is Resolved or Closed. And unlike every other request type in Office-X, you can close your own ticket yourself whenever you want. Just remember two rules: keep each file under 2 MB, and Resolved and Closed are final — there is no reopen.
