
Track, manage, and monitor all company assets in one place.
Every business owns valuable assets — from laptops and office furniture to vehicles and software licenses. These assets play a vital role not only in daily operations but also in the company’s net worth and valuation.
The Asset Tracking module in Office-X helps management and HR teams maintain complete visibility over every item owned by the company.
Whether you’re a CEO checking total assets or an admin verifying who currently holds which device — everything is just one click away.
Good to know: Asset Tracking is part of a specific subscription plan. If you don’t have it, check that your company’s plan includes it.
Permission Behavior #
Asset Tracking permissions are controlled from:
Dashboard → Admin → Permission → Tracking
In the Tracking permission section, the following asset permissions are available:
- Create Asset
Required action: Create
Allows the user to add a brand-new company asset from the “Add Asset” button. - View Asset (For Own)
Required action: View
Allows the user to view only assets where they are the current owner. - View Asset (For All)
Required action: View
Allows the user to view all company assets across the organization. - Edit Asset (For All)
Required action: Update
Allows the user to edit asset details, ownership, condition, purchase information, and related asset data for any asset. There’s no “For Own” edit permission — even the current owner of an asset can’t edit its record unless they separately hold this permission. - Duplicate Asset (For All)
Required action: Update
Shows the Duplicate option in an asset’s action menu, letting the user create a new asset by copying an existing one’s data.
Each permission is controlled by its related action toggle: Create, View, or Update.
Good to know: Create Asset and Duplicate Asset (For All) are two separate permissions that control two separate ways of adding an asset. Create Asset controls the “Add Asset” button, for starting from a blank form. Duplicate Asset (For All) controls the Duplicate option, for starting from a copy of an existing asset. You can hold either one without the other — for example, someone with only Duplicate Asset (For All) can create new assets by duplicating existing ones, but won’t see the “Add Asset” button to start from scratch.
Adding a New Asset #
To add a new asset, click “Add Asset” and fill in the form:
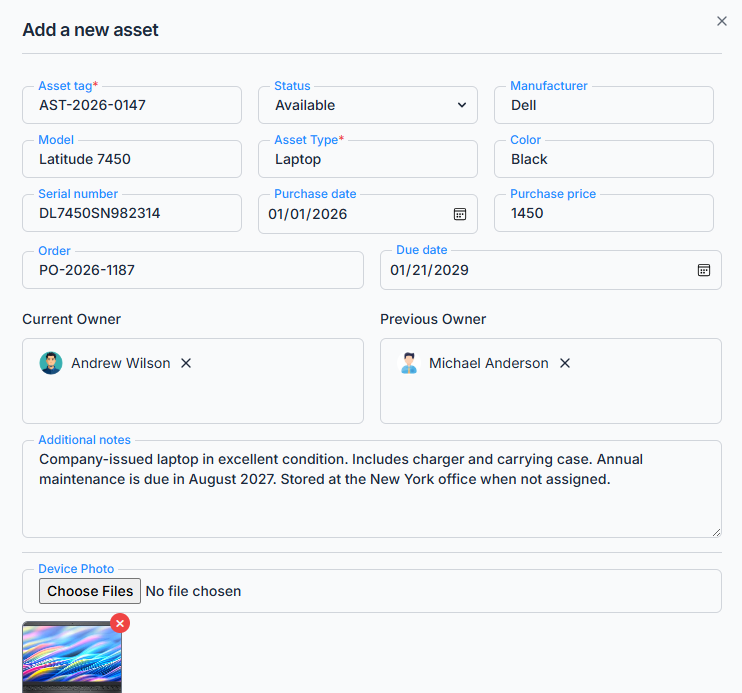
- Asset Tag — required, 2–50 characters. Must be unique within your company; you can’t reuse a tag that’s already assigned to another asset.
- Asset Type — required, up to 50 characters. This is a free-text field you type yourself (e.g., “Laptop,” “Vehicle”) — there’s no pre-configured list of types to choose from, so it’s worth keeping your naming consistent across entries.
- Status — required, defaults to Available. Other values (like Assigned or Retired) are available to reflect the asset’s current state.
- Manufacturer, Model, Color — optional, up to 100 / 100 / 50 characters.
- Serial Number — optional, up to 100 characters.
- Purchase Date and Purchase Price — optional; price can’t exceed 1,000,000.
- Order — optional, up to 100 characters, for recording a purchase order or order reference number.
- Current Owner — optional employee picker. Must be an active, licensed employee.
- Previous Owner — optional employee picker, for recording who held this asset before the current owner.
- Due Date — optional date field. This is a plain date you set yourself (for a return, renewal, or replacement you want to track) — it’s not tied to any automatic reminder or calculation.
- Additional Notes — optional, up to 500 characters, for condition notes or any other free-text detail.
You can also upload supporting files, in two separate categories:
- Device Photo — image files (JPG, JPEG, PNG), up to 5 files, each up to 2MB.
- Attachment — PDF files only, up to 5 files, each up to 2MB.
These are two independent upload areas — you can have up to 5 photos and up to 5 PDF attachments on the same asset, not one combined pool of 5. Click “Add” to save. If a Current Owner is assigned, the asset will automatically appear in that employee’s asset list.
Managing Assets #
After adding an asset, you can:
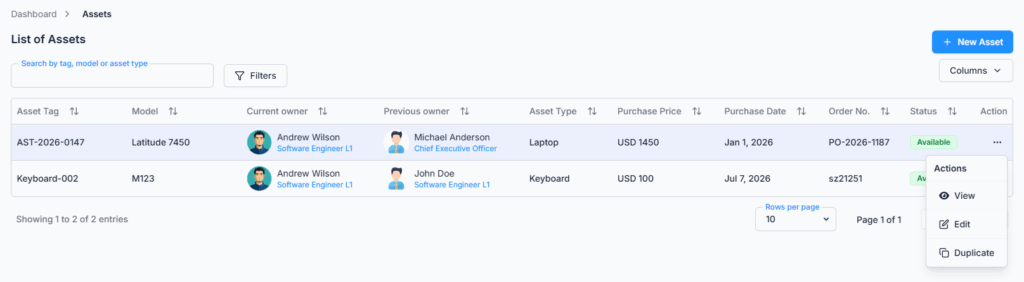
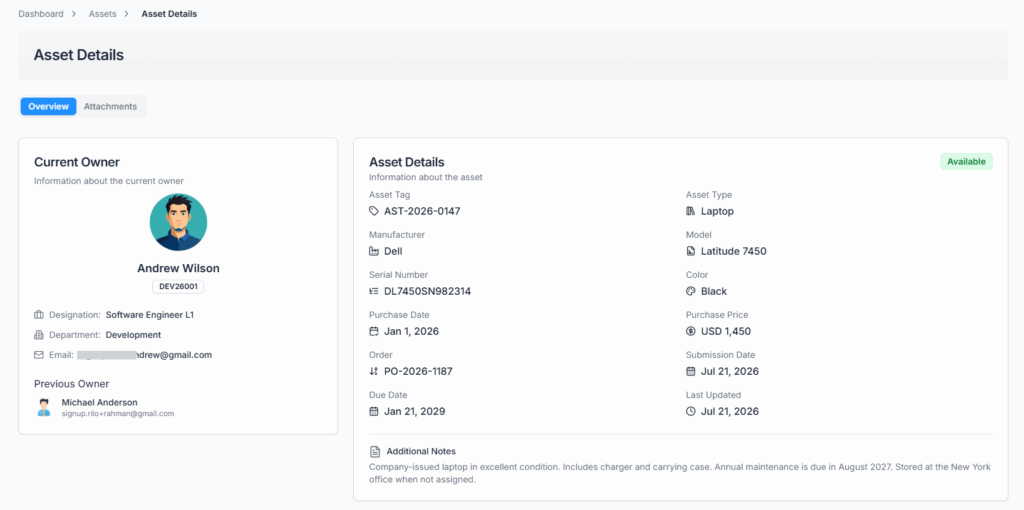
- View: View allows you to open full asset details, where you can see complete owner information, asset data, and access attachments. You can also preview and download any uploaded files directly from the details page. This option is available only if you have View Asset (For Own) or View Asset (For All) permission. With For Own, you can view only assets currently assigned to you. For All allows access to all assets. (There’s also a second, simpler place to see your own assigned assets — see Viewing Your Own Assigned Assets below.)
- Edit: Edit allows you to update any field on an asset at any time — including its Asset Tag, ownership (current and previous owner), condition notes, and purchase information — to keep records accurate. This option is available only if you have Edit Asset (For All) permission; being the asset’s current owner doesn’t grant edit access by itself.
- Duplicate: Duplicate allows you to create a new asset using existing asset data. It opens a pre-filled form, making it quick and easy to add similar assets without entering all information again. This option is available only if you have Duplicate Asset (For All) permission.
Good to know: when you duplicate an asset, almost everything carries over into the new form, including the Current Owner, Previous Owner, and any uploaded photos and attachments — it isn’t a blank ownership slate. Only the Asset Tag and Serial Number are cleared for you to fill in fresh, since both need to be unique. If the duplicate is actually a different physical item with a different owner, remember to update the owner fields yourself before saving.
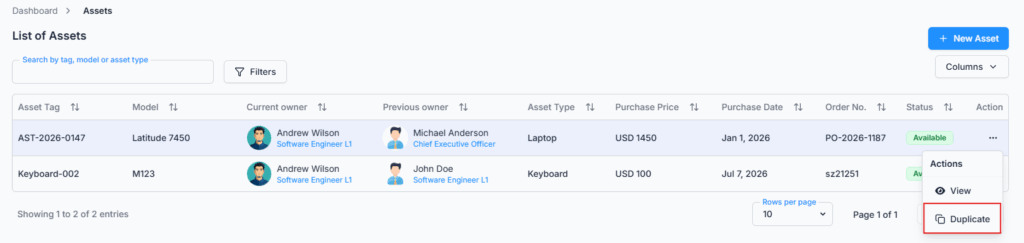
This ensures your records always reflect the current real-world ownership and condition of every item.
Good to know: there’s no Delete option for assets — once created, an asset record is permanent. If an item is retired, sold, or no longer in use, reflect that by editing its Status (e.g., to Retired) rather than trying to remove it; this keeps a complete, permanent record for auditing.
Viewing Your Own Assigned Assets #
Besides the main Tracking page, every employee has a second, much simpler place to check what’s currently assigned to them — no special asset permission needed, since it’s always just your own record:
Dashboard → Settings → Account tab → Assets tab
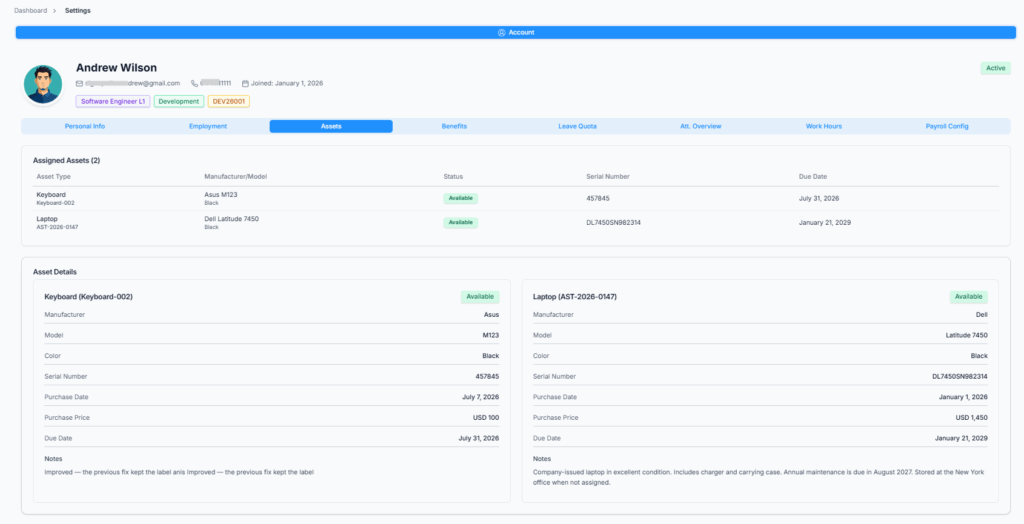
This shows a card titled “Assigned Assets” with a count, listing the Asset Type, Asset Tag, Manufacturer/Model, Color, Status, Serial Number, and Due Date for everything currently assigned to you as Current Owner. Below that, a second card gives the fuller details for each asset — Manufacturer, Model, Color, Serial Number, Purchase Date, Purchase Price, Due Date, and any condition notes.
Good to know: this page is purely for looking things up — the rows aren’t clickable, and there’s no link from here into the full asset details page on the main Tracking screen. If you need to see attachments, request a change, or do anything beyond viewing, use the main Dashboard → Tracking → Assets page instead (which needs View Asset (For Own) or View Asset (For All) permission, as covered above).
Good to know: if your company’s plan doesn’t include Asset Tracking, this Assets tab still appears in your Account settings, but it will always be empty.
Viewing an Employee’s Assets from Their Profile #
The Subscriber Admin — or anyone holding View All Employees permission — can check what’s assigned to a specific employee directly from that employee’s own profile, without needing to search for it on the main Tracking page:
Dashboard → Employees → open an employee’s row (Action menu → View, or just click the row) → Assets tab
This opens the exact same “Assigned Assets” view described above, just scoped to that specific employee instead of yourself.
Good to know: access to this Assets tab is controlled by whether you’re allowed to view that employee’s profile at all (the Subscriber Admin, anyone with View All Employees permission, or the employee viewing their own profile) — it isn’t gated by the View Asset (For Own) / View Asset (For All) permissions from the Permission Behavior section above. So someone could have full access to an employee’s profile (and therefore their Assets tab) without holding either Asset permission, and vice versa.
Just like the Account tab version, this is read-only — for anything beyond viewing (editing, checking attachments, reassigning ownership), go to the main Dashboard → Tracking → Assets page and open that asset’s full details there instead.
Why It Matters
- Maintains a transparent record of all company property.
- Prevents asset loss or misplacement by always showing who currently — and previously — held each item.
- Simplifies audits and reporting, since nothing is ever deleted.
- Lets you record purchase price, purchase date, and a due date so you have the raw information on hand for your own depreciation or replacement planning — Office-X stores these as plain fields you fill in and doesn’t calculate depreciation or send replacement reminders automatically.
Summary #
With Office-X Asset Tracking, your organization stays organized, accountable, and audit-ready — ensuring every asset is exactly where it should be. Assets are created once and kept forever (there’s no delete, only editing and status changes), current and previous ownership is always on record, and permissions decide who can see, edit, or add to that record.