
The Incident Report feature allows organizations to record, track, and manage workplace incidents efficiently.
It helps ensure:
- Workplace safety
- Accountability
- Proper documentation
- Compliance with policies
Related Setup and Navigation #
Before anyone files an incident report, admins should make sure the following setup is in place.
- Incident Config Setup
Route: Dashboard → Admin → Incident Config
Used to configure the Status, Severity, and Incident Type values used on every incident report, and to assign Incident Managers to a type. A separate Incident Config permission controls access to this admin page itself, distinct from the Incident Report permissions below. Please check the Incident Configuration guide for a better understanding. - Permission Setup
Route: Dashboard → Admin → Permission → Report
Used to assign incident-related permissions, such as creating reports for yourself or on behalf of others, viewing, editing, completing, and discarding incident reports. Please check the Permissions Management guide for a better understanding. - Incident Report
Route: Dashboard → Report → Incident
Used by employees to file incident reports and by permitted users to manage them company-wide.
Without the Status, Severity, and Incident Type values configured first, the corresponding dropdowns on the incident create form will simply be empty — set up at least a few values in each before anyone needs to file a report.
Good to know: assigning someone as an Incident Manager on any Incident Type isn’t just a display label — the moment you save them as a manager, Office-X automatically grants that employee the tenant-wide Create Incident Report (For All) and Edit & Discard Incident Report (For All) permissions (covered below), if they don’t already have them. This happens for any type they’re added to, and it grants access company-wide, not just for incidents of that one type. Removing them as a manager later does not automatically take those permissions back — you’d need to remove them manually from Admin → Permission if that’s not what you intended. See the Incident Configuration guide for how to set up Incident Types and their managers.
Access Incident Reports #
Navigate to: Dashboard → Report → Incident
From this page, users can view accessible incident reports, search, filter, customize columns, create new incidents, view details, edit, mark as completed, or discard incidents based on permission.
Permission Setup
Incident Report permissions are managed from: Dashboard → Admin → Permission → Report
In the permission screen, the Report section includes Incident Report permissions with action toggles such as Create, View, and Update.
For Incident Reports, the permissions are:
- Create Incident Report (For All)
Action: Create
Allows the user to create incident reports for any employee. - Create Incident Report (For Own)
Action: Create
Allows the user to create incident reports only for themselves. - View Incident Report (For All)
Action: View
Allows the user to view all incident reports across the organization. - Edit Incident Report (For Own)
Action: Update
Allows the user to edit only incident reports where they are the reporter. - Edit & Discard Incident Report (For All)
Action: Update
Allows the user to edit any incident report, mark incidents as completed, and discard completed incidents.
There is no permanent delete for incident reports. Instead, the system uses Discard to remove completed incidents from active tracking while keeping them stored for history and audit purposes.
Who Can See a Given Incident Report #
This is the part worth understanding carefully, since it’s not just a simple “your own reports vs. everything” split. A user can see a specific incident report if any of the following is true:
- They are the Subscriber Admin.
- They hold View Incident Report (For All).
- They are the Reported By employee — the person who reported the incident.
- They are the person who created the report — if someone files an incident report on another employee’s behalf, the filer keeps visibility into it even though the report is “about” someone else.
- They are currently listed as an Incident Manager on that report’s Incident Type.
Good to know: the Incident Manager check always looks at the Incident Type’s current manager list, not whoever was a manager back when the report was created. If you remove someone as a manager on a type, they immediately lose visibility into that type’s incidents (unless one of the other rules above still applies to them, like being the reporter).
Good to know: If you’re an Incident Manager, you can create, edit, complete, and discard incidents across the company. However, you can’t automatically view all incident reports. You can only view incidents that:
- You reported
- You created
- Belong to the Incident Types you manage
To view all incident reports across the company, you must also have the “View Incident Report (For All)” permission.
Search, filter, column visibility, and pagination are available on the list, but they never override any of these access rules — you’ll only ever find incidents you’re already allowed to see.
Default Employee Access
Employees can open the Incident Report list without any special permission.
Without any of the permissions above, and without being an Incident Type manager:
- Employees can view only incident reports where they are the Reported By employee, or the one who created the report.
- The Action column still appears on each row, but only offers View — no Edit, Complete, or Discard options.
- The + New Incident Report button is hidden if the user does not have create permission.
Create an Incident Report #
To create a new incident report:
- Go to Dashboard → Report → Incident.
- Click + New Incident Report.
- Fill in the incident details.
- Upload attachments if needed.
- Click Add.
The form includes:
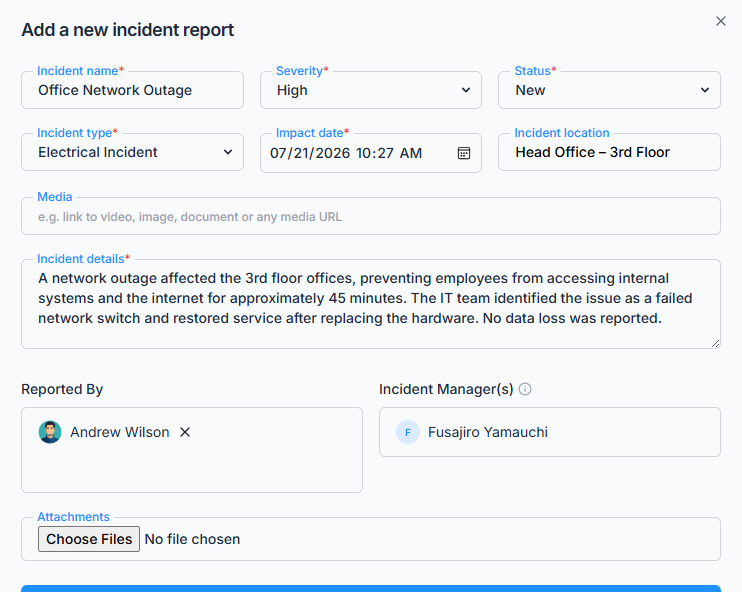
- Incident Name — required, up to 100 characters.
- Reported By — the employee the incident is about. If you only hold Create Incident Report (For Own), this is locked to yourself; with Create Incident Report (For All), you can pick any employee.
- Incident Type — required, chosen from the types configured in Incident Config.
- Incident Manager(s) — shown automatically based on the Incident Type you selected; this isn’t something you pick yourself, and shows “No manager assigned to this type” if that type has none configured.
- Severity — required, chosen from the severities configured in Incident Config.
- Status — required, chosen from the statuses configured in Incident Config.
- Impact Date — required, includes both date and time.
- Location — optional, up to 200 characters.
- Incident Details — required description, up to 500 characters.
- Media Link — optional URL to an external video, image, or document.
- Attachments — optional, images or PDF files, up to 5 files, each up to 2MB.
The create button appears only if the user has one of the following permissions:
- Create Incident Report (For Own)
- Create Incident Report (For All)
After Creating an Incident #
After successful creation:
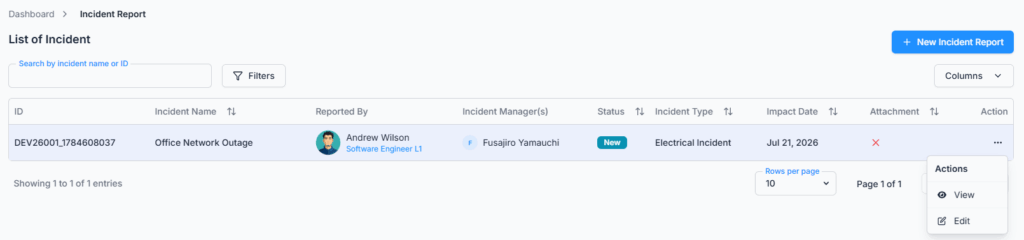
- A success message is displayed: Incident report created successfully.
- The incident appears in the Incident list.
- The incident becomes trackable in the system.
- Users with access (per the visibility rules above) can view the incident details.
View Incident Details #
Users can open an incident to view full details.
The details page includes:
- Breadcrumb: Dashboard → Incident Report → Incident Details
- Page title: Incident Details
- Tabs:
- Overview
- Attachments
The Overview tab shows:
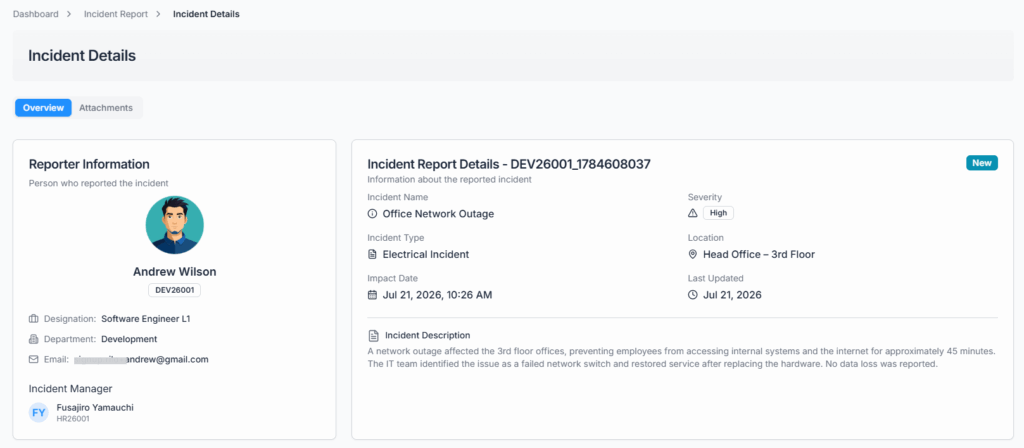
- Reporter information
- Employee name
- Employee code
- Designation
- Department
- Incident Manager(s)
- Incident name
- Incident type
- Impact date
- Incident description
- Severity
- Location
- Last updated date
- Status
The Attachments tab shows uploaded files with:
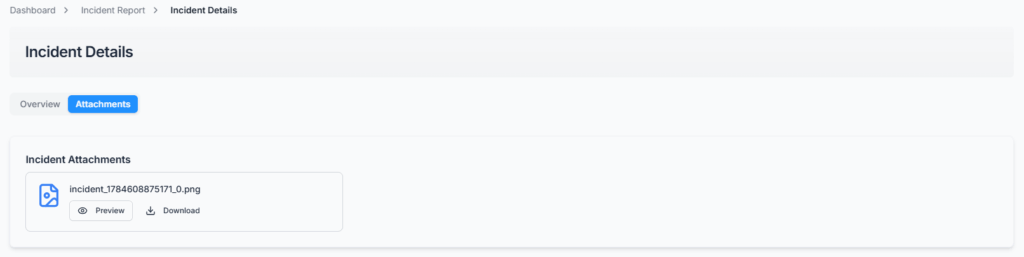
- File icon
- File name
- Preview option
- Save or Download option
Edit Incident Report #
Users can edit incident reports only if they have edit permission (or are an Incident Manager on that report’s type, which — as covered above — comes with the same edit rights).
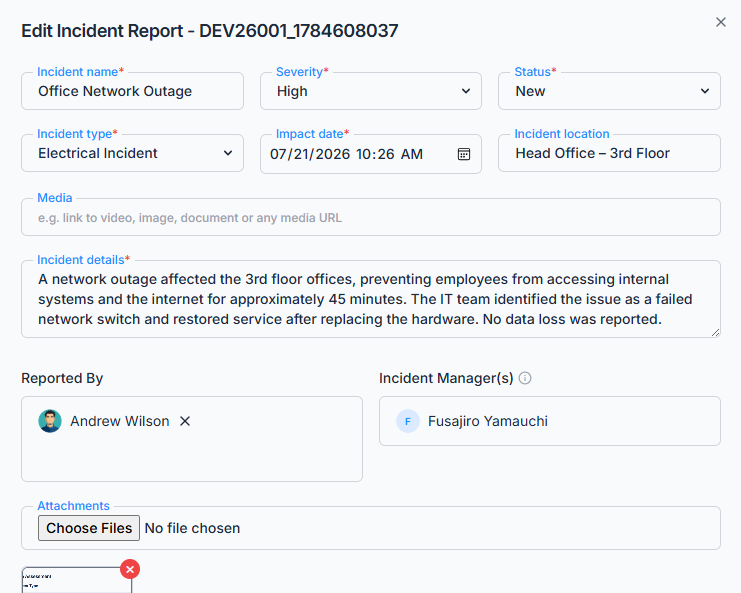
Edit permissions include:
- Edit Incident Report (For Own)
- Edit & Discard Incident Report (For All)
The Edit option appears in the action menu only when the user has the required permission and the incident is still editable.
Completed incidents cannot be edited by anyone, including “For All” holders — completing an incident locks it just as firmly as discarding does.
Edit Permission Behavior
Edit Incident Report (For Own) allows the user to edit only incidents where they are the reporter.
For this permission:
- The user can edit only their own incidents.
- Reported By is locked.
- Mark as Completed is not available.
- Discard is not available.
Edit & Discard Incident Report (For All) allows the user to manage any incident.
For this permission:
- The user can edit any incident.
- Reported By is editable.
- Mark as Completed is available.
- Discard is available, once the incident is completed.
Good to know: the Incident Manager(s) field is never directly editable by anyone, under either permission. It always follows whatever managers are currently configured on the incident’s Incident Type — if you need to change who’s shown as the manager, update the Incident Type’s manager list in Incident Config instead.
Good to know: unlike some other approval-style features in Office-X, there’s no rule stopping someone from completing or discarding an incident they reported themselves. If you hold Edit & Discard Incident Report (For All), that applies to your own reported incidents too, not just other people’s.
Mark as Completed #
Mark as Completed is a checkbox inside the Edit form — it isn’t a separate button. It’s available only to users with Edit & Discard Incident Report (For All) (or the Subscriber Admin), and only while the incident isn’t already completed.
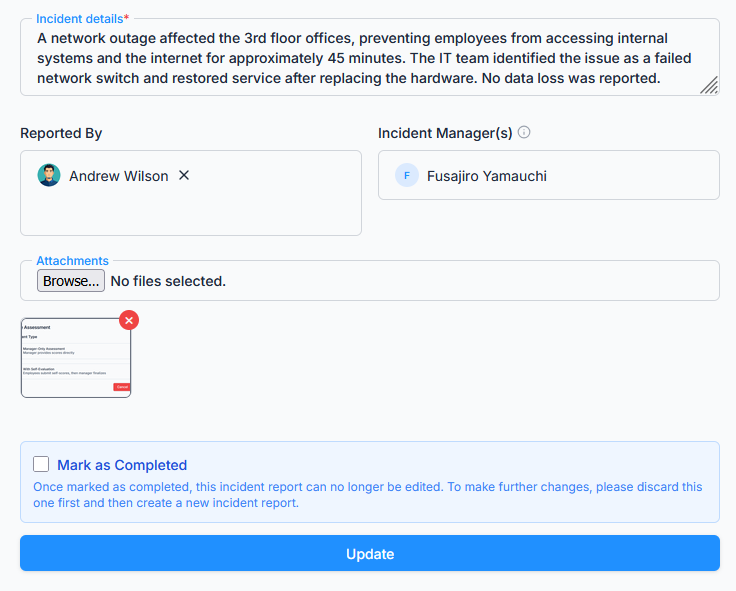
Once an incident is marked as completed:
- The incident becomes completed.
- It becomes non-editable — for everyone, including “For All” holders.
- The Edit option is no longer available.
- The incident becomes eligible for discard.
This protects finalized incident records from further changes.
Discard Incident #
The system does not permanently delete incident reports. Instead, it uses a discard mechanism.
Only users with Edit & Discard Incident Report (For All) (or the Subscriber Admin) can discard incidents.
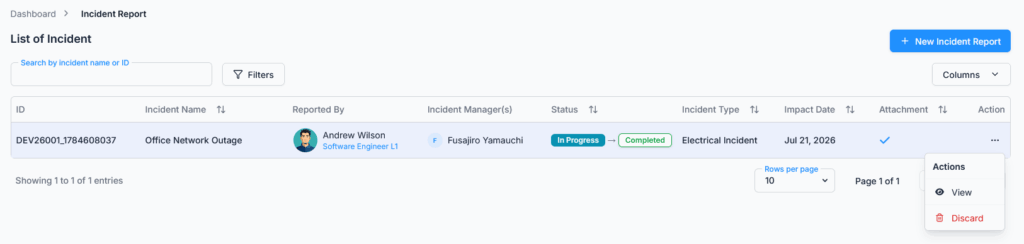
The Discard option appears only when:
- The incident is completed.
- The incident is not already discarded.
- The user has Edit & Discard Incident Report (For All) permission.
When a user clicks Discard, a confirmation window titled “Confirm Discard” appears, asking: “Are you sure you want to discard this completed incident report? This action cannot be undone.”
The discard action is genuinely irreversible — there’s no undo option anywhere in Office-X once an incident is discarded.
After discard:
- The incident is marked as discarded.
- It cannot be edited.
- It cannot be discarded again.
- It remains stored for history and audit purposes.
- It can still be found using the Discarded filter.
Incident Lifecycle #
Rather than one single status that moves through fixed stages, an incident report’s state is really made up of three independent pieces:
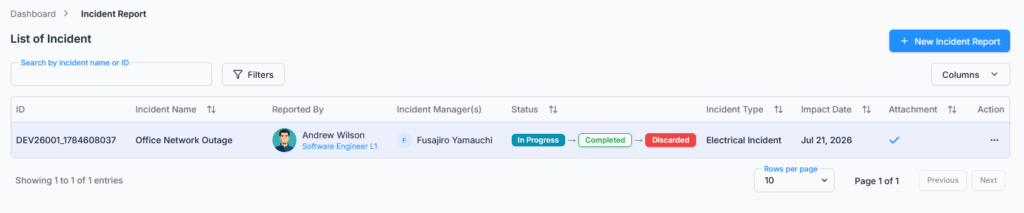
- Its Status — whichever label was chosen from your company’s configured Status list (e.g., Open, Under Review). This is just descriptive and can be updated any time before the incident is completed; it doesn’t by itself lock or unlock anything.
- Whether it’s Completed — a yes/no flag set via the Mark as Completed checkbox. Once Completed, the incident is locked from further edits.
- Whether it’s Discarded — a yes/no flag, only settable once Completed is true, and permanent once set.
In practice, an incident report’s journey looks like: created → (Status label changes as needed while it’s being worked on) → marked Completed (locked from edits) → optionally Discarded (removed from active tracking, kept for history). Only completed incidents can be discarded.
Working an Incident as an Incident Manager #
Here’s exactly what happens, end to end, when someone reports an incident that falls under a type you manage.
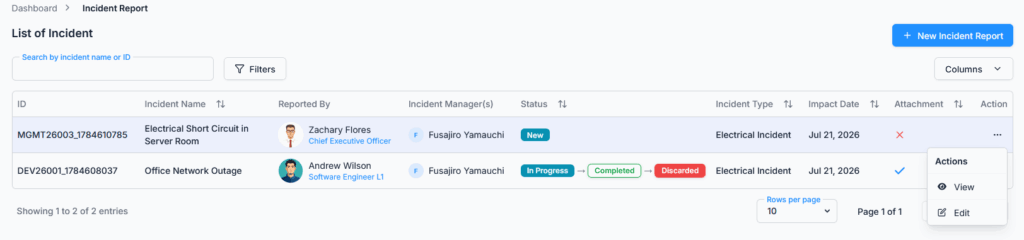
The report appears in your list immediately. As soon as an incident of your managed type is created, it shows up in your Report → Incident list right away. If you manage more than one Incident Type, all of their incidents appear together in this same single list, not split into separate views — use the Incident Type filter if you want to narrow it down to just one type at a time.
There’s no “new” badge or “assigned to me” filter. Just with Edit/Complete/Discard options available on the rows you’re allowed to act on. You will, however, be notified separately the moment a new incident is created under your managed type (see Notifications and Emails below), so you don’t have to keep checking the list manually to find out.
The actual workflow is:
- The incident appears in your list, and you’re notified.
- While you’re looking into it, you can open the same Edit form used everywhere else and update its Status label (e.g., from “Open” to “Under Investigation”) to reflect where things stand.
- Once you’re done, tick the Mark as Completed checkbox in that same Edit form and save. This locks the report from further edits (by anyone) and notifies the reporter that it’s been completed.
- From there, you can optionally Discard it to remove it from active tracking, which also notifies the reporter.
Notifications and Emails #
Four events send a notification. Each one always creates an in-app notification, and separately attempts to send an email — the email only actually goes out if your company has an active email template for “Incident Report” and a working email (SMTP) setup; otherwise it’s silently skipped and only the in-app notification arrives. Every recipient also needs an email address on file for the email specifically to reach them.
1. Incident Report Created
- Who gets it: the Incident Type’s current managers. If that type has no managers configured, the Subscriber Admin gets it instead, so a report never goes completely unnoticed.
- In-app notification: titled “New Incident Report,” reading “A new incident report [ID] ‘[Incident Name]’ has been reported and needs your attention.”
- Email to the managers: subject shows the report as newly “Reported,” with an intro saying a new incident report has been submitted and requires their attention — including the incident name, type, severity, who reported it, and a link straight to the report.
- Email to the reporter, separately: a confirmation that their incident report was submitted successfully and is now under review.
2. Status Label Changed
- Who gets it: the reporter only — unless the reporter is the one who made the change, in which case nobody is notified.
- In-app notification: titled “Incident Report Status Updated,” reading “The status of your incident report [ID] ‘[Incident Name]’ has been updated to [New Status].”
- No email is sent for this event — only the in-app notification.
3. Marked Completed
- Who gets it: the reporter only — again, unless they completed their own report themselves.
- In-app notification: titled “Incident Report Completed,” reading “Your incident report [ID] ‘[Incident Name]’ has been marked as completed.”
- Email: confirms the report has been marked completed.
- Managers aren’t separately notified when a report they manage is completed — only the reporter is.
4. Discarded
- Who gets it: the reporter only.
- In-app notification: titled “Incident Report Discarded,” reading “Your incident report [ID] ‘[Incident Name]’ has been discarded.”
- Email: confirms the report has been discarded.
Good to know: a notification or email failure (missing template, missing email address, mail server issue) never blocks or reverses the underlying action — the status change, completion, or discard always goes through regardless of whether anyone actually gets told about it.
Summary #
The Incident Report feature helps organizations record, manage, complete, and preserve workplace incident records in a controlled way.
Admins configure incident values — Status, Severity, and Incident Type (including each type’s Incident Managers) — from Incident Config, assign the five Incident Report permissions from Admin → Permission → Report, and users manage incidents from Report → Incident.
Visibility isn’t just “your own reports vs. everything” — it also includes whoever created the report on someone else’s behalf, and whoever currently manages that report’s Incident Type. Being an Incident Type manager additionally grants company-wide create and edit-and-discard rights automatically, which is worth keeping in mind when assigning managers. Managers are notified the moment a new incident under their type is filed, and reporters are kept in the loop at every step — status changes, completion, and discard — through in-app notifications and, where configured, email.
This ensures incident reports are accurate, traceable, secure, and compliant with company policy.