
The View All Leaves module allows authorized users to view all leave requests submitted by employees, across every leave type (Casual, Sick, Annual, Lieu, etc.) and every status (Pending, Approved, Rejected, Cancelled). It’s a company-wide, read-only monitoring view — it doesn’t let you approve, reject, cancel, edit, or delete anything from here.
Access to this module is permission-based. Route: Dashboard → Leave → View (the page itself is titled “All Leaves”).
Who Can Use This Feature #
Subscriber Admin can always access View All Leaves and see every leave request in the company, without needing any specific permission.
Employees can access it only if they hold the required permission below.
Permission Behavior
One permission controls access to this entire page:
- View All Leave Requests (Route Access)
Required action: View
Grants access to the View All Leaves page, showing every employee’s leave requests company-wide.
Without this permission (and without being the Subscriber Admin), attempting to open this page shows a “no access” message instead of the leave list.
This permission can be assigned directly to an employee, or to an entire team at once (so everyone on that team inherits it, including teams set up as “all employees” or “all reporting managers”). See the Permissions Management guide for how to assign permissions.
What the List Shows #
Each row in the All Leaves table shows:
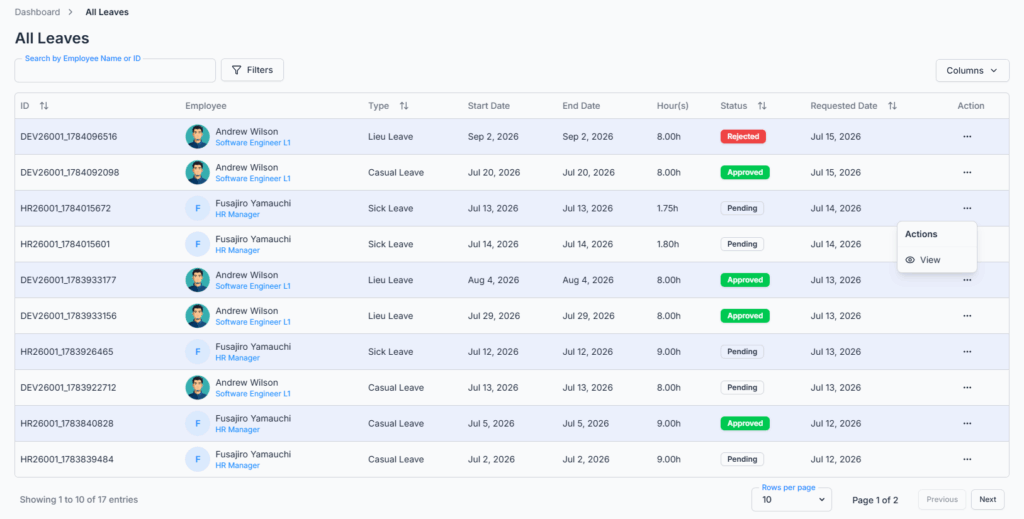
- ID — the leave request’s own Request ID, or the employee’s ID if a Request ID isn’t available.
- Employee — the requester’s photo, name, and designation.
- Type — the leave type (Casual, Sick, Lieu, etc.).
- Start Date / End Date — the leave period.
- Hour(s) — the requested/calculated hours for the leave.
- Status — Pending, Approved, Rejected, or Cancelled.
- Requested Date — when the request was originally submitted (sortable).
- Action — a View option that opens the request’s details.
You can show or hide most of these columns yourself using the Columns option above the table.
By default, the newest submitted requests appear first.
Search and Filters #
You can narrow the list using:
- Search — by employee name or employee/request ID.
- Leave Type — filter to a single configured leave type.
- Status — Pending, Approved, Rejected, Cancelled, or All.
- Requested Date (From / To) — a date range.
Good to know: the Requested Date filter narrows results by when the request was submitted, not by the leave’s own start or end date. If you’re trying to find every leave that falls within a particular period of time off (rather than requests submitted during a particular window), this filter won’t do that — use the Leave Type/Status filters and Search instead, or scan the Start Date/End Date columns directly.
All searching and filtering happens on the server, so it stays accurate and fast even with a large number of leave requests, and results are spread across pages (10 per page by default, adjustable to 20 or 30) rather than loaded all at once.
Viewing a Leave Request’s Details #
Clicking View (or clicking anywhere on a row) opens that leave request’s details, showing:
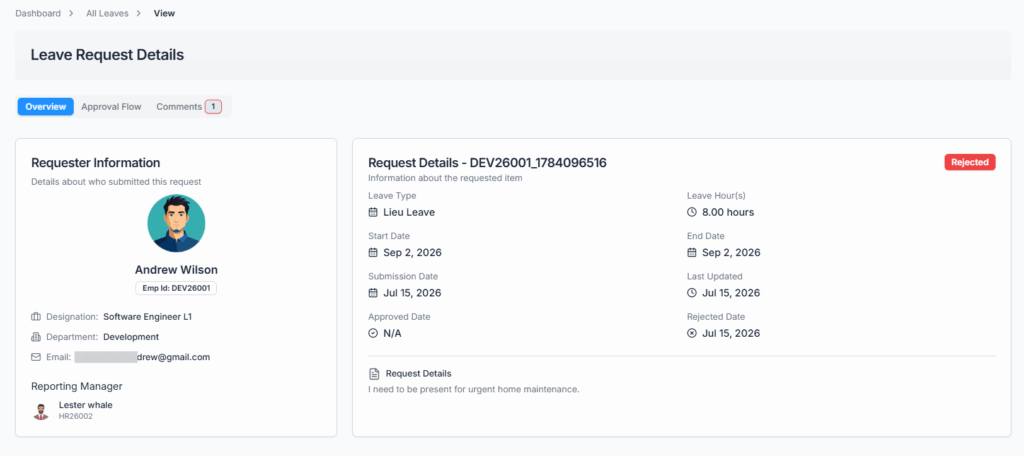
- An overview of the request — employee, leave type, period, hours, and reason.
- The approval flow steps and history, if the request has one.
- Comments on the request.
Good to know: unlike opening the same leave request from the Approve Leaves page, opening it from View All Leaves does not show the employee’s Leave Quota/balance breakdown — that tab simply isn’t part of this view. If you need to see someone’s leave balance alongside a specific request, that’s currently only available from the Approve Leaves page (if you’re an approver for it) or the employee’s own profile.
Known limitation: View All Leaves is meant to let anyone holding its permission open any request’s details. In practice, if you’re not the requester, their reporting manager, a named approver on the request’s approval flow, or the Subscriber Admin, clicking into a specific request’s details page can send you back to the list instead of showing the details — even though the request appeared there in the first place. If this happens, ask the Subscriber Admin, the employee’s reporting manager, or one of the request’s approvers to pull up the details for you.
Good to know: there’s currently no Excel or PDF export option on this page — unlike some other modules in Office-X, the list is for on-screen review only.
Leave Quota and Balance Calculation #
When an employee requests leave, Office-X automatically calculates their leave balance based on:
- Assigned work hours
- Company leave policy
- Previously used leave
This leave quota information is visible on the employee’s profile and while creating a leave request — see the Create Leave Request guide for exactly how each figure (Entitled, Earned, Used Paid, Used Unpaid, Remaining Balance, and Overused) is calculated. View All Leaves itself is a request-tracking view only; it doesn’t display quota or balance figures anywhere in the list or in the details it opens.
Summary #
The View All Leaves module ensures that authorized users have full visibility of all leave requests, across all leave types and statuses. It’s mainly used to monitor leave activity and maintain historical records — it does not offer any way to act on a request, only to search, filter, and review it. Permission controls (the View All Leave Requests (Route Access) permission, or Subscriber Admin status) maintain security while providing a single source of truth for company-wide leave visibility.