Skip to content
Office-X
Partners Pricing Add-ons FAQ Help Center
Sign in Start free trial →
Features & Solutions

Everything You Need to
Make Your Workplace Smarter

Office-X brings your people, payroll, clients, and daily operations together in one secure workspace.

Employee Management
Onboarding & Performance Manage and track growth
Attendance & OT IP-locked check in + overtime
Time off / Leave Requests, balances & approvals
Internal Support Tickets & helpdesk
Payroll Paystubs & Tax statements
Work Shifts Schedule Create and manage rosters
Business Management
CRM Manage leads, clients & sales
Estimate & Agreements Quotation + e-sign docs.
Web & AI Phone Bookings Automated scheduling
Activity Log Who did what, when & where
Permissions & Approvals Multi-level approval flows
Business Management
Task Management Assign & track work
Asset & Incident Tracking Track assets & report incidents
Bill, Travel & Purchase Approve & manage expenses
Holiday Calendar Company-wide holidays
Email Templates & SMTP Branded emails & delivery
Employee Management
Onboarding & Performance Attendance & OT Time off / Leave Internal Support Payroll Work Shifts Schedule
Business Management
CRM Estimate & Agreements Web & AI Phone Bookings Activity Log Permissions & Approval Flow Task Management Asset & Incident Tracking Bill, Travel & Purchase Holiday Calendar Email Templates & SMTP
Partners Pricing Add-ons FAQ Help Center
Sign in Start free trial

Getting Started

1
  • Getting Started with Office-X

Subscription & Billing

1
  • How Seats Work in Office-X

Features & Modules

80
  • Overview
  • Business Management
    • Company
    • Billing & Payment
    • Payroll Configuration
    • Business Support
  • Employees Module
    • Employee List
    • Adding a New Employee
    • View Employee Details
    • Edit an Employee
    • Reset Password
    • Work Hours/Shift Hours
    • Change Status
    • Assign/Unassign Seat
    • Opening Balance
    • Assign Work Days
    • Visual Guide
  • Privacy & Security
    • Security
  • Performance Management
    • Performance Management
  • Work Shifts
    • Work Shifts
  • Tasks
    • Schedule
    • History
    • Customers
  • Holidays Calendar
    • Calendar
  • Attendance Management
    • Attendance Records
    • Individual Attendance Summary
    • Overall Attendance Summary
    • Visual Guide
  • Leave Management
    • Create Leave
    • Approve & Reject Leave
    • Cancel Approved Leave
    • View All Leaves
    • Visual Guide
  • Bill Management
    • Create Bill
    • Approve & Reject Bill
    • View All Bills
    • Visual Guide
  • Travel Requests
    • Create Travel Request
    • Approve & Reject Travel Request
    • View All Travel Requests
    • Visual Guide
  • Purchase Requests
    • Create Purchase Request
    • Approve & Reject Purchase Requests
    • View All Purchase Requests
    • Visual Guide
  • Payroll (Bangladesh)
    • Business → Payroll Configuration
    • Payroll Management
    • Income and Tax Statement
    • Visual Guide
  • Incident Report
    • Incident Report
  • Asset Tracking
    • Asset Tracking
  • Admin Module
    • Department
    • Designation
    • Pay Type
    • Employment Status
    • Leave Types
    • Benefits
    • Expense Category
    • Teams
    • Forms
    • Events & Announcements
    • Incident Configuration
    • IP Configuration
    • Currency
    • Support Categories
    • Integrations
  • CRM
    • Clients
    • Items
    • Estimates
    • Docs
    • Agreements
    • Bookings
  • Support
    • Create Support Request
    • Resolve Support Requests
    • View All Support
    • Visual Guide
  • Activity Logs
    • Activity Logs
  • Permissions & Approval Flows
    • Permissions Management
    • Approval Flows
  • SMTP & Email Templates
    • SMTP Config
    • Email Templates
View Categories
  • Home
  • Docs
  • Features & Modules
  • Attendance Management
  • Attendance Records

Attendance Records

Attendance is an important part of Office-X. It keeps track of when your people start work, when they finish, how long they took a break, and how many extra hours they put in. Everything an employee records here flows straight into leave balances and payroll, so you only have to get it right once.

This guide walks you through the whole thing: what employees do every day, how you find and check their records, how you fix a mistake, and how you approve overtime.

Where to Find It #

Go to Dashboard → Attendance.

Depending on what you’re allowed to see, the page shows up to three tabs:

  • Attendance Records — the day-by-day list. This is the tab this guide is about.
  • Individual Attendance Summary — one employee’s totals over a period. See its own guide.
  • Overall Attendance Summary — everyone’s totals side by side, with an Excel export. See its own guide.

If you don’t have permission for the two summary tabs, you’ll simply land on the Attendance Records list with no tabs at all.

Who Can Use This Feature #

Subscriber Admin can always view and manage every employee’s attendance, without needing any specific permission.

Every employee can check themselves in and out for their own day, and can always see their own attendance history in the list — that part doesn’t need anything special, regardless of permissions. Viewing, correcting, or approving other employees’ attendance needs one of the permissions below.

Permission Behavior

This is controlled from: Admin → Permission → Attendance

Most attendance actions come in two versions — (For Others) and (For Subordinates) —

  • For Others — Allows you to perform these actions for any employee except yourself. You cannot approve, manually add, or reclassify hours on your own attendance record.
  • For Subordinates — only employees in your own reporting chain (people who report to you, directly or through someone else who reports to you) — with the same self-exclusion as above.

This is separate from the Employee Attendance Portal described further down — checking yourself in and out for your own day never needs any permission at all, regardless of what you hold here.

  • View Attendance (For All / For Subordinates)
    Lets you open the Attendance Records list for all employees, in that scope. Without either one, you still see the list — but only your own rows.
  • Create Manual Attendance (For Others / For Subordinates)
    Lets you add or correct a manual attendance entry for someone else, in that scope.
  • Approve Check-in / Check-out (For Others / For Subordinates)
    Lets you approve a pending check-in or check-out for someone else, in that scope.
  • Approve OT/Lieu Hours (For Others / For Subordinates)
    Lets you approve overtime and lieu-leave hours for someone else, in that scope — this one also covers the Rest Day, Holiday and Weekly Overtime approvals.
  • Bulk Approve Check-in / Check-out (For Others / For Subordinates)
    Lets you approve check-ins or check-outs for several employees at once, in that scope.
  • Overall Attendance Summary and Individual Attendance Summary
    Separate permissions covering the two attendance summary pages — see those guides.

Good to know: The Bulk Approve permission works on its own. You do not need the separate Approve Check-in/Check-out permission. With Bulk Approve (For Others or For Subordinates), you can select attendance records and approve them individually or in bulk.

There’s no Delete permission for attendance — Office-X doesn’t allow deleting an attendance record. A wrong entry is corrected by submitting a new Manual Attendance entry, not by removing the old one (see below).

These permissions can be assigned directly to an employee, or to an entire team at once. See the Permissions Management guide for how to assign permissions.

Before You Start #

Three things must be set up first, or nobody will be able to check in. If you’re setting up Office-X for the first time, do these before you tell your team to start using attendance.

  1. Add your office IP address under Admin → IP Config.
    Office-X only accepts a check-in from an IP address on this list. If the list is empty, everyone is blocked — including the Subscriber Admin. So add at least one active IP before anything else.
  2. Set each employee’s work schedule (their working days and shift hours).
    Without a schedule, Office-X doesn’t know which days are working days, how long a shift is or when overtime starts — so it blocks the check-in and asks you to set the schedule first.
  3. Add your holidays under the company calendar and set your company time zone.
    Office-X decides what “today” means using your company’s time zone, not the employee’s browser or phone. If the time zone is wrong, late-evening check-ins can land on the wrong date.

Good to know: If an employee needs to work on a weekend or holiday, you must assign them a Workday for that date beforehand. Office-X will not allow them to check in on a non-working day unless a workday has been assigned.

Employee Attendance Portal #

Every employee has their own small panel to record their own day. It sits at the top of the Attendance page, and the same buttons are also on the employee dashboard in the My Attendance Today card — use whichever is closer to hand, they do exactly the same thing.

Portal View

  • Current Status: Not Checked In / Checked In / Checked Out
  • Current Date and Time: e.g., January 22, 2026, 5:19 PM, refreshing automatically every minute
  • Check In / Check Out Buttons: employees mark their attendance with these. Check In becomes unavailable once used for the day and Check Out only becomes available after checking in.

When You Check Out

Clicking Check Out opens a small window asking for your break time before it finalizes your check-out for the day. If you took a break, enter the duration in minutes (leave it empty otherwise). A break can be up to 3 hours (180 minutes), and it can’t be longer than the hours you actually worked. Break time is unpaid, so it is taken out of your worked hours.

If you worked during night-premium hours, tick the box below and enter the exact break start and end time so your night hours are calculated accurately.

Good to know: the “Worked during night-premium hours?” checkbox and the exact break start/end fields only show up for employees who are actually eligible for Night Premium or Night OT — this is set per employee (Edit Employee → Eligible for Night Premium / Eligible for Night OT), defaulting from your company’s Business → Payroll Configuration but adjustable per employee. If neither is enabled for you, you’ll just see the plain Break Time (minutes) field, with no checkbox at all.

Night Shifts That Cross Midnight

If an employee starts work in the evening and finishes after midnight, Office-X still records the full shift correctly. It links the shift to the day the employee started work. For example, a shift from Monday 10:00 PM to Tuesday 6:00 AM will appear as Monday’s attendance record.

When Check-In Is Blocked

Office-X stops a check-in in a few situations, and always tells you why on screen:

  • You’re outside the office network — your IP address isn’t on the allowed list.
  • Your work schedule isn’t set yet — ask your admin to set it.
  • You’re on approved full-day leave — you can’t check in on a day you’ve already been given off. (A partial leave of less than a full day still lets you check in.)
  • It’s your weekend or a company holiday and nobody assigned you to work that day.
  • You already checked in today — one check-in per day, per person.

IP Restriction

If the employee’s current IP address isn’t on the allowed list (configured under Admin → IP Config), Office-X blocks the check-in or check-out entirely.

This helps prevent someone from marking attendance from outside an approved location or network.

Finding the Records You Need #

The list opens on today. Everything you need to move around it sits in the toolbar just above the table.

  • Search box — type an employee’s name or their Employee ID. Results update as you type.
  • ◀ and ▶ arrows — jump one day back or one day forward. The forward arrow greys out when you’re already on the latest day, so you can’t wander into the future.
  • Filters button — opens the filter panel (see below). The number on the button tells you how many filters are currently on.
  • Columns button — tick or untick any column to show or hide it.
  • Pagination at the bottom — 10, 20 or 30 rows per page, and a “go to page” box for long lists.

Filters

Select the filters you need and click Apply. Use Clear to remove all filters and reset the list. Your selected filters will appear as small Active Filters labels below the toolbar, so you can easily see which filters are currently applied.

  • Status — All, Present, Absent, On Leave, Holiday or Weekend.
  • Eligibility Type — All, OT + Lieu (Both), Overtime Only, Lieu Only, or None. Useful when you only want to approve overtime and don’t want lieu-only people in the way.
  • Worker Type — All, Shift Worker or Regular Worker. This filter only appears if your company actually has shift workers.
  • Employment Type — All, Full-Time Employee, Part-Time Employee or Contractor.
  • Check In Date — a From and To date. This is how you pull up a whole week or a whole month instead of a single day. You can’t go back further than the date your company joined Office-X.

Good to know: you can also sort the list by clicking the Date, Status, Check-In or Check-Out column headings.

Attendance List Table #

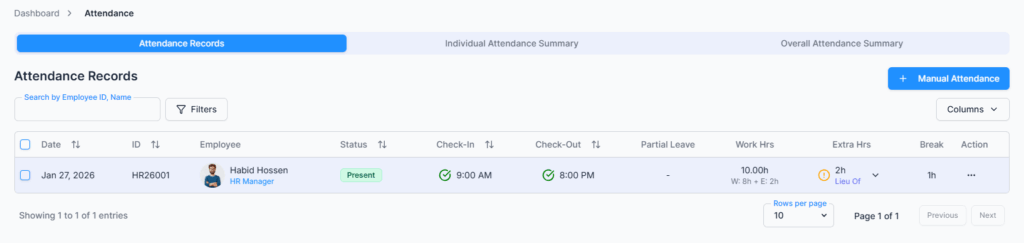
The table shows one row per employee per day — every day in the range you picked, not only the days somebody clocked in. So a day off, a weekend, a holiday or a plain missed day all still get their own row, marked Absent, Weekend, Holiday or On Leave automatically. You never have to create a row for a day someone didn’t turn up.

These columns are always there:

  • Date — the day, with weekday.
  • Employee — photo, name, ID, designation, and any eligibility badges (OT for overtime, Lieu for lieu leave, Shift for shift workers). Hover over the name to open a small card with their email, whether they’re eligible for OT, Lieu and Tier 2 OT, their employment type, worker type and their working days. This is the quickest way to answer “why did this person get lieu hours instead of overtime?”
  • Status — Present, Absent, On Leave, Weekend or Holiday. A small coloured dot next to the badge means something extra: Present on Holiday, Present on Weekend, or Assigned Work Day. Hover the dot to see which.
  • Check-In and Check-Out — the recorded times. A green tick means approved; an orange warning mark means it’s still waiting for approval. Hover to confirm.
  • Partial Lv. — any partial (less than full-day) approved leave hours that day, e.g. 2h or 4h.
  • Regular — hours worked at the normal rate, based on the employee’s work hours.
  • Total Hrs — the day’s full total, including any extra hours.
  • Break — unpaid break time taken that day. If the employee worked night hours and gave an exact break window, a small info icon shows the exact break start and end time.
  • Action — the three-dot menu. What’s inside depends on your permissions and on what still needs doing for that row. If there’s nothing for you to do, no menu appears at all.

Good to know about Total Hrs.: If an employee is eligible for both Overtime and Lieu Off, the same weekend or holiday hours can be counted for both. However, Total Hrs. counts those hours only once, so the total reflects the employee’s actual working time. Because of this, adding all the individual hour columns together may give you a higher number than Total Hrs. This is expected and not an error.

Beyond those, the table can show a large set of extra-hours columns — but only the ones your company has actually configured and that apply to the employee eligibility involved, so most companies will only see a handful of these at once. The names are shortened to fit the table:

  • Lieu Hrs — extra hours banked as paid time off instead of being paid out.
  • Non-Elig. Hrs — “Non-Eligible Hours”: extra hours worked by someone who isn’t eligible for overtime or lieu. Recorded so you can see them, but never paid or credited.
  • Night Premium — normal hours that fell inside your company’s night window (22:00–06:00 by default).
  • D/OT and D/OT Night — “Daily Overtime”: hours past the employee’s daily overtime threshold, and the part of it that fell in the night window.
  • D/T2 OT and D/T2 OT Night — “Daily Tier 2 Overtime”, sometimes called double-time: hours past a second, higher threshold. Only fills for employees marked Tier 2 OT eligible.
  • W/OT and W/OT Night — “Weekly Overtime”: hours past the weekly threshold. See Weekly Overtime Approval below.
  • Monthly Excess OT — overtime that went past the monthly cap and had to be reclassified.
  • Rest Premium, Rest Night, Rest OT, Rest OT Night, Rest D/T2 OT (+ Night) — all the weekend / rest-day categories.
  • Holiday Premium, Holiday Night, Holiday OT, Holiday OT Night, Holiday D/T2 OT (+ Night) — the same set again, for official holidays.

Each of these is the same overtime category used elsewhere in Office-X (for example, on the Opening Balance and Payroll Configuration pages), just shown here as it’s actually earned day by day.

Manual Attendance — Fixing a Missed or Wrong Entry #

Use this when someone forgot to check in or out, or when a time needs correcting. Office-X never deletes an attendance record — you fix it by submitting the right times instead.

There are two ways in, and the second one is usually easier:

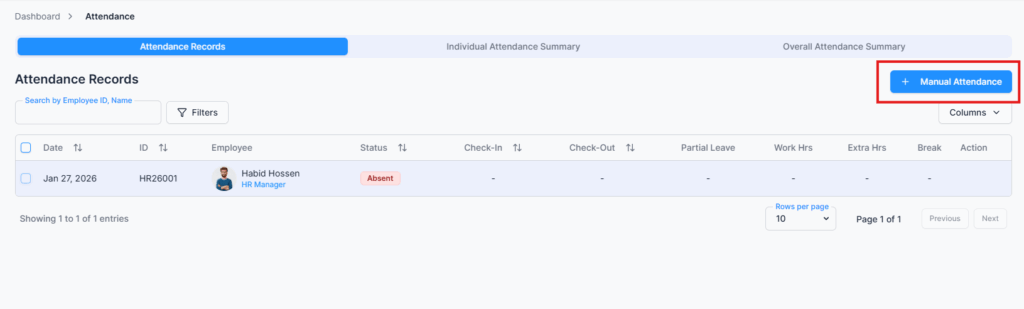
  • The Manual Attendance button at the top right of the page — opens an empty form.
  • The three-dot Action menu on the row itself → Manual Attendance — opens the same form with the employee, the date, and any times and break already filled in for you. You just change what’s wrong. Use this one when you’re correcting an existing row.

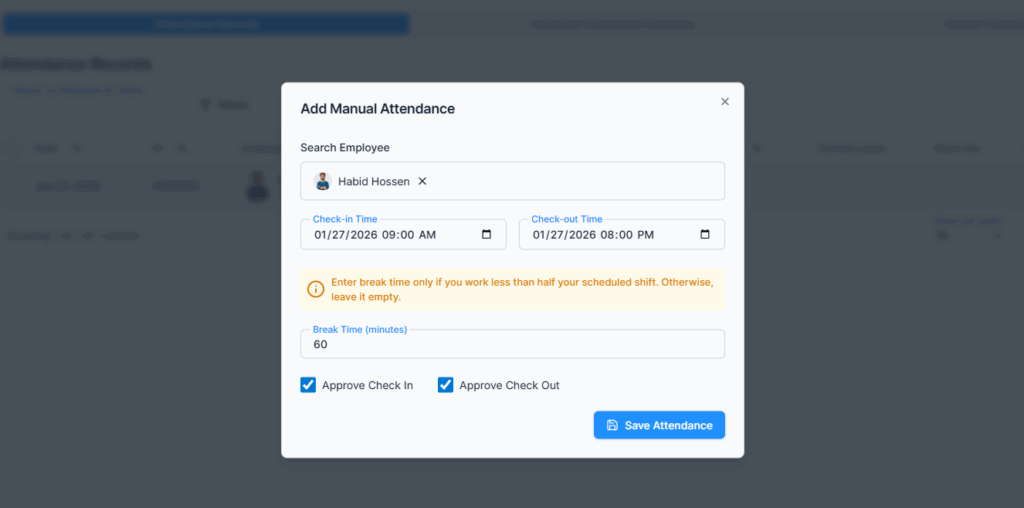
How to do it

  1. Open the form from the row you want to fix, or from the button at the top.
  2. Search Employee — type their name or email and pick them from the list. Already filled in if you came from a row.
  3. Check-in Time and Check-out Time — each field holds a date and a time together, so you can fix yesterday’s record from today. You can fill in just one of them if only one is wrong.
  4. Break Time (minutes) — up to 3 hours (180 minutes), and never more than the hours actually worked. If the employee is eligible for Night Premium or Night OT, tick “Worked during night-premium hours?” to enter an exact break start and end time instead, so the night hours come out right.
  5. Click Save Attendance.

The rules Office-X checks for you

  • You can’t record attendance for a future date.
  • You can’t record a date before the employee’s joining date.
  • The date must have been a working day for that employee — a weekend or holiday only works if they had an Assigned Work Day.
  • The break must sit inside the check-in and check-out times, and the break end must come after the break start.
  • If the employee had a partial leave that day, the check-out time has to match the shorter day. Office-X tells you the exact time it expects, for example: “Employee has a 4-hour leave on this day. Checkout time should be 1:00 PM.”

Once submitted, the entry is saved as Pending — it still needs to be approved from the Action menu afterward, the same as a normal check-in or check-out (see below). The employee also gets a notification telling them their time was updated.

Good to know: Once a check-in or check-out is approved, it can no longer be changed through Manual Attendance.

Partial Leave Days: What to Expect #

This one surprises people, so it’s worth knowing up front.

When an employee has an approved partial leave (less than a full day), Office-X already knows they’re only expected to work the remaining hours. So when they check out, the recorded check-out time is capped at check-in + the hours they still owed + their break — even if they actually clicked Check Out later than that.

Example: an employee normally works 8 hours and has an approved 4-hour leave that day. They check in at 9:00 AM and click Check Out at 6:00 PM. The record will show 1:00 PM, not 6:00 PM — 4 hours of work, because the other 4 hours are already covered by the leave.

This keeps the day from being paid twice: once as leave and again as worked hours. If the employee genuinely worked longer and should be paid for it, raise it with your admin — the leave hours for that day are what need changing, not the attendance record.

Approve Extra Hours / Overtime / Lieu Leave #

This section is about a normal working day — not a weekend or holiday (that’s covered separately below) — where an employee simply works longer than their scheduled shift. What happens to that extra time depends entirely on the employee’s own eligibility settings (set on their Employment Info):

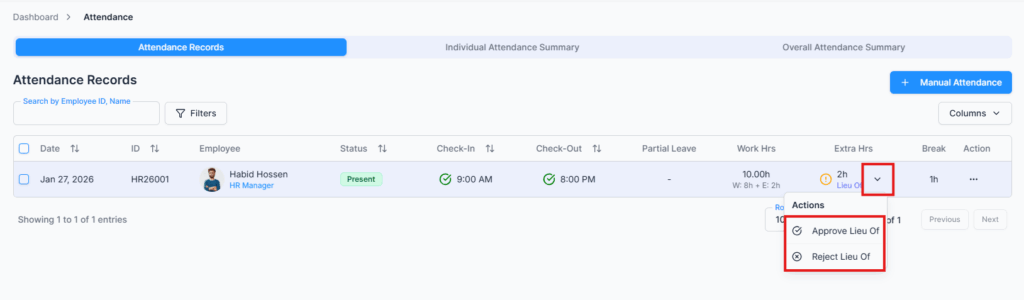
  • Eligible for Overtime only: the extra time is recorded as Overtime. An approver with the Approve OT/Lieu Hours permission clicks Approve OT to confirm it.
  • Eligible for Lieu Leave only: the extra time is recorded as Lieu Hours instead — banked as time off rather than paid as overtime. The approver clicks Approve Lieu Hours.
  • Eligible for both Overtime and Lieu Leave: on a normal working day, the extra time always goes to Overtime — never Lieu. The approver clicks Approve OT, exactly as if the employee were only Overtime-eligible.
  • Not eligible for either: the extra time is simply recorded as Non-Eligible Extra Hours for visibility — there’s nothing to approve, and it’s never paid or credited.

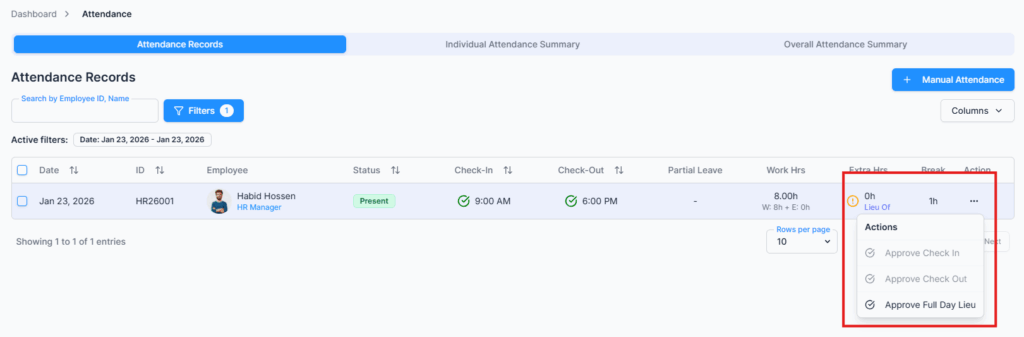
First things first: you can’t approve extra hours until both the check-in and the check-out for that day are approved. Until then the buttons are greyed out. So the order is always: approve check-in → approve check-out → approve the extra hours.

Good to know: The Rest Day/Holiday Compensation Method only applies when an employee works on a weekend or holiday. It does not affect overtime on a regular working day. On a normal working day, any extra hours for an employee who is Eligible for Overtime will always be counted as Overtime, regardless of the compensation method selected.

Example: An employee works 9 hours instead of their scheduled 8-hour shift, so 1 extra hour is recorded.

  • Overtime-eligible (only, or eligible for both) → the 1 hour appears under Overtime; approving it credits the employee’s Overtime balance.
  • Lieu-eligible only → the 1 hour appears under Lieu Hrs; approving it credits the employee’s Lieu balance.
  • Neither → the 1 hour appears under Non-Eligible Extra Hours; there is no approval action, and the time is not paid or credited.
  • Rest Day/Holiday: If the employee works on a weekend or holiday, the Rest Day/Holiday Compensation Method determines where the extra hours are credited:
    • Overtime only → all extra hours are credited to Overtime.
    • Lieu Leave only → all extra hours are credited to Lieu Hrs.
    • Both Overtime and Lieu Leave → the same extra hours are credited to both Overtime and Lieu Hrs. For example, 2 extra hours = 2 Overtime hours + 2 Lieu hours.
  • Once approved, the employee’s profile reflects the updated Extra Work Balance.

One decision per day: as soon as you pick one of these approval options, the rest disappear from the menu for that row. That’s on purpose a day’s extra hours can only be classified one way. So read the options before you click.

Weekend & Holiday Work Handling #

If an employee works a full day on a weekend (rest day) or official holiday, that day can be approved as full-day Overtime, full-day Lieu credit, or in some cases both depending entirely on the employee’s own eligibility and when they’re eligible for both, their Rest Day/Holiday Compensation Method setting (Overtime Only / Lieu Off Only / Overtime + Lieu Off, set per employee).

Good to know: this only becomes available once the employee already has both a check-in and a check-out approved for that day, and only if the date was set up beforehand as an Assigned Work Day for them. Office-X won’t let someone check in at all on a weekend or holiday that wasn’t specifically assigned to them.

Eligible for Overtime only

The Compensation Method setting doesn’t come into play here at all — working a full weekend or holiday day always becomes overtime pay. The approver chooses how precisely it’s calculated:

  • Approve Rest Day OT / Approve Holiday OT — pays the day exactly as worked: the portion within the normal rest-day/holiday premium rate, plus the portion that goes further into the special rest-day/holiday overtime rate.
  • Approve as FD Rest Day OT / Approve as FD Holiday OT — “FD” means full day. This pays all hours of the day at the higher Rest Day or Holiday OT rate, instead of using the lower rate for part of the day.
  • Approve as FD Regular OT — pays the entire day at the ordinary overtime rate, without any rest-day/holiday premium at all.
  • Approve as FD Regular — pays the entire day at plain regular pay, with no overtime premium whatsoever. This is a manual override for unusual cases.

Example: an employee has an Assigned Work Day on a Saturday, works 10 hours (their normal daily overtime threshold is 8 hours).

  • Approve Rest Day OT → 8 hours at the rest-day premium rate, 2 hours at the rest-day overtime rate — the actual split.
  • Approve as FD Rest Day OT → all 10 hours at the rest-day overtime rate.
  • Approve as FD Regular OT → all 10 hours at the plain overtime rate, no rest-day premium.
  • Approve as FD Regular → all 10 hours at ordinary pay, no overtime at all.

Eligible for Lieu Off only

The Compensation Method setting doesn’t matter here either — a full weekend or holiday day worked is simply converted into paid time off. The approver clicks Approve Lieu Hours (the same button used for everyday Lieu-eligible overtime — there’s no separate “FD” version of it), and the entire day’s hours are credited straight to the employee’s Lieu balance, with no overtime pay involved at all.

Example: an employee works a full 8-hour shift on a public holiday. Approving it credits 8 hours to their Lieu balance — no extra pay for that day, just 8 hours they can take off later.

Eligible for both Overtime and Lieu off

Here, the employee’s Rest Day/Holiday Compensation Method setting decides what happens. This is an employee-level setting (found under Edit Employee), and it defaults to whatever your company has set under Business → Payroll Configuration — but it can still be set differently for individual employees when needed:

  • Set to “Overtime Only”: works exactly like the Overtime-only case above — the day becomes overtime pay, and no Lieu credit is generated.
  • Set to “Lieu Off Only”: works exactly like the Lieu-only case above — the whole day is converted into paid time off, with no overtime pay.
  • Set to “Overtime + Lieu Off”: the employee gets both — the full overtime/rest-day premium pay for the day, and a full matching amount of Lieu credit for the same hours. This is not a 50/50 split between the two; it’s the full amount of each, at the same time. Approve this with the single Approve Lieu + Rest Day OT (or Approve Lieu + Holiday OT) button.

Example (“Overtime + Lieu Off”): an employee eligible for both, set to “Overtime + Lieu Off,” works a full 8-hour Saturday shift. Clicking Approve Lieu + Rest Day OT credits 8 hours at the rest-day premium pay rate and 8 hours to their Lieu balance — a genuine double benefit for that one day’s work.

Good to know: when an employee is set up this way, you’ll never see a button that quietly drops the Lieu half. Office-X hides the plain “Approve Rest Day OT” / “Approve Holiday OT” options, and renames the full-day option to “Approve as Lieu + FD Rest Day OT” (or “Approve as Lieu + FD Holiday OT”). Whichever of the “Lieu + …” buttons you click, both things are credited together: the full overtime/rest-day premium pay for the day, and a full matching amount of Lieu credit.

Not eligible for either

There’s no special approval step at all. A full weekend or holiday day worked is simply paid as an ordinary day, automatically — no overtime, no lieu credit, and nothing for an approver to click. If the employee happens to work longer than their assigned hours for that day, the extra time is recorded as Non-Eligible Extra Hours, the same as on a normal working day — visible, but not paid or credited.

Weekly Overtime Approval #

Some companies count overtime by the week instead of by the day — anything past, say, 40 hours in a week is overtime, no matter how the individual days looked. This is set per employee as their Overtime Calculation Method, and it changes what the Action menu offers you.

  • Daily method — the usual case. You see Approve OT on each day that has overtime, and you approve day by day.
  • Weekly method — the button is called Approve Weekly OT, and it appears on the last record of the week only. Clicking it approves the whole week’s overtime in one go. On the other days of that week you simply won’t see an overtime button — that’s expected, not a bug.
  • Daily + Weekly method — you get both: Approve OT on the individual days, plus a separate Approve Weekly OT on the last record of the week for the weekly portion.

Before weekly overtime can be approved

  • Every check-in and check-out for that whole week must be approved first. If even one day is still pending, Office-X tells you: “All check-in and check-out records for the week must be approved first.”
  • A weekly overtime threshold must be configured for the employee. Without it you’ll see “No weekly overtime threshold configured” — set it under Payroll Configuration or on the employee.
  • Weekly overtime can only be approved once per week. Trying again gives you “Weekly OT is already approved for this week.”

Good to know: the W/OT and W/OT Night columns only turn green once the weekly approval has actually gone through. A day whose daily overtime you already approved can still show a pending mark on its weekly columns — those are two separate approvals.

Bulk Approve Check-In / Check-Out #

To save time when managing many employees, Office-X provides Bulk Approve options for attendance.

From the Attendance List, authorized users can:

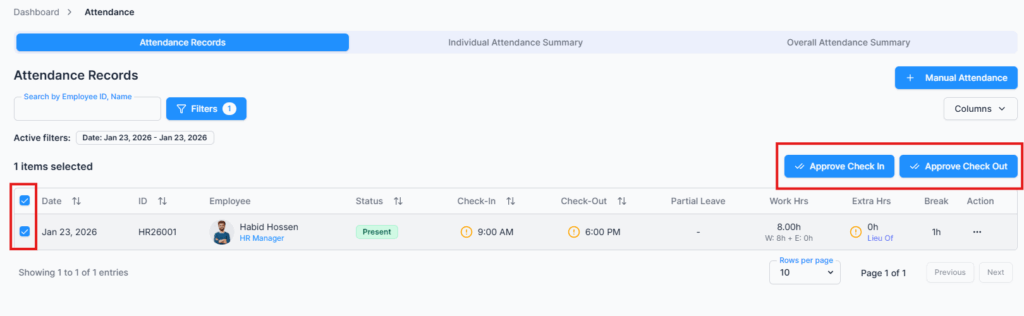
  • Select multiple employees at once using the checkboxes (only rows currently marked Present can be selected). Tick the box in the heading to select the whole page.
  • Shift+Click a second checkbox to select everything in between — much faster than ticking twenty boxes one by one.
  • Click Approve Check In to approve all the selected check-ins.
  • Click Approve Check Out to approve all the selected check-outs.

A small line above the buttons tells you how many rows you’ve selected.

Good to know: Approve Check Out stays greyed out until the check-ins you’ve selected are approved, and until every selected row actually has a check-out time. Check-in always comes first. If the button won’t light up, look for a row in your selection that hasn’t checked out yet.

This is especially useful when:

  • Many employees check in or out around the same time.
  • Managers need to approve attendance for a whole team or shift.
  • You want to avoid repetitive one-by-one approvals.

Your Daily Routine #

If you’re the person who approves attendance, here’s the short version of your day:

  1. Open Dashboard → Attendance. It already shows today — use the ◀ arrow if you’re catching up on yesterday.
  2. Open Filters and set Status to Present, so you only look at people who actually worked.
  3. Tick the heading checkbox to select the page, then click Approve Check In.
  4. Click Approve Check Out for the same selection.
  5. Scan the overtime columns. On any row with pending extra hours, open the three-dot Action menu and pick the right approval — Approve OT, Approve Lieu Hours, or one of the Rest Day / Holiday options.
  6. Anyone who forgot to check in or out? Use Manual Attendance from their row, then approve it like any other entry.

Do this once a day and payroll will have clean data at the end of the month with no catch-up work.

Notifications and Activity Log #

You don’t have to keep the attendance page open to know what’s happening.

  • When an employee checks in or out, everyone who can approve attendance gets a New Check-in Request or New Check-out Request notification.
  • When you approve something, the employee gets a notification back — for their check-in, check-out, lieu hours, overtime, rest day hours, holiday hours or weekly overtime.
  • When you correct someone’s time through Manual Attendance, they’re told what it was changed to.
  • Every one of these actions is written to the Activity Log — who did it, what changed, and when. Attendance records can’t be deleted, so the log plus the record itself gives you a complete history for audits and payroll questions.

Summary #

The Attendance Records feature gives you:

  • Accurate, IP-secured work hour tracking, including night shifts that cross midnight
  • Search, filters, day-by-day navigation and 30+ optional columns, so you can find any record fast
  • Manual correction for missed check-ins and check-outs, with no deletions
  • Partial leave, overtime and lieu tracking that lines up with payroll
  • Weekend, holiday and weekly overtime handling
  • Individual and bulk approval workflows for managers and admins
  • Notifications and a full activity log, so nothing happens quietly

All attendance data stays consistent with payroll, leave balances, and employee records — and once an entry is approved, it’s locked in and can’t be edited or deleted, only corrected going forward.

Updated on August 19, 2026
Individual Attendance Summary
Table of Contents
  • Where to Find It
  • Who Can Use This Feature
  • Before You Start
  • Employee Attendance Portal
  • Finding the Records You Need
  • Attendance List Table
  • Manual Attendance — Fixing a Missed or Wrong Entry
  • Partial Leave Days: What to Expect
  • Approve Extra Hours / Overtime / Lieu Leave
  • Weekend & Holiday Work Handling
  • Weekly Overtime Approval
  • Bulk Approve Check-In / Check-Out
  • Your Daily Routine
  • Notifications and Activity Log
  • Summary

Office-X brings your people, payroll, clients, and daily operations together in one secure workspace.

Facebook Linkedin Youtube

Company

  • Partner Programme
  • Pricing
  • Trust & Security
  • Free Migration

EMPLOYEE MANAGEMENT

  • Onboarding & Performance
  • Attendance & OT
  • Time off / Leave
  • Work Shifts Schedule
  • Payroll
  • Internal Support

BUSINESS MANAGEMENT

  • CRM, Estimate & Agreement
  • Tasks Management
  • Web & AI Phone Bookings
  • Activity log
  • Permissions & Approval Flow
  • Asset & Incident Tracking

Resources

  • Help Center
  • See how it works
  • FAQs
© Office-X. All rights reserved.
  • Terms of Service
  • Cookie Policy
  • Privacy Policy