
The Add Employee feature allows authorized users to create a complete employee profile in Office-X.
The employee creation process is completed through a guided 5-step form. Each step collects specific employee information, including employment details, personal information, addresses, bank details, benefits, leave entitlements, overtime eligibility, lieu leave eligibility, and shift worker status.
After successful creation, the employee appears in the Employees list, and the system sends a welcome email to the employee’s work email with login credentials.
Who Can Use This Feature #
Subscriber Admin can always create new employees, without needing any specific permission.
Employees can create new employees only if they hold the permission below.
Permission Behavior
This is controlled from: Admin → Permission → Employee → Create Employee
- Create Employee
Required action: Create
Lets you open the Add Employee wizard and submit it to create a new employee.
Without this permission (and without being the Subscriber Admin), the + Add Employee button doesn’t appear on the Employees page, and opening the first step of the wizard directly shows Access Denied.
This permission can be assigned directly to an employee, or to an entire team at once. See the Permissions Management guide for how to assign permissions.
Access / Navigation #
To add a new employee:
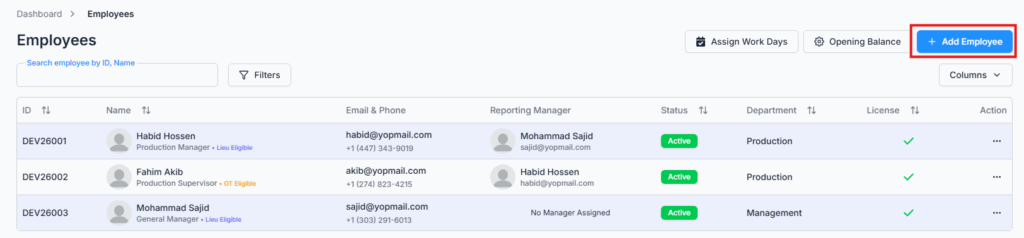
- Go to Dashboard → Employees.
- Click the Add Employee button.
- The system opens the Add Employee multi-step form.
Navigation path:
Dashboard → Employees → Add Employee
Add Employee Page Layout #
The Add Employee page has a 5-step wizard:

- Employment Info
- Personal Info
- Present Address
- Permanent Address
- Bank Details
Each step collects a different part of the employee profile. Required fields are marked with an asterisk *.
Step 1: Employment Info #
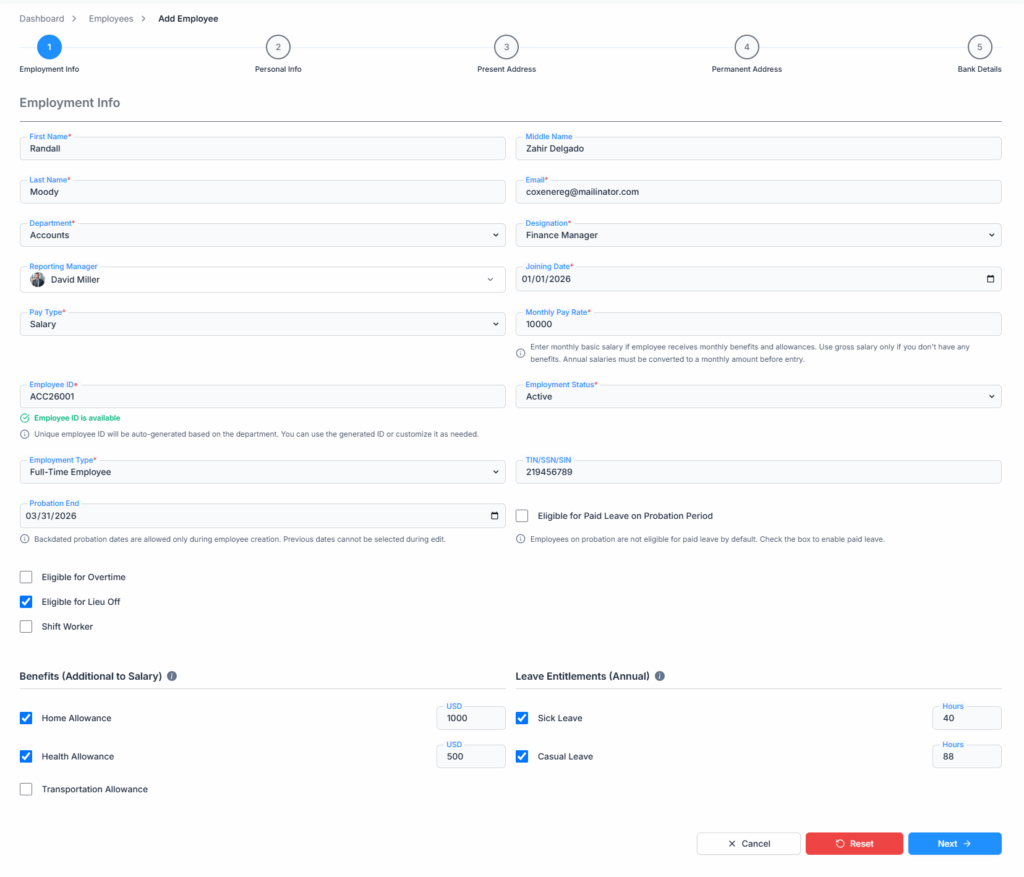
The Employment Info step collects the employee’s main work-related information.
Fields Available #
- First Name
- Middle Name
- Last Name
- Department
- Designation
- Reporting Manager
- Joining Date
- Pay Type
- Pay Rate / Hourly Pay Rate / Monthly Pay Rate
- Employee ID
- Employment Status
- Employment Type
- Probation End
- Eligible for Paid Leave on Probation Period
- Eligible for Overtime
- Eligible for Lieu Leave
- Shift Worker
- TIN / SSN / SIN
- Benefits
- Leave Entitlements
Employee ID #
The Employee ID is automatically generated after selecting a department, built from the department’s code plus the year and a running sequence number (for example, TEC26001).
You can use the generated Employee ID or customize it manually.
As you type, the system checks in the background whether that Employee ID is already in use, and the Next button stays disabled while it’s checking or if the ID already exists.
If the Employee ID already exists, you cannot continue until a unique Employee ID is entered.
Department and Designation #
The Designation dropdown depends on the selected Department.
Behavior:
- If no department is selected, the designation list remains unavailable.
- If a department is selected, only designations under that department are shown.
- If the selected department has only one designation, the system auto-selects it.
- If the department is changed and the previous designation does not belong to the new department, the designation field is cleared.
Pay Type and Pay Rate #
The pay rate field label changes based on the selected pay type:
- If no Pay Type is selected, the label shows Pay Rate
- You can select either Salary or Hourly as the Pay Type.
For salary-based employees, enter the Salary amount.
The amount basic salary or gross salary depending on your payroll setup.
For annual salary employees, convert the annual amount to monthly before entering it.
Overtime and Lieu Leave #
Office-X supports overtime and lieu leave eligibility based on your company’s payroll settings.
Eligible for Overtime #
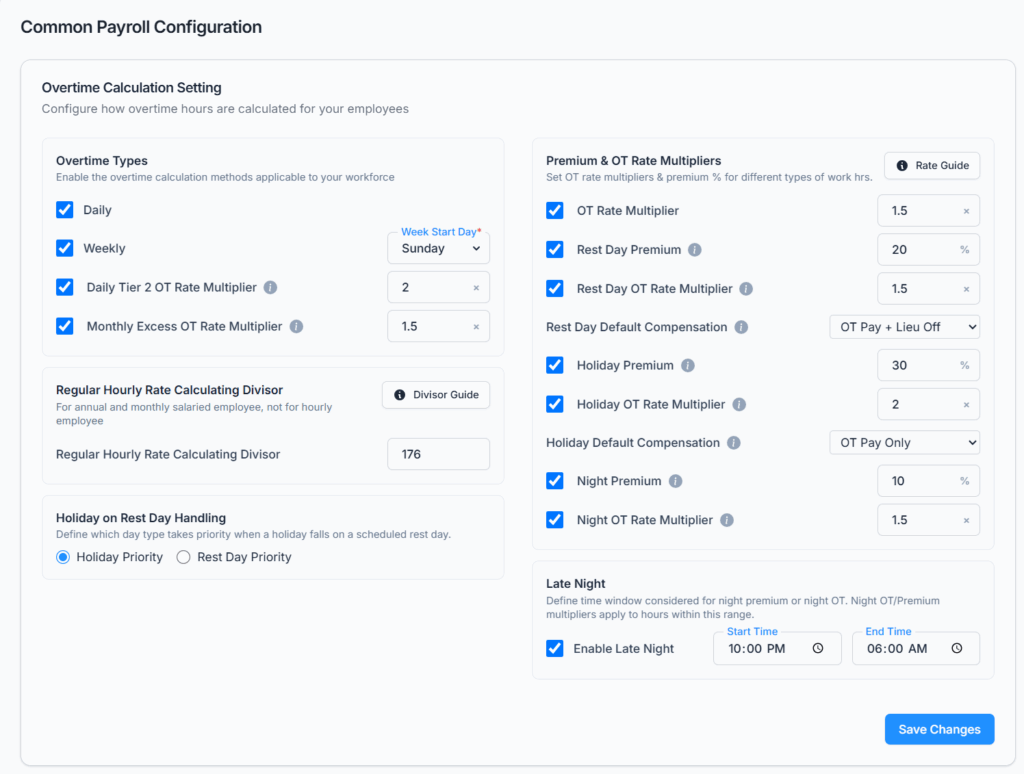
When Eligible for Overtime is selected, overtime-related fields appear — but only the ones your company has actually configured under Business → Payroll Configuration → Overtime Calculation Setting. Depending on your setup, this can include:
- Regular OT (rate per hour)
- Daily OT and its threshold
- Weekly OT and its threshold
- Daily Tier 2 (Double-Time) OT, multiplier, and threshold — only available if Daily OT is enabled
- Monthly Excess OT, multiplier, and threshold
- Rest Day Premium and Rest Day OT
- Holiday Premium and Holiday OT
- Night Premium and Night OT
Each of these only shows up here if it’s switched on in Payroll Configuration, and its default value comes from there too.
Good to know: if your company hasn’t configured any overtime settings yet, checking “Eligible for Overtime” shows an informational note instead of any fields. At least one overtime setting must be enabled somewhere in Payroll Configuration before you can mark an employee eligible for overtime.
Eligible for Lieu Leave #
Select Eligible for Lieu Leave if the employee should be able to bank time off in lieu of overtime pay, instead of (or alongside) being paid for it.
Good to know: Overtime and Lieu Leave are not exclusive — you can enable both for the same employee. Doing so reveals a Compensation Method section, letting you choose separately for Rest Day work and Holiday work whether that time is paid as OT, taken as Lieu Off, or a mix of both (OT Pay Only / Lieu Off Only / OT Pay + Lieu Off). See Common Payroll Configuration for better understanding.
Probation Settings #
You can set a Probation End date for the employee.
Behavior:
- Probation End is optional by default.
- Probation End cannot be before the Joining Date.
- If Eligible for Paid Leave on Probation Period is selected, Probation End becomes required.
- If no Probation End date is selected, the paid leave on probation checkbox remains disabled.
Good to know: If “Eligible for Paid Leave on Probation Period” is enabled, any leave earned by the employee during the probation period will be treated as paid leave. If it is disabled, all leave taken during the probation period will be treated as unpaid leave, regardless of the employee’s leave balance.
Shift Worker #
Select Shift Worker if the employee works under shift-based scheduling rather than a fixed weekly schedule.
You can rewrite it like this:
If the employee is marked as a shift worker, you can configure their shifts in the Work Shifts feature. For a better understanding of how shift schedules work, please refer to the Work Shifts feature documentation.
If the employee is not marked as a shift worker, you’ll configure their work hours from employee -> Work Hours by setting a regular Start Time and End Time instead.
Benefits #
You can assign salary benefits during employee creation.
The benefit options from:
Admin → Benefits
Available benefit examples:
- Home Allowance
- Health Insurance
- Travel Allowance
When a benefit is selected, an amount field appears.
Leave Entitlements #
You can assign annual leave entitlements during employee creation.
The leave entitlement options from:
Admin → Leave Type
Available leave examples:
- Casual Leave
- Sick Leave
When a leave type is selected, a quota field appears.
Leave quotas are shown later in the employee’s Leave Quota tab.
Good to know: any leave type with “Lieu” in its name won’t appear in this list — Lieu Leave is handled separately through the Eligible for Lieu Leave checkbox above, not as a regular leave entitlement here.
Step 2: Personal Info #
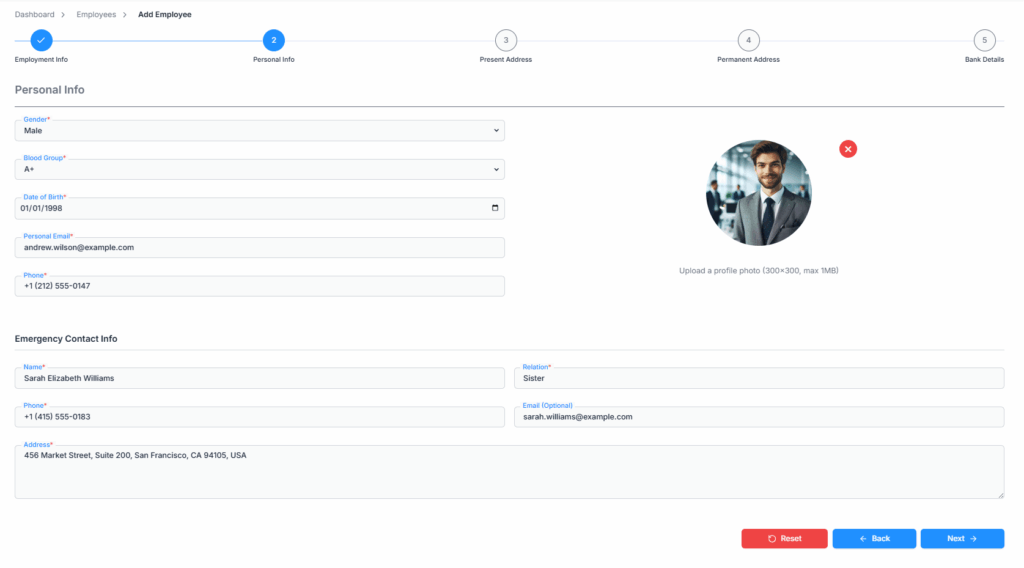
The Personal Info step collects the employee’s personal details, photo, and emergency contact information.
Fields Available #
- Gender
- Blood Group
- Date of Birth
- Personal Email
- Phone
- Profile Photo
- Emergency Contact Name
- Emergency Contact Relation
- Emergency Contact Phone
- Emergency Contact Email
- Emergency Contact Address
Profile Photo Upload #
You can upload a profile photo for the employee.
Supported rules:
- File type: JPG, PNG
- Maximum size: 1 MB
- Recommended image size: 300×300
After selecting an image, the system opens the image cropper.
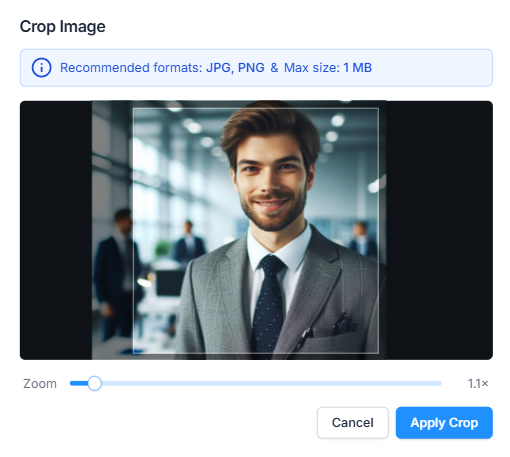
You can:
- Crop the image
- Adjust zoom
- Cancel crop
- Apply crop
After applying the crop, the cropped image is shown as the employee profile photo preview.
Step 3: Present Address #
The Present Address step collects the employee’s current address.
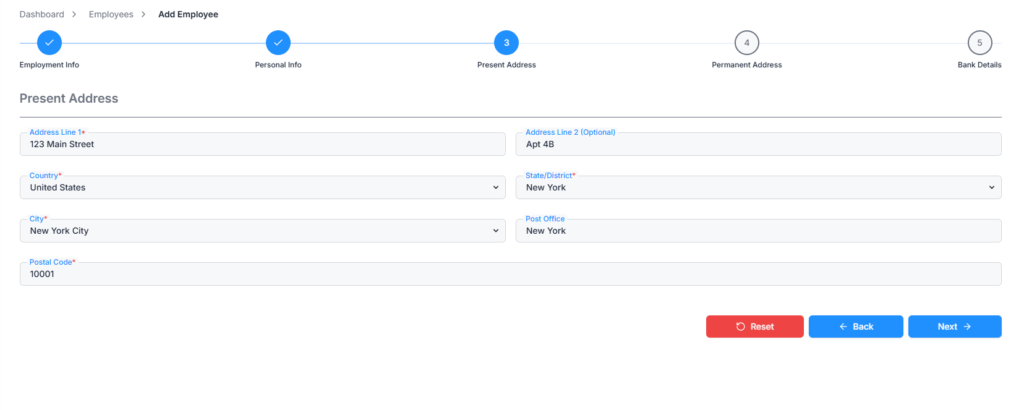
Fields Available #
- Address Line 1
- Address Line 2
- Country
- State / District
- City
- Post Office
- Postal Code
Address Selection Behavior #
Address fields follow a dependent selection flow:
- Select Country
- Select State / District
- Select City
The State/District field becomes available after selecting Country.
The City field becomes available after selecting State/District.
If your company’s own registered country is the United States or Canada, this form shows only Postal Code instead of both Post Office and Postal Code.
Step 4: Permanent Address #
The Permanent Address step collects the employee’s permanent address.
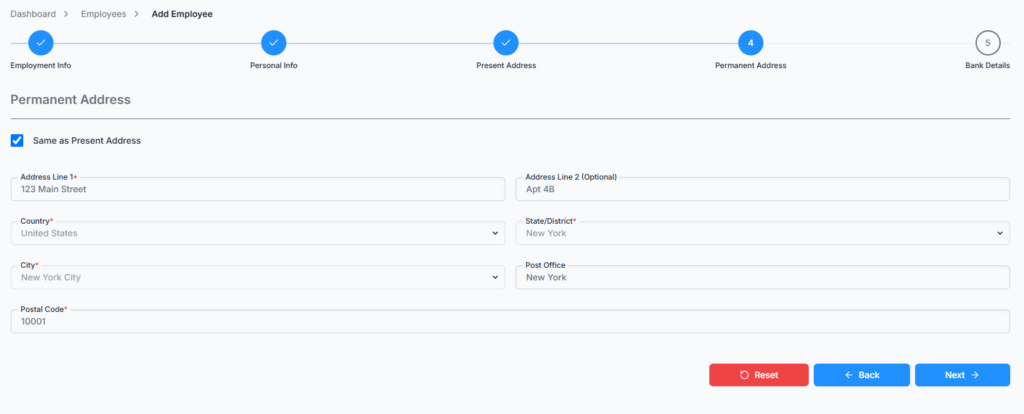
Fields Available #
- Address Line 1
- Address Line 2
- Country
- State / District
- City
- Post Office
- Postal Code
Same as Present Address #
If the employee’s permanent address is the same as the present address, select:
Same as Present Address
When selected, the system copies the Present Address data into the Permanent Address fields, and locks those fields while it’s checked.
Step 5: Bank Details #
The Bank Details step collects the employee’s bank information.
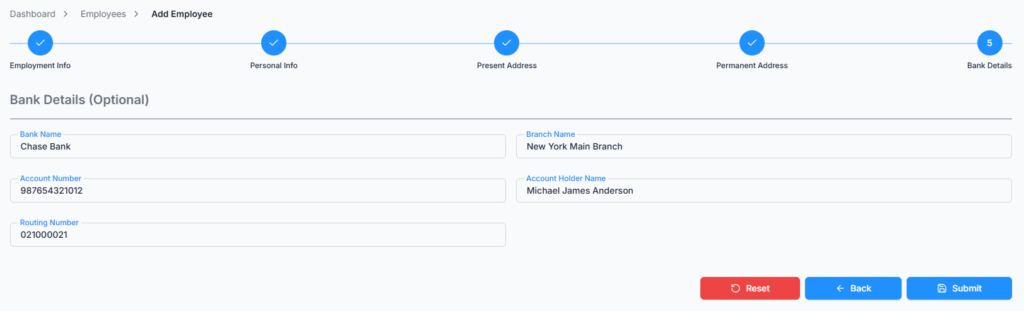
Fields Available #
- Bank Name
- Branch Name
- Account Number
- Account Holder Name
- Routing Number
Bank Details Are Optional
You can create the employee without entering bank details.
If bank details are provided, they are saved with the employee profile.
Button Behavior #
- Cancel: Exits the Add Employee form and returns to the Employees list. Only available on Step 1 — from Steps 2–5, use Back to step back through the wizard instead.
- Reset: Clears all entered form data and takes you back to Step 1 to start again.
- Back: Returns to the previous step. Only takes you back to whatever you last confirmed with Next on that step — anything typed on the current step since arriving on it, but not yet confirmed with Next, is lost when you click Back.
- Next: Validates the current step and moves to the next step if all required fields are valid.
- Submit: Appears on Step 5, validates the full form, and creates the employee record.
What Happens After Employee Creation #
After successful employee creation:
- The employee appears in the Employees list.
- The employee profile is created.
- Selected leave quotas are assigned.
- Selected benefits are assigned.
- Bank details are saved if provided.
- Profile photo is saved if uploaded.
- A welcome email is sent to the employee’s work email.
- The email contains login credentials and asks the employee to change their password after first login.
Success message:
“Employee created successfully”
Good to know: A newly created employee does not have a seat assigned by default. To give the employee login access and allow them to use the system, you must purchase a seat if needed and assign it to the employee from the Employees list. For more information about how seats work, please visit here.
Email Notification #
After successful employee creation, the system sends a welcome email to the employee’s work email.
The email includes:
- Login URL
- Temporary password
- Instruction to change password after first login
Important: The employee must have a seat assigned to access the system. If no seat is assigned, the employee will not be able to log in, even if they have received the welcome email and login credentials.
Summary #
The Add Employee wizard walks you through employment details, personal information, addresses, and bank details across five steps, pulling in your company’s own Department, Designation, Benefit, Leave Type, and Payroll Configuration setup along the way. Only holders of the Create Employee permission (or the Subscriber Admin) can complete it, and a successful submission creates the employee profile, assigns their chosen benefits and leave quotas, and emails them their login details — with a license/seat left for you to assign separately afterward.