Skip to content
Office-X
Partners Pricing Add-ons FAQ Help Center
Sign in Start free trial →
Features & Solutions

Everything You Need to
Make Your Workplace Smarter

Office-X brings your people, payroll, clients, and daily operations together in one secure workspace.

Employee Management
Onboarding & Performance Manage and track growth
Attendance & OT IP-locked check in + overtime
Time off / Leave Requests, balances & approvals
Internal Support Tickets & helpdesk
Payroll Paystubs & Tax statements
Work Shifts Schedule Create and manage rosters
Business Management
CRM Manage leads, clients & sales
Estimate & Agreements Quotation + e-sign docs.
Web & AI Phone Bookings Automated scheduling
Activity Log Who did what, when & where
Permissions & Approvals Multi-level approval flows
Business Management
Task Management Assign & track work
Asset & Incident Tracking Track assets & report incidents
Bill, Travel & Purchase Approve & manage expenses
Holiday Calendar Company-wide holidays
Email Templates & SMTP Branded emails & delivery
Employee Management
Onboarding & Performance Attendance & OT Time off / Leave Internal Support Payroll Work Shifts Schedule
Business Management
CRM Estimate & Agreements Web & AI Phone Bookings Activity Log Permissions & Approval Flow Task Management Asset & Incident Tracking Bill, Travel & Purchase Holiday Calendar Email Templates & SMTP
Partners Pricing Add-ons FAQ Help Center
Sign in Start free trial

Getting Started

1
  • Getting Started with Office-X

Subscription & Billing

1
  • How Seats Work in Office-X

Features & Modules

80
  • Overview
  • Business Management
    • Company
    • Billing & Payment
    • Payroll Configuration
    • Business Support
  • Employees Module
    • Employee List
    • Adding a New Employee
    • View Employee Details
    • Edit an Employee
    • Reset Password
    • Work Hours/Shift Hours
    • Change Status
    • Assign/Unassign Seat
    • Opening Balance
    • Assign Work Days
    • Visual Guide
  • Privacy & Security
    • Security
  • Performance Management
    • Performance Management
  • Work Shifts
    • Work Shifts
  • Tasks
    • Schedule
    • History
    • Customers
  • Holidays Calendar
    • Calendar
  • Attendance Management
    • Attendance Records
    • Individual Attendance Summary
    • Overall Attendance Summary
    • Visual Guide
  • Leave Management
    • Create Leave
    • Approve & Reject Leave
    • Cancel Approved Leave
    • View All Leaves
    • Visual Guide
  • Bill Management
    • Create Bill
    • Approve & Reject Bill
    • View All Bills
    • Visual Guide
  • Travel Requests
    • Create Travel Request
    • Approve & Reject Travel Request
    • View All Travel Requests
    • Visual Guide
  • Purchase Requests
    • Create Purchase Request
    • Approve & Reject Purchase Requests
    • View All Purchase Requests
    • Visual Guide
  • Payroll (Bangladesh)
    • Business → Payroll Configuration
    • Payroll Management
    • Income and Tax Statement
    • Visual Guide
  • Incident Report
    • Incident Report
  • Asset Tracking
    • Asset Tracking
  • Admin Module
    • Department
    • Designation
    • Pay Type
    • Employment Status
    • Leave Types
    • Benefits
    • Expense Category
    • Teams
    • Forms
    • Events & Announcements
    • Incident Configuration
    • IP Configuration
    • Currency
    • Support Categories
    • Integrations
  • CRM
    • Clients
    • Items
    • Estimates
    • Docs
    • Agreements
    • Bookings
  • Support
    • Create Support Request
    • Resolve Support Requests
    • View All Support
    • Visual Guide
  • Activity Logs
    • Activity Logs
  • Permissions & Approval Flows
    • Permissions Management
    • Approval Flows
  • SMTP & Email Templates
    • SMTP Config
    • Email Templates
View Categories
  • Home
  • Docs
  • Features & Modules
  • SMTP & Email Templates
  • Email Templates

Email Templates

Office-X sends emails automatically throughout the day. For example, welcome emails, leave notifications, and client estimates. An Email Template controls how each email looks and what it contains, including the subject, message, design, and sending email account. Use this page to view, edit, and test your email templates.

You don’t need to create anything from scratch. A complete set of ready-to-use templates is already available in your account.

Where to Find It #

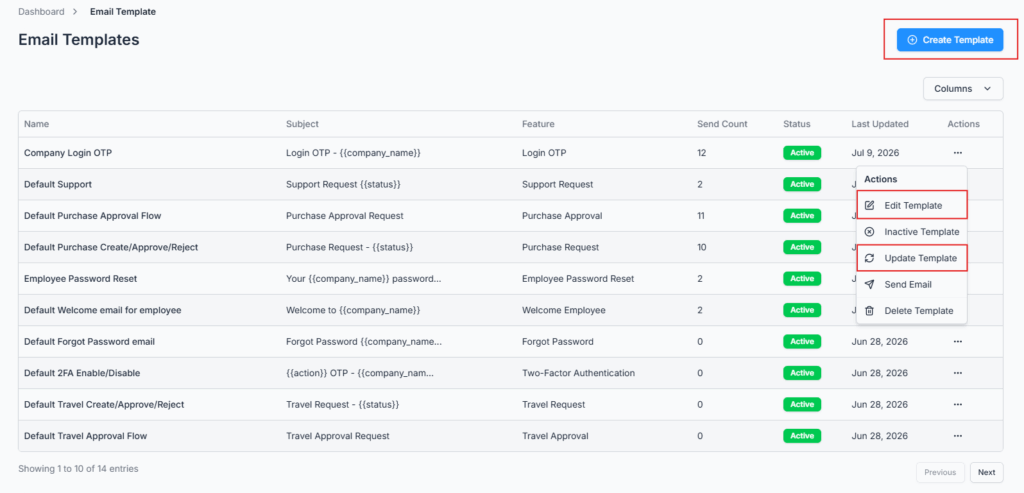
  • The template list: Dashboard → Email Template
  • It is also step “Template Customization” in the Setup Progress checklist on your dashboard. That step is optional — your emails already work without it.

Who Can Use This Feature #

Subscriber Admin only. They can see and manage every template.

Good to know: unlike most features in Office-X, Email Templates has no permission you can hand out. There is nothing in Admin → Permissions for it, not even View-only. If an employee opens the page they are told “You don’t have permission to view email templates.” If someone else needs to manage your emails, they need Subscriber Admin access.

Before You Start #

  • Your templates are already set up. When your company was created, Office-X automatically added default templates for each feature to your account. So, when you open this page for the first time, you’ll already have templates ready to use.
  • They all send through the shared Office-X mail account to begin with. That is why your emails work from day one. If you want them to come from your own company address, set up an SMTP first — see the SMTP Configuration guide — and then come back here to point your templates at it.

What You Get Out of the Box #

Every company starts with a ready-made template for each major feature — already designed, already worded, already sending. You are free to leave them exactly as they are. When you do want to change one, you are editing your own copy.

If a feature in the table below is missing from your list. Click Create Template, pick that feature, and it arrives pre-filled with Office-X’s current default design — the same as if it had been there all along.

Note: each Feature can have only one template per company. Trying to create a second one for a feature that already has a template is refused with “Template already exists for this feature”. Edit the existing one instead.

Which Template Is Used For What #

Here is what each feature is for, who receives that email, and what sets it off:

FeatureWho Receives ItWhen It’s Sent
Welcome EmployeeThe new employeeRight after an admin creates their employee account — includes their login email and password.
Employee Password ResetThe employeeRight after an admin manually resets that employee’s password — includes their new temporary password.
Leave RequestThe employee who requested the leaveRight after they submit the request, and again once the request reaches its final Approved or Rejected outcome.
Leave ApprovalThe approver at each step of that Leave request’s approval flowAs soon as the request reaches their step and is waiting on their decision.
Bill RequestThe employee who submitted the billRight after they submit it, and again once it reaches its final Approved or Rejected outcome.
Bill ApprovalThe approver at each step of that Bill request’s approval flowAs soon as the request reaches their step and is waiting on their decision.
Purchase RequestThe employee who submitted the purchase requestRight after they submit it, and again once it reaches its final Approved or Rejected outcome.
Purchase ApprovalThe approver at each step of that Purchase request’s approval flowAs soon as the request reaches their step and is waiting on their decision.
Travel RequestThe employee who submitted the travel requestRight after they submit it, and again once it reaches its final Approved or Rejected outcome.
Travel ApprovalThe approver at each step of that Travel request’s approval flowAs soon as the request reaches their step and is waiting on their decision.
Support RequestThe employee who filed the ticket, and every Resolver assigned to that ticket’s categoryRight when the ticket is submitted (a confirmation to the employee, and a “new ticket” alert to every Resolver on that category), and again to the employee once the ticket is marked Resolved or Closed.
Incident ReportThe employee who filed the report, and that Incident Type’s managers (or the Subscriber Admin, if that type has no managers assigned)Right after the report is submitted, and again once it’s marked Completed or Discarded.
Self-Assessment InvitationEach invited employeeRight when a manager or the Subscriber Admin sends out self-assessment invitations for a review quarter.
Assessment UpdateThe employee’s manager, and the employee themselvesReused across three moments in one self-assessment cycle: the manager is notified when the employee submits their self-assessment, the employee is notified once their manager finalizes it, and the employee is notified again once it’s marked complete.
TaskThe employee assigned to the task, and the people following itEvery time a task moves — assigned, started, completed, updated, rescheduled, reassigned, cancelled, or marked as a no show.
Task CustomerThe customer the task is for (not an employee)Four moments only, so your customer is not flooded: the visit is confirmed, rescheduled, completed, or cancelled. Internal steps like “started” are never sent to them.
EstimateThe client the estimate was sent to (not an employee)Right when you send an Estimate to a client from the CRM, and again as its status changes — viewed, accepted, declined, expired, or converted.
Estimate CommentThe client on that estimate (not an employee)Whenever a new comment is added to an estimate the client has been sent, so they know there is something new to read.
AgreementThe client the agreement was sent to (not an employee)Right when you send an Agreement to a client from the CRM, and again as its status changes — pending signature, partially signed, active, declined, or terminated.
Agreement AuthenticationWhoever is opening an Agreement to view or sign it (not necessarily an employee)Every time someone has to prove who they are before an Agreement will open — contains the one-time code they need.
BookingThe client the booking is for (not an employee)Right when a booking is confirmed, rescheduled, or cancelled.
Login OTPThe person signing inEvery time someone whose account has Two-Factor Authentication enabled logs in — contains the one-time code needed to finish signing in.
Two-Factor AuthenticationThe employee or admin making the changeRight when they turn their own Two-Factor Authentication on or off — the code confirms that specific change.
Forgot PasswordThe person requesting the resetRight after they use “Forgot Password” on the login screen — contains their password-reset link.

Note: For the four request types—Leave, Bill, Purchase, and Travel:

If a request has multiple approval steps, the same “…Approval” template is sent to each approver one step at a time as the request moves through the approval process.

“…Request” templates are sent to the person who submitted the request, both when they submit it and when it reaches a final outcome.

“…Approval” templates are sent to the person who needs to approve the request.

Note: Incident Report, Self-Assessment Invitation, Assessment Update, Estimate, and Agreement work a little differently. Each uses one shared template throughout its process, with the current stage included in the message. So, when customizing these templates, keep the wording general enough to work well at every stage.

Good to know: Estimate, Estimate Comment, Agreement, Agreement Authentication, Booking and Task Customer all go to people outside your company — your clients and customers. Keep that in mind when you write them, and avoid anything internal.

Which Mail Account Does a Template Send Through? #

Every template carries its own SMTP Configuration — the mail account it sends through. This is the single setting that decides which address your email appears to come from.

1. By default, everything uses the shared Office-X account

Every template you were given starts out pointing at the shared Office-X SMTP. That is deliberate — it means your emails send correctly from your very first day, before you have configured anything. Recipients simply see Office-X as the sender.

2. The Subscriber Admin can change it to your own mail account

Once you have added and activated your own SMTP (see the SMTP Configuration guide), come here and switch a template over:

  1. Find the template in the list — for example Leave Request.
  2. Open its menu and choose Edit Template.
  3. In Select SMTP Configuration, pick your own mail account instead of Office-X.
  4. Save. Every leave request email from now on comes from your address.

Important: this is per template. Switching the Leave Request template changes leave emails only. Everything else still uses Office-X until you change it too.

3. You can mix — some templates on one account, some on another

You are not forced to pick one mail account for the whole company. If you have set up two SMTPs, you can send five templates through one and five through the other. A common setup is staff emails from HR and client emails from Sales:

These templatesSet their SMTP toSo the email comes from
Welcome Employee, Employee Password Reset, Leave Request, Leave Approval, Support RequestHR Mailbox[email protected]
Estimate, Estimate Comment, AgreementSales Mailbox[email protected]
Everything you have not changed yetOffice-X (shared)Office-X’s own address

Mixing like this is completely normal, and you can rearrange it at any time. Nothing breaks while some templates are on your own account and others are still on Office-X.

Good to know:

  • The Select SMTP Configuration dropdown only shows Active SMTP accounts and the shared Office-X account. If an SMTP account is missing, go to Settings → SMTP and activate it first.

Tip: If you want to keep a specific sender address, make sure its SMTP account stays Active.

Create or Edit an Email Template #

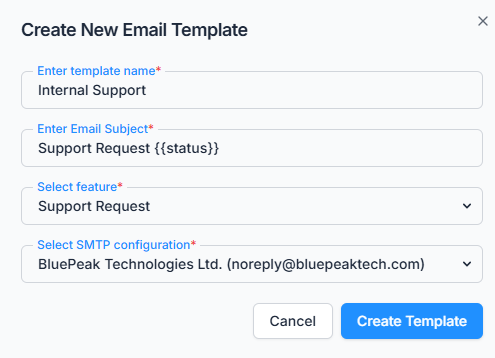
Use Create Template (top right) for a feature that does not have a template yet, or open a template’s menu and choose Edit Template to change an existing one.

Both screens ask for the same four things:

  • Template Name — a clear name for your own reference. Recipients never see it.
  • Email Subject — the subject line recipients do see. You can use variables here too, for example Leave Request — {{status}}.
  • Select Feature — which kind of email this template is for (Leave Request, Support Request, Estimate, and so on).
  • Select SMTP Configuration — the mail account it sends through. See the section above.

A new template is never blank. When you create one, Office-X fills it with our current default design, subject and wording for that feature. So you always start from something that already works and just adjust it.

Update Template vs Edit Template #

These two menu items sit next to each other and sound alike. Here is the difference:

Menu itemWhat it opensUse it when you want to change…
Update TemplateThe full email designerHow the email looks and what it says — layout, colours, logo, body text, buttons.
Edit TemplateA small settings boxThe template’s details — name, email subject, feature, and which SMTP it sends through.

Inside Update Template you can work two ways:

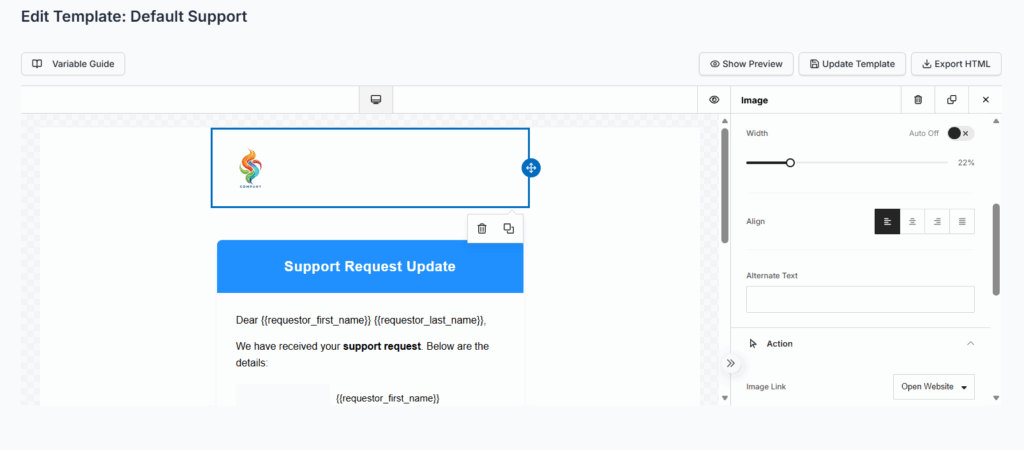
  • Drag & drop — pull in text, images and buttons, no coding needed. This is what most people use.
  • HTML mode — full control over layout and styling, if you or your designer prefer to write it directly.

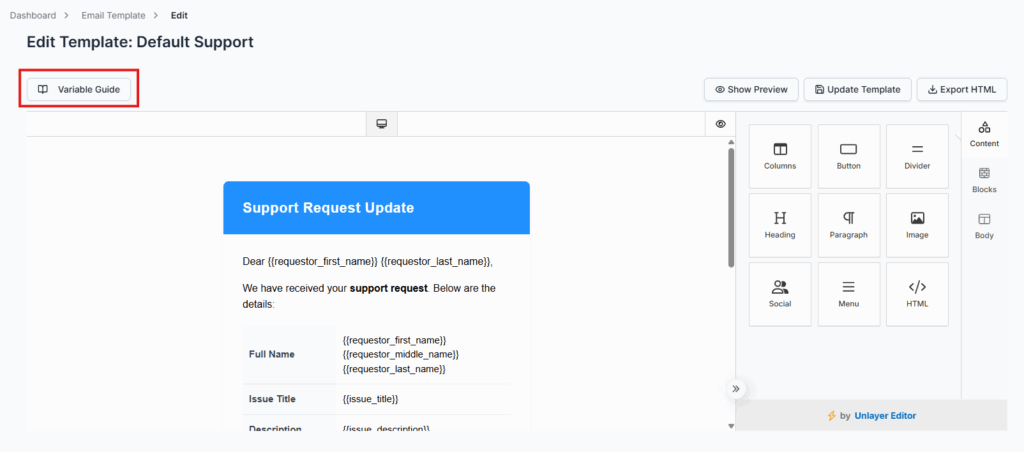
Three buttons sit along the top of the designer:

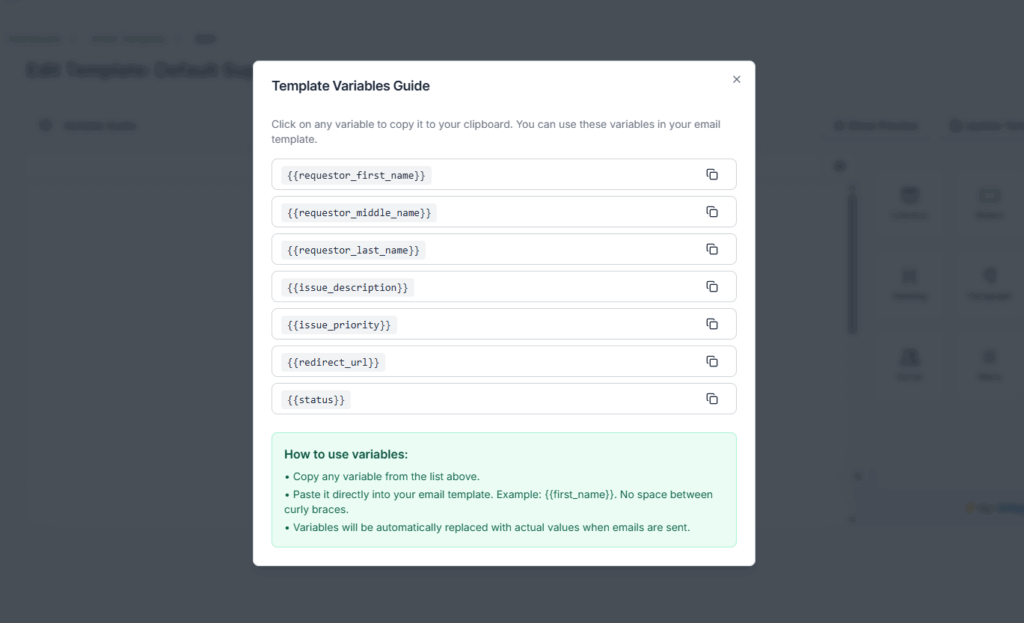
  • Variable Guide — the list of variables you may use in this template. Click any one to copy it.
  • Show Preview — see the email as a recipient will. Click again to go back to editing.
  • Save Template — saves your design. Nothing is saved until you press it, so do not close the tab first.

You can also download the finished design as an HTML file if you want to keep a copy or hand it to a designer.

Template Variables Guide #

A variable is a placeholder you drop into your wording, which Office-X swaps for real information when the email is sent. Write {{requestor_first_name}} and the reader sees Rahim.

Example. In a Support Request template you write:

Dear {{requestor_first_name}},

Your support request is now marked as {{status}}. Priority: {{issue_priority}}.

And the reader receives:

Dear Rahim,

Your support request is now marked as Resolved. Priority: High.

The variables you can use depend on the feature. A Leave Request template and an Estimate template do not offer the same list, because they are describing different things. The Variable Guide button inside the designer always shows the correct list for the template you have open — that list is the authority, and this table is here for planning:

FeatureVariables you can use
Welcome Employeecompany_name, employee_first_name, employee_last_name, employee_email, employee_password, login_url
Employee Password Resetcompany_name, employee_first_name, employee_last_name, employee_email, temporary_password, login_url, support_email
Leave Requestcompany_name, requestor_first_name, requestor_middle_name, requestor_last_name, leave_type, hours, starting_date, ending_date, reason, status, createdAt, redirect_url
Leave Approvalcompany_name, approver_first_name, approver_middle_name, approver_last_name, leave_type, hours, starting_date, ending_date, reason, status, requestor_first_name, requestor_middle_name, requestor_last_name, requestor_email, createdAt, redirect_url
Bill Requestcompany_name, requestor_first_name, requestor_middle_name, requestor_last_name, bill_title, bill_amount, date_of_expense, expense_category, notes, status, createdAt, redirect_url
Bill Approvalcompany_name, approver_first_name, approver_middle_name, approver_last_name, subject, bill_title, bill_amount, date_of_expense, expense_category, notes, status, requestor_first_name, requestor_middle_name, requestor_last_name, requestor_email, createdAt, redirect_url
Purchase Requestcompany_name, requestor_first_name, requestor_middle_name, requestor_last_name, equipment_details, estimated_cost, priority_level, status, redirect_url
Purchase Approvalcompany_name, approver_first_name, approver_middle_name, approver_last_name, equipment_details, estimated_cost, priority_level, status, requestor_first_name, requestor_middle_name, requestor_last_name, requestor_email, redirect_url
Travel Requestcompany_name, requestor_first_name, requestor_middle_name, requestor_last_name, travel_title, travel_reason, travel_destination, travel_dates, travel_mode, status, createdAt, updatedAt
Travel Approvalcompany_name, approver_first_name, approver_middle_name, approver_last_name, travel_title, travel_reason, travel_destination, travel_dates, travel_mode, status, requestor_first_name, requestor_middle_name, requestor_last_name, requestor_email, createdAt, updatedAt
Support Requestrequestor_first_name, requestor_middle_name, requestor_last_name, issue_description, issue_priority, status, redirect_url
Incident Reportcompany_name, recipient_first_name, recipient_last_name, intro_message, incident_name, request_id, incident_type, severity, reported_by_name, status, cta_label, redirect_url
Self-Assessment Invitationcompany_name, employee_first_name, employee_last_name, quarter_name, criteria_list, requested_by_name, redirect_url
Assessment Updatecompany_name, recipient_first_name, recipient_last_name, employee_name, quarter_name, status, score, total_possible, percentage, criteria_rows, feedback, intro_message, cta_label, redirect_url
Taskrecipient_first_name, recipient_last_name, task_ref, task_title, assignee_name, customer_name, customer_phone, customer_email, customer_fax, location_details, scheduled_start, scheduled_end, actual_start, actual_end, buffer_after_minutes, previous_schedule, new_schedule, previous_assignee, new_assignee, task_reason, cancellation_reason, subtitle, introMessage, detailsHtml, statusText, action_url, actionText
Task Customercompany_name, recipient_first_name, recipient_last_name, task_ref, task_title, customer_name, representatives, location_details, scheduled_start, scheduled_end, actual_start, actual_end, previous_schedule, new_schedule, task_reason, subtitle, introMessage, detailsHtml, statusText
Estimaterecipient_first_name, recipient_last_name, client_name, organization_name, title, estimate_id, grand_total, currency, valid_until, decline_reason, statusText, action_url, actionText
Estimate Commentrecipient_first_name, recipient_last_name, client_name, organization_name, title, estimate_id, action_url, actionText
Agreementrecipient_first_name, recipient_last_name, client_name, organization_name, agreement_id, expiry_date, private_note, signer_count, decline_reason, decliner_name, termination_reason, statusText, action_url, actionText
Login OTPcompany_name, otp, verification_link
Two-Factor Authenticationcompany_name, otp, action
Forgot Passwordcompany_name, email, reset_link, reset_time

How to use one

  1. Open Update Template and click Variable Guide.
  2. Click the variable you want — it is copied to your clipboard, curly brackets included.
  3. Paste it into your text exactly where the real value should appear.
  4. Save, then check it with Send Email (see below) before you rely on it.

Good to know: a variable that is misspelled, or that does not belong to this feature, is not reported as an error. It simply vanishes and leaves a blank gap in the email your recipient reads. So always copy from the Variable Guide rather than typing from memory and preview before you save.

Template Actions #

Open the menu at the end of any row and you get:

  • Update Template — open the designer and change how the email looks.
  • Edit Template — change the name, subject, feature or SMTP.
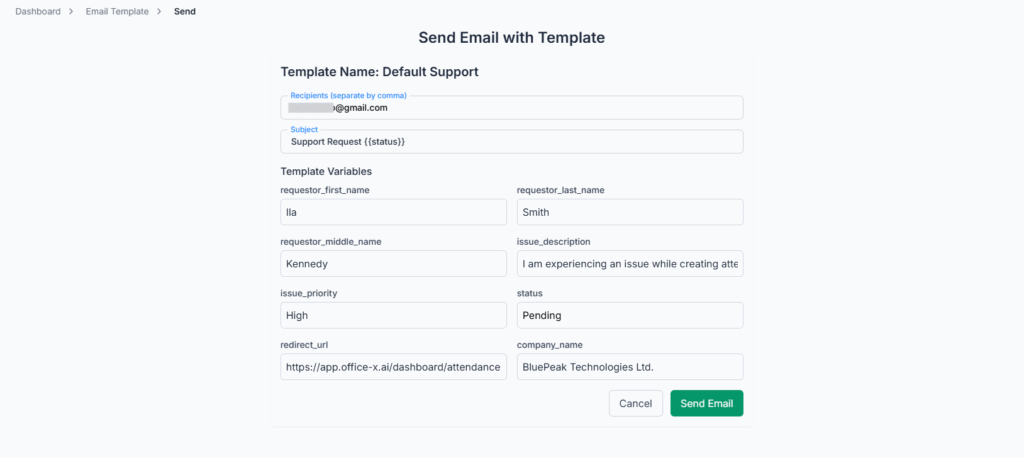
  • Send Email — send this template to an address of your choice, right now. Perfect for checking your work.
  • Activate / Inactivate — turn the template on or off.
  • Delete Template — remove it permanently.

Sending a test with Send Email

The Send Email screen has three parts, and the third one catches people out:

  1. Recipients — one or more email addresses, separated by commas. Up to 50 at a time; more than that is refused with “Too many recipients. A maximum of 50 recipients is allowed per email.”
  2. Subject — pre-filled from the template. You can change it just for this send.
  3. Template Variables — one box for every variable found in your design. These are empty, and whatever you type is what the test email shows. Leave them blank and your test arrives with blank gaps — which looks alarming but is not a fault. Type sample values such as Rahim and Resolved to see the email as a real recipient would.

Before You Inactivate or Delete a Template #

Switching a template off does not always mean “send the standard version instead”. It depends on the feature, so please read this before turning anything off.

FeatureWhat happens if its template is inactive or missing
Leave, Bill, Purchase, Travel, Support, Welcome Employee, Password Reset, Login OTP, Two-Factor, Forgot Password, Estimate, Estimate Comment, Agreement, Booking, Task, Task CustomerThe email still goes out, using Office-X’s standard built-in design instead of yours. Nobody misses anything.
Agreement AuthenticationThe email still goes out, but as a plain message with just the code in it — no design at all. The client can still open their agreement.
Incident Report, Self-Assessment Invitation, Assessment UpdateNo email is sent at all. These three have no built-in design to fall back on. The in-app notification still reaches the person, but nothing lands in their inbox.

So double-check before you inactivate Incident Report, Self-Assessment Invitation or Assessment Update — if your team relies on those emails, switching the template off silently stops them.

Important: Delete and Inactivate work differently.

  • Delete permanently removes the template, including your custom wording and design. If you create it again later, Office-X gives you the default template, not your previous version.
  • Inactivate simply pauses the template. Your changes are kept, and you can reactivate it anytime with one click.

Tip: If you only want to pause a template, use Inactivate instead of Delete.

Finding the Template You Need #

The list shows these columns: Name, Subject, Feature, Send Count, Status, Last Updated and Actions.

  • Search — matches the Name and Feature columns only. Searching for words from a subject line will not find anything, so search by feature name instead — for example type Leave.
  • Filters — filter by Status: All / Active / Inactive.
  • Columns — hide any column you do not want to see.
  • Send Count — how many times this template has been used, including your own test sends. A count stuck at zero on a feature you use often is a good hint that the template is inactive, or that the emails are going out through the built-in design instead.
  • Last Updated — when the template was last saved, useful for spotting which ones you have already customised.

Activity Log #

Every change to a template is recorded in the Activity Log — creating one, editing it, activating or inactivating it, and deleting it. Edits store the old and new name, subject, feature and status side by side, so you can see what changed and who changed it.

Check here first if an email suddenly looks different, or stops arriving.

Summary #

  • You already have a working template for every feature, sending through the shared Office-X mail account. Nothing needs setting up on day one.
  • Each template chooses its own SMTP, so you can move some to your own address, keep others on Office-X, or split staff and client emails across two mailboxes.
  • Update Template changes how the email looks. Edit Template changes its name, subject, feature and SMTP.
  • Variables fill in real details automatically. Copy them from the Variable Guide — a wrong one leaves a silent blank.
  • Use Send Email to test, and fill in the variable boxes so the test looks like the real thing.
  • Inactivating most templates falls back to a standard design — but for Incident Report, Self-Assessment Invitation and Assessment Update it stops the email entirely.
Updated on August 23, 2026
SMTP Config
Table of Contents
  • Where to Find It
  • Who Can Use This Feature
  • Before You Start
  • What You Get Out of the Box
  • Which Template Is Used For What
  • Which Mail Account Does a Template Send Through?
  • Create or Edit an Email Template
  • Update Template vs Edit Template
  • Template Variables Guide
  • Template Actions
  • Before You Inactivate or Delete a Template
  • Finding the Template You Need
  • Activity Log
  • Summary

Office-X brings your people, payroll, clients, and daily operations together in one secure workspace.

Facebook Linkedin Youtube

Company

  • Partner Programme
  • Pricing
  • Trust & Security
  • Free Migration

EMPLOYEE MANAGEMENT

  • Onboarding & Performance
  • Attendance & OT
  • Time off / Leave
  • Work Shifts Schedule
  • Payroll
  • Internal Support

BUSINESS MANAGEMENT

  • CRM, Estimate & Agreement
  • Tasks Management
  • Web & AI Phone Bookings
  • Activity log
  • Permissions & Approval Flow
  • Asset & Incident Tracking

Resources

  • Help Center
  • See how it works
  • FAQs
© Office-X. All rights reserved.
  • Terms of Service
  • Cookie Policy
  • Privacy Policy