Skip to content
Office-X
Partners Pricing Add-ons FAQ Help Center
Sign in Start free trial →
Features & Solutions

Everything You Need to
Make Your Workplace Smarter

Office-X brings your people, payroll, clients, and daily operations together in one secure workspace.

Employee Management
Onboarding & Performance Manage and track growth
Attendance & OT IP-locked check in + overtime
Time off / Leave Requests, balances & approvals
Internal Support Tickets & helpdesk
Payroll Paystubs & Tax statements
Work Shifts Schedule Create and manage rosters
Business Management
CRM Manage leads, clients & sales
Estimate & Agreements Quotation + e-sign docs.
Web & AI Phone Bookings Automated scheduling
Activity Log Who did what, when & where
Permissions & Approvals Multi-level approval flows
Business Management
Task Management Assign & track work
Asset & Incident Tracking Track assets & report incidents
Bill, Travel & Purchase Approve & manage expenses
Holiday Calendar Company-wide holidays
Email Templates & SMTP Branded emails & delivery
Employee Management
Onboarding & Performance Attendance & OT Time off / Leave Internal Support Payroll Work Shifts Schedule
Business Management
CRM Estimate & Agreements Web & AI Phone Bookings Activity Log Permissions & Approval Flow Task Management Asset & Incident Tracking Bill, Travel & Purchase Holiday Calendar Email Templates & SMTP
Partners Pricing Add-ons FAQ Help Center
Sign in Start free trial

Getting Started

1
  • Getting Started with Office-X

Subscription & Billing

1
  • How Seats Work in Office-X

Features & Modules

80
  • Overview
  • Business Management
    • Company
    • Billing & Payment
    • Payroll Configuration
    • Business Support
  • Employees Module
    • Employee List
    • Adding a New Employee
    • View Employee Details
    • Edit an Employee
    • Reset Password
    • Work Hours/Shift Hours
    • Change Status
    • Assign/Unassign Seat
    • Opening Balance
    • Assign Work Days
    • Visual Guide
  • Privacy & Security
    • Security
  • Performance Management
    • Performance Management
  • Work Shifts
    • Work Shifts
  • Tasks
    • Schedule
    • History
    • Customers
  • Holidays Calendar
    • Calendar
  • Attendance Management
    • Attendance Records
    • Individual Attendance Summary
    • Overall Attendance Summary
    • Visual Guide
  • Leave Management
    • Create Leave
    • Approve & Reject Leave
    • Cancel Approved Leave
    • View All Leaves
    • Visual Guide
  • Bill Management
    • Create Bill
    • Approve & Reject Bill
    • View All Bills
    • Visual Guide
  • Travel Requests
    • Create Travel Request
    • Approve & Reject Travel Request
    • View All Travel Requests
    • Visual Guide
  • Purchase Requests
    • Create Purchase Request
    • Approve & Reject Purchase Requests
    • View All Purchase Requests
    • Visual Guide
  • Payroll (Bangladesh)
    • Business → Payroll Configuration
    • Payroll Management
    • Income and Tax Statement
    • Visual Guide
  • Incident Report
    • Incident Report
  • Asset Tracking
    • Asset Tracking
  • Admin Module
    • Department
    • Designation
    • Pay Type
    • Employment Status
    • Leave Types
    • Benefits
    • Expense Category
    • Teams
    • Forms
    • Events & Announcements
    • Incident Configuration
    • IP Configuration
    • Currency
    • Support Categories
    • Integrations
  • CRM
    • Clients
    • Items
    • Estimates
    • Docs
    • Agreements
    • Bookings
  • Support
    • Create Support Request
    • Resolve Support Requests
    • View All Support
    • Visual Guide
  • Activity Logs
    • Activity Logs
  • Permissions & Approval Flows
    • Permissions Management
    • Approval Flows
  • SMTP & Email Templates
    • SMTP Config
    • Email Templates
View Categories
  • Home
  • Docs
  • Features & Modules
  • SMTP & Email Templates
  • SMTP Config

SMTP Config

Your company sends many emails automatically such as welcome emails, leave updates, support alerts, estimates, and agreements.

An SMTP configuration is simply the email account Office-X uses to send these messages. Set it up with your company email and automated emails will be sent from your own company address instead of an Office-X address.

Where to Find It #

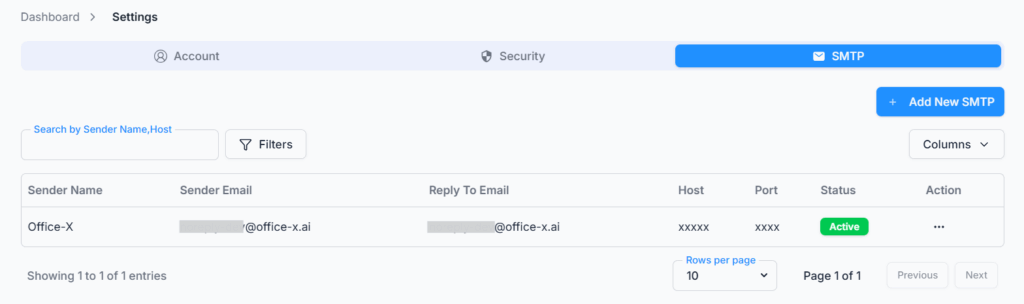
  • Your SMTP list: Dashboard → Settings → SMTP tab
  • Add a new one: the Add New SMTP button on that tab, which opens its own page
  • Give an employee access: Admin → Permissions → Setting group → SMTP Settings

SMTP stands for Simple Mail Transfer Protocol. You don’t need to know what that means, think of it as “the mailbox Office-X uses to send email on your behalf”.

Who Can Use This Feature #

Subscriber Admin can always open this page and manage every SMTP configuration, without needing any permission.

Employees can open it only if they hold at least one of the permission actions below.

Permission Behavior

  • SMTP Settings — View
    They can open this page and see the company’s SMTP list.
  • SMTP Settings — Create
    They can add a new SMTP configuration.
  • SMTP Settings — Update
    They can edit an SMTP configuration, activate or inactivate it, and use the Send Test Email button.
  • SMTP Settings — Delete
    They can delete an SMTP configuration.

These four actions are granted independently. For example, an employee could be given View only, letting them see the list without being able to add, edit, or remove anything.

This permission can be given to one employee, or to a whole team at once. See the Permissions Management guide.

Before You Start #

You are not creating a new mailbox here you are connecting one you already have. Before you open the form, collect these from your email provider:

  • The host and port of your mail server (for example smtp.gmail.com and 587).
  • The username and password of the mailbox you want to send from.
  • Whether the server uses TLS or SSL.

Using Gmail or Google Workspace? Your normal Gmail password will not work here. You need an App Password, and Google only offers App Passwords once 2-Step Verification is switched on for that account. Turn on 2-Step Verification first, then go to Google Account → Security → App passwords and generate one.

Good to know: Once Office-X sends emails from your company domain, ask your IT team to set up SPF and DKIM for your domain. These help emails reach the recipient’s inbox instead of the spam folder. SPF and DKIM are configured with your domain provider, not in Office-X.

The Office-X Default SMTP #

Your list is never empty. Every company on the platform starts with a shared configuration named Office-X. It belongs to us, not to you and it is what sends your emails until you set up your own.

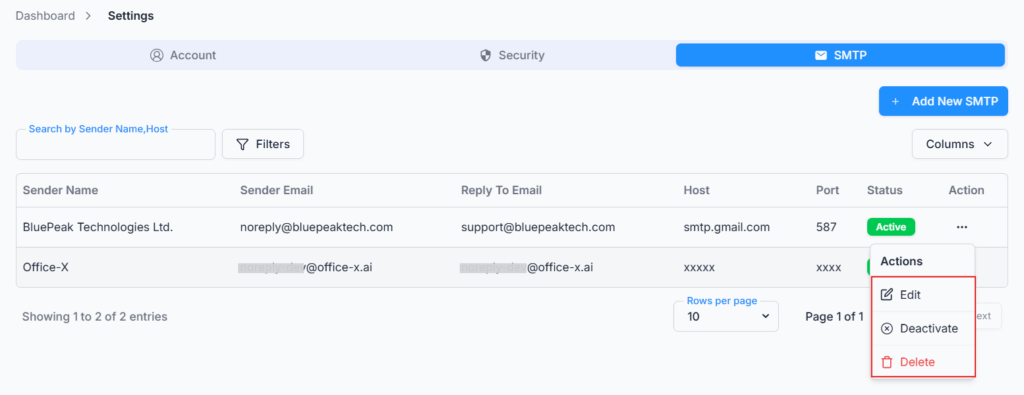
Note: the Office-X default cannot be edited, inactivated, or deleted. Those menu options appear greyed out on that row that is expected, not a fault.

Add New SMTP #

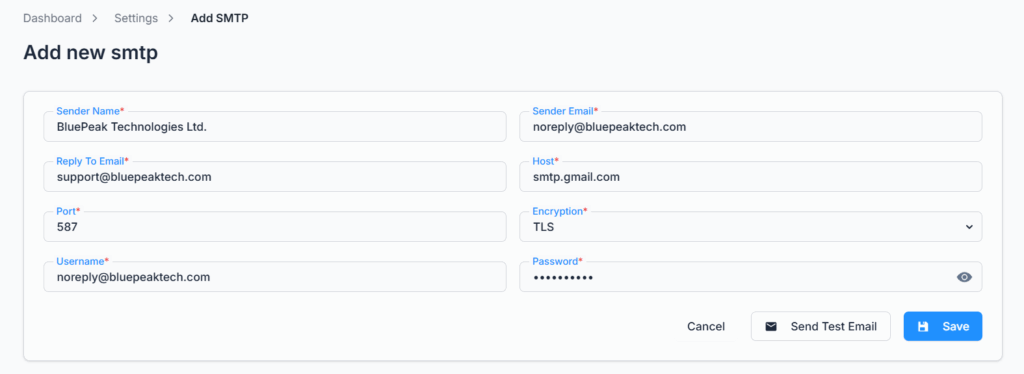
Click Add New SMTP and fill in the following fields. All of them are required.

  • Sender Name → The name recipients see in their inbox. (Example: HR Department)
  • Sender Email → The address the email is sent from. (Example: [email protected])
  • Reply-To Email → Where replies land when someone hits Reply. It can be the same as the Sender Email, or a different inbox.
  • Host → Your mail server address. (Example: smtp.gmail.com for Gmail, smtp.office365.com for Outlook)
  • Port → The port number your server uses. It starts at 587, the usual port for TLS. Use 465 for SSL.
  • Encryption → TLS (the default), SSL, or No Encryption. Match whatever your provider tells you.
  • Username → The login for that mailbox, usually the email address itself.
  • Password → The mailbox password, or your App Password if your provider needs one (see Before You Start above).

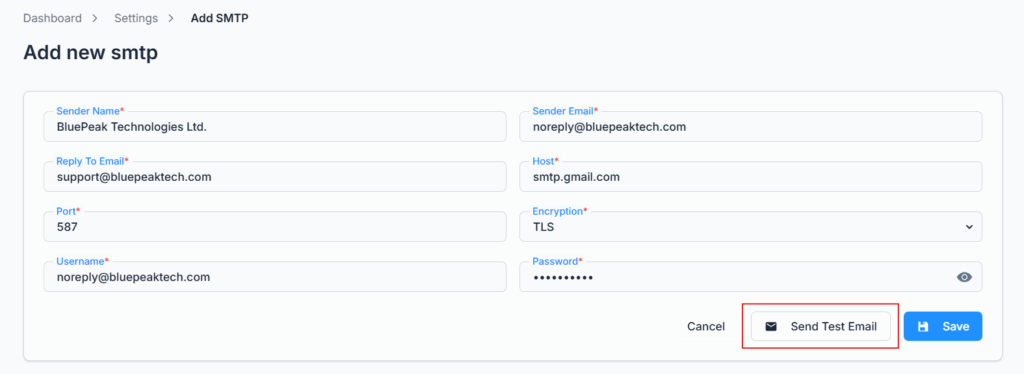
Once the form is filled in, you have two buttons:

  • Send Test Email — checks the details actually work, before you save anything.
  • Save — stores the configuration. You will see “SMTP configuration created successfully.”

Where does the test email go? It is sent to the address you typed in Reply-To Email, so open that inbox to check it arrived. Look for the subject “Test Email from Office-X”.

A new SMTP is saved as Inactive. Saving does not put it to work. You still need to activate it and then point your email templates at it. Both steps are explained below.

Edit SMTP #

To change an existing SMTP configuration:

  1. Click Open Menu → Edit on the row you want to change.
  2. Update any field you need — Sender Name, Email, Host, Port, and so on.
  3. Save. The change applies straight away to every email sent through this SMTP from then on.

Good to know: for security, your saved password is never shown back to you — the Password field always opens empty. You have to type it in again every time you save an edit, even if you only changed the Sender Name. Leaving it blank is not accepted.

Activate / Inactivate SMTP #

Click Open Menu → Activate or Inactivate on any row. The Status column shows which state it is in.

  • Active — ready to use. It appears in the SMTP list when you set up an email template.
  • Inactive — the settings stay saved, but it will not send, and it disappears from the email template dropdown.

This is handy when you are switching mail servers or trying a new one — you can park the old configuration instead of deleting it.

Which SMTP Sends Which Email? #

This is the part most people get stuck on, so here it is in one line:

Every email template carries its own SMTP setting, and the email goes out through whichever SMTP that template is set to. This page decides what is available. The Email Templates page decides what is actually used.

1. On day one, everything uses the Office-X default

When your company was created, Office-X automatically added a set of email templates and connected them to the shared Office-X SMTP.

This means your welcome emails, leave updates, support alerts, and client documents work automatically from day one. They simply come from an Office-X address instead of your company email.

Nothing is broken, and no changes are required if you’re happy with this setup.

2. If you would rather use your own address, you switch it yourself

Only the Subscriber Admin can do this, and it is done from the Email Templates page.

Example. You want leave emails to come from your HR mailbox:

  1. On this page, add an SMTP called HR Mailbox ([email protected]) and activate it.
  2. Go to Email Templates and find the Leave Request template.
  3. Choose Edit Template, and in Select SMTP Configuration pick HR Mailbox. Save.
  4. From now on, leave request emails arrive from [email protected].

Important: adding and activating your SMTP is not enough on its own. Every other template still points at Office-X until you change it too. If you want your whole company on your own mail server, walk through the template list and switch each one.

3. You can mix different emails from different addresses

You are not limited to one SMTP for the whole company. Because the setting sits on each template, you can send five templates through one mailbox and five through another. Plenty of companies do exactly this: staff emails from HR, client emails from Sales.

Example. A company with two of its own SMTPs set up:

These templatesUse this SMTPSo the email comes from
Welcome Employee, Employee Password Reset, Leave Request, Leave Approval, Support RequestHR Mailbox[email protected]
Estimate, AgreementSales Mailbox[email protected]
Everything you have not changed yetOffice-X (shared)Office-X’s own address

Your staff see HR as the sender, your clients see Sales, and anything you never got round to keeps working through Office-X in the meantime. You can change any of it later, again one template at a time.

Delete SMTP #

Click Open Menu → Delete, then Confirm in the box that appears. This cannot be undone the settings are gone and you would have to type them in again from scratch.

An SMTP that is still assigned to an email template cannot be deleted. You will see: “Cannot delete SMTP configuration. It is already used in an email template.” Go to Email Templates, point those templates at a different SMTP, then come back and delete this one.

Good to know: if you only want to stop using an SMTP for a while, Inactivate it instead of deleting. That keeps the settings, so switching back later is one click.

Finding the SMTP You Need #

Above the table you have:

  • Search — type part of a Sender Name, Sender Email or Host and the list narrows as you type.
  • Filters — filter by Status: All / Active / Inactive. A small number on the button shows a filter is on, and the chosen filter appears as a badge under the toolbar.
  • Columns — tick or untick which columns to show: Sender Name, Sender Email, Reply To Email, Host, Port, Status, Actions.
  • Paging — at the bottom, choose 10, 20 or 30 rows per page.

Setting Up Your Own Mail Server, Step by Step #

  1. Collect your host, port, username and password (see Before You Start).
  2. Go to Settings → SMTP → Add New SMTP and fill in the form.
  3. Click Send Test Email and check the Reply-To inbox. Fix anything that failed before moving on.
  4. Save. It lands in the list as Inactive.
  5. Open Menu → Activate on the new row.
  6. Go to Email Templates and, for each template you want moved, use Edit Template → Select SMTP Configuration and pick your new SMTP.
  7. Trigger one real email to confirm — for example submit a test leave request — and check who it came from.

Activity Log #

Every SMTP change is recorded in the Activity Log — adding one, editing one, activating or inactivating it, and deleting it. Edits store the old and new values side by side, so you can see exactly what a Sender Email or Host was changed from and to, and who did it. Passwords are never written to the log.

This is the first place to look if your outgoing emails suddenly start coming from a different address.

Summary #

  • You start with the shared Office-X SMTP, and every email works from day one.
  • Add your own SMTP to send from your company address instead. Test it, save it, then activate it.
  • Activating is not the last step. Each email template chooses its own SMTP, so switch the templates over too.
  • You can mix freely — HR emails from one mailbox, client emails from another, the rest still on Office-X.
  • An SMTP in use by a template cannot be deleted. Inactivate it, or move the template first.
Updated on August 22, 2026
Email Templates
Table of Contents
  • Where to Find It
  • Who Can Use This Feature
  • Before You Start
  • The Office-X Default SMTP
  • Add New SMTP
  • Edit SMTP
  • Activate / Inactivate SMTP
  • Which SMTP Sends Which Email?
  • Delete SMTP
  • Finding the SMTP You Need
  • Setting Up Your Own Mail Server, Step by Step
  • Activity Log
  • Summary

Office-X brings your people, payroll, clients, and daily operations together in one secure workspace.

Facebook Linkedin Youtube

Company

  • Partner Programme
  • Pricing
  • Trust & Security
  • Free Migration

EMPLOYEE MANAGEMENT

  • Onboarding & Performance
  • Attendance & OT
  • Time off / Leave
  • Work Shifts Schedule
  • Payroll
  • Internal Support

BUSINESS MANAGEMENT

  • CRM, Estimate & Agreement
  • Tasks Management
  • Web & AI Phone Bookings
  • Activity log
  • Permissions & Approval Flow
  • Asset & Incident Tracking

Resources

  • Help Center
  • See how it works
  • FAQs
© Office-X. All rights reserved.
  • Terms of Service
  • Cookie Policy
  • Privacy Policy